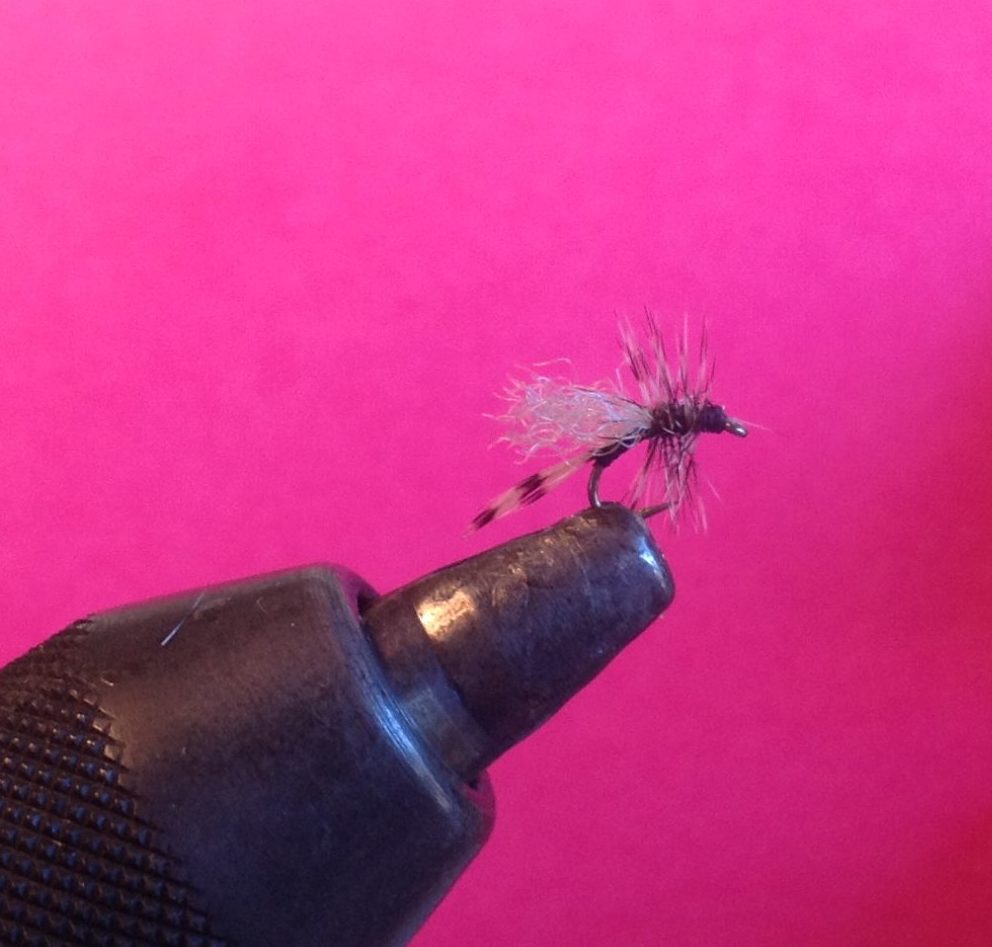
A truly successful pattern for many years. Ten years age this fly was featured in one of our club classes. Probably not a good pattern for beginners. Hopefully the hand drawn directions are helpful.

Posted on March 31st, 2021
Tying instructions and materials needed to tie a specific fly. Often the fly that is going to be tied in the upcoming month’s fly tying class.
A truly successful pattern for many years. Ten years age this fly was featured in one of our club classes. Probably not a good pattern for beginners. Hopefully the hand drawn directions are helpful.
Posted on March 31st, 2021
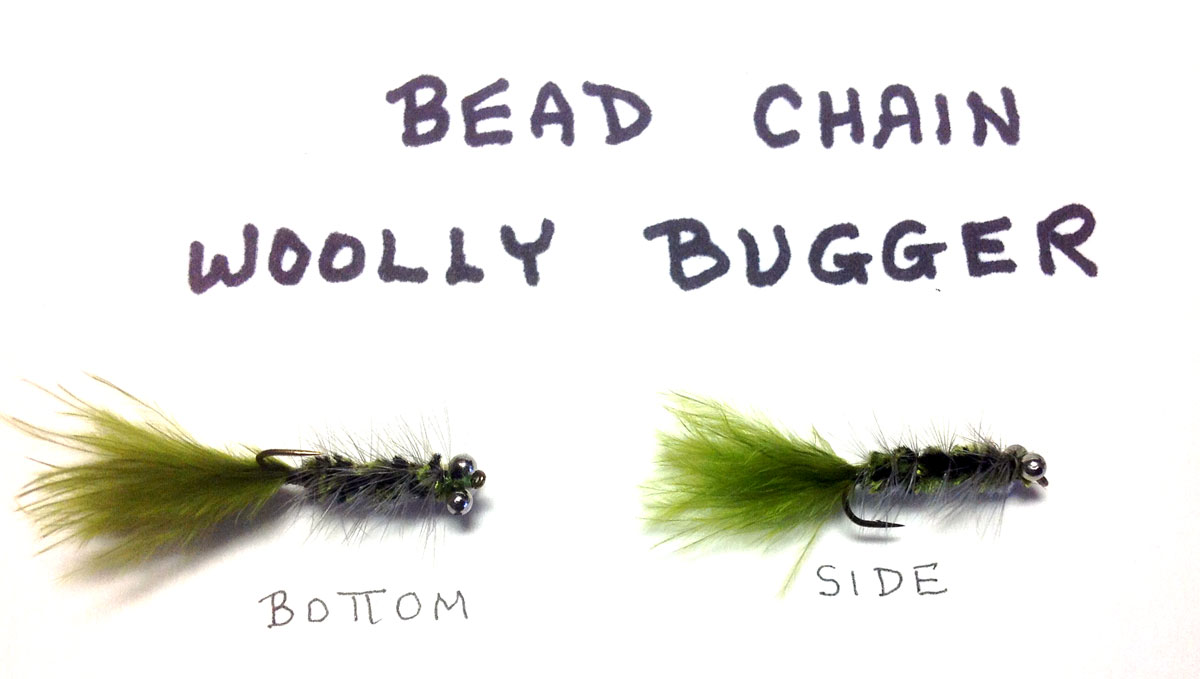
To fish this fly, use a sinking line, twitch or strip to elicite a strike from a trout. Woolybuggers typically are not tied with bead chain eyes. They give an entirely different profile. This pattern also varies in that dry fly hackle is used and barbs are kept short.
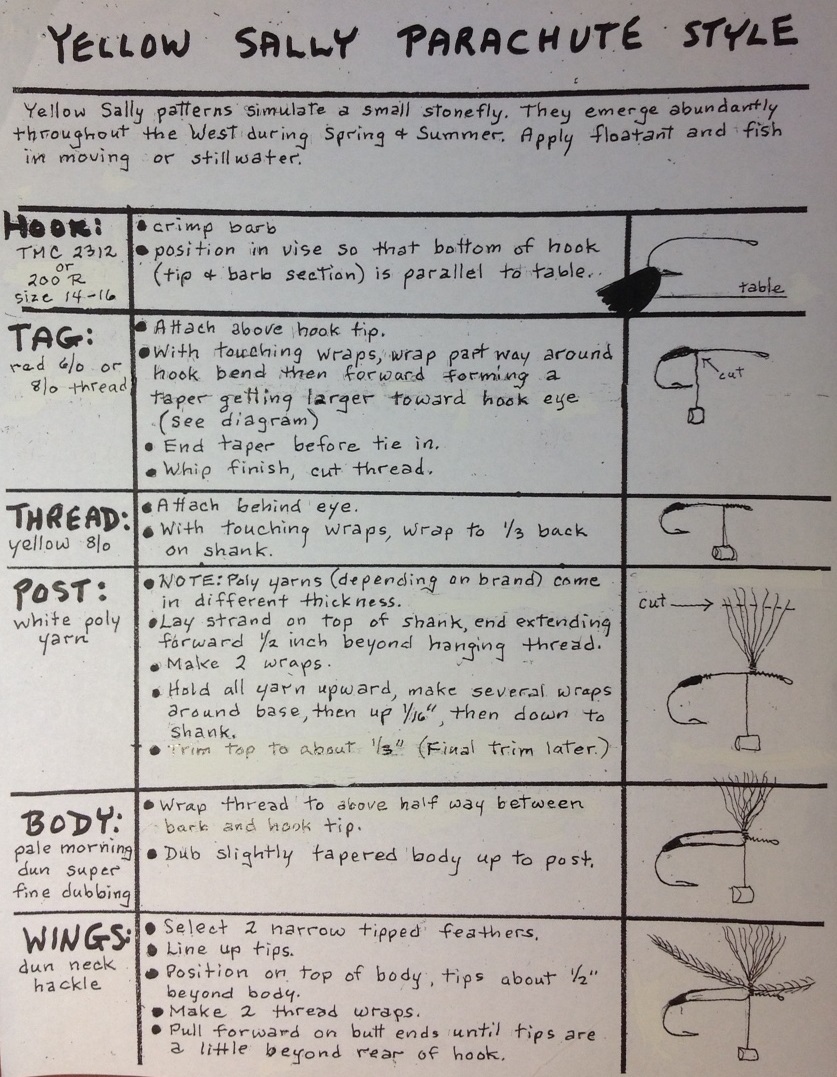
Hook: TMC 5263 , sizes 8-14
Thread: color to match tail or body
Eyes: bead chain , size proportional
Tail: Marabou, color to match hackle or body.
Hackle: Neck or saddle. Color to match body or tail, or dun.
Body: Chenille: black, brown, olive, cinnamon, or those colors variegated.
1. Crimp Barb.
2. Attach thread behind eye. Touching wraps 1/4 back on shank then forward to one hook eye behind eye.
3. Cut bead chain with wire cutters into sets of 2.
4. Attach bead chain eyes to top of shank, one ball on each side, using multiple figure eight wraps and around base of eyes on top of shank. Wrap thread to mid shank. Apply drop of glue.
5. Pull clump of marabou off stem of feather. Note: moisten marabou for easy handling. Cut off butt ends. Lay butts on top of shank behind eyes. Tie to top of shank back to end of shank. Break (do not cut) tips to desired length.
6. Select hackle with barbs equal to 1 1/2 hook gap. Holding tip, stroke barbs against grain. Position tip on top of shank, butt end to rear. Tie in place.
7. Pull fibers off about 1/4″ of chenille exposing core threads. Attach threads to rear of shank. Advance thread to behind bead chain.
8. Wrap body forward with touching wraps. Tie off, cut excess.
9. Spiral hackle forward in 6 evenly spaced wraps. Tie off, cut excess. A couple more thread wraps to secure.
10. Make several figure 8 wraps around bead chain eyes. Wrap thread head. Whip finish. Cut thread. Apply glue to head.
Posted on March 3rd, 2021
This emerging caddis is fished in the surface film using a floating line. Apply floatent to the loop wing only.
Hook: TMC 100 sizes 14-18
Thread: tan 8/0
Shuck: Amber Z-Lon or spooled Antron
Body: tan Hairtron or Hairline dubbing
Wing: white Z-Lon or Antron
Thorax: same as body AND dubbing wax
Head: thread
1. Crimp Barb.
2. Apply thread 1/3 back on shank.
3. Separate strand of shuck material in half. Tie to top of shank from tie-in to a little around bend of hook. Cut length equal to 1/2 hook shank long.
4. Dub a generous body up to tie in. Brush backward a little to make rough.
5. Tie in wing material on your side of shank. Form a loop that extends to rear of shank. Tie in on far side of shank at original tie in location. Cut excess. Wrap down butts.
6. Apply dubbing wax to a couple inches of thread. Using touch method, apply small amounts of dubbing to thread. Wrap a generous, shaggy thorax forward to hook eye. Wet fingers, pull forward dubbing backward. Make several thread wraps forming a head. Whip finish, cut thread. Brush thorax fibers back a little forming a shaggy fly.
Posted on March 2nd, 2021
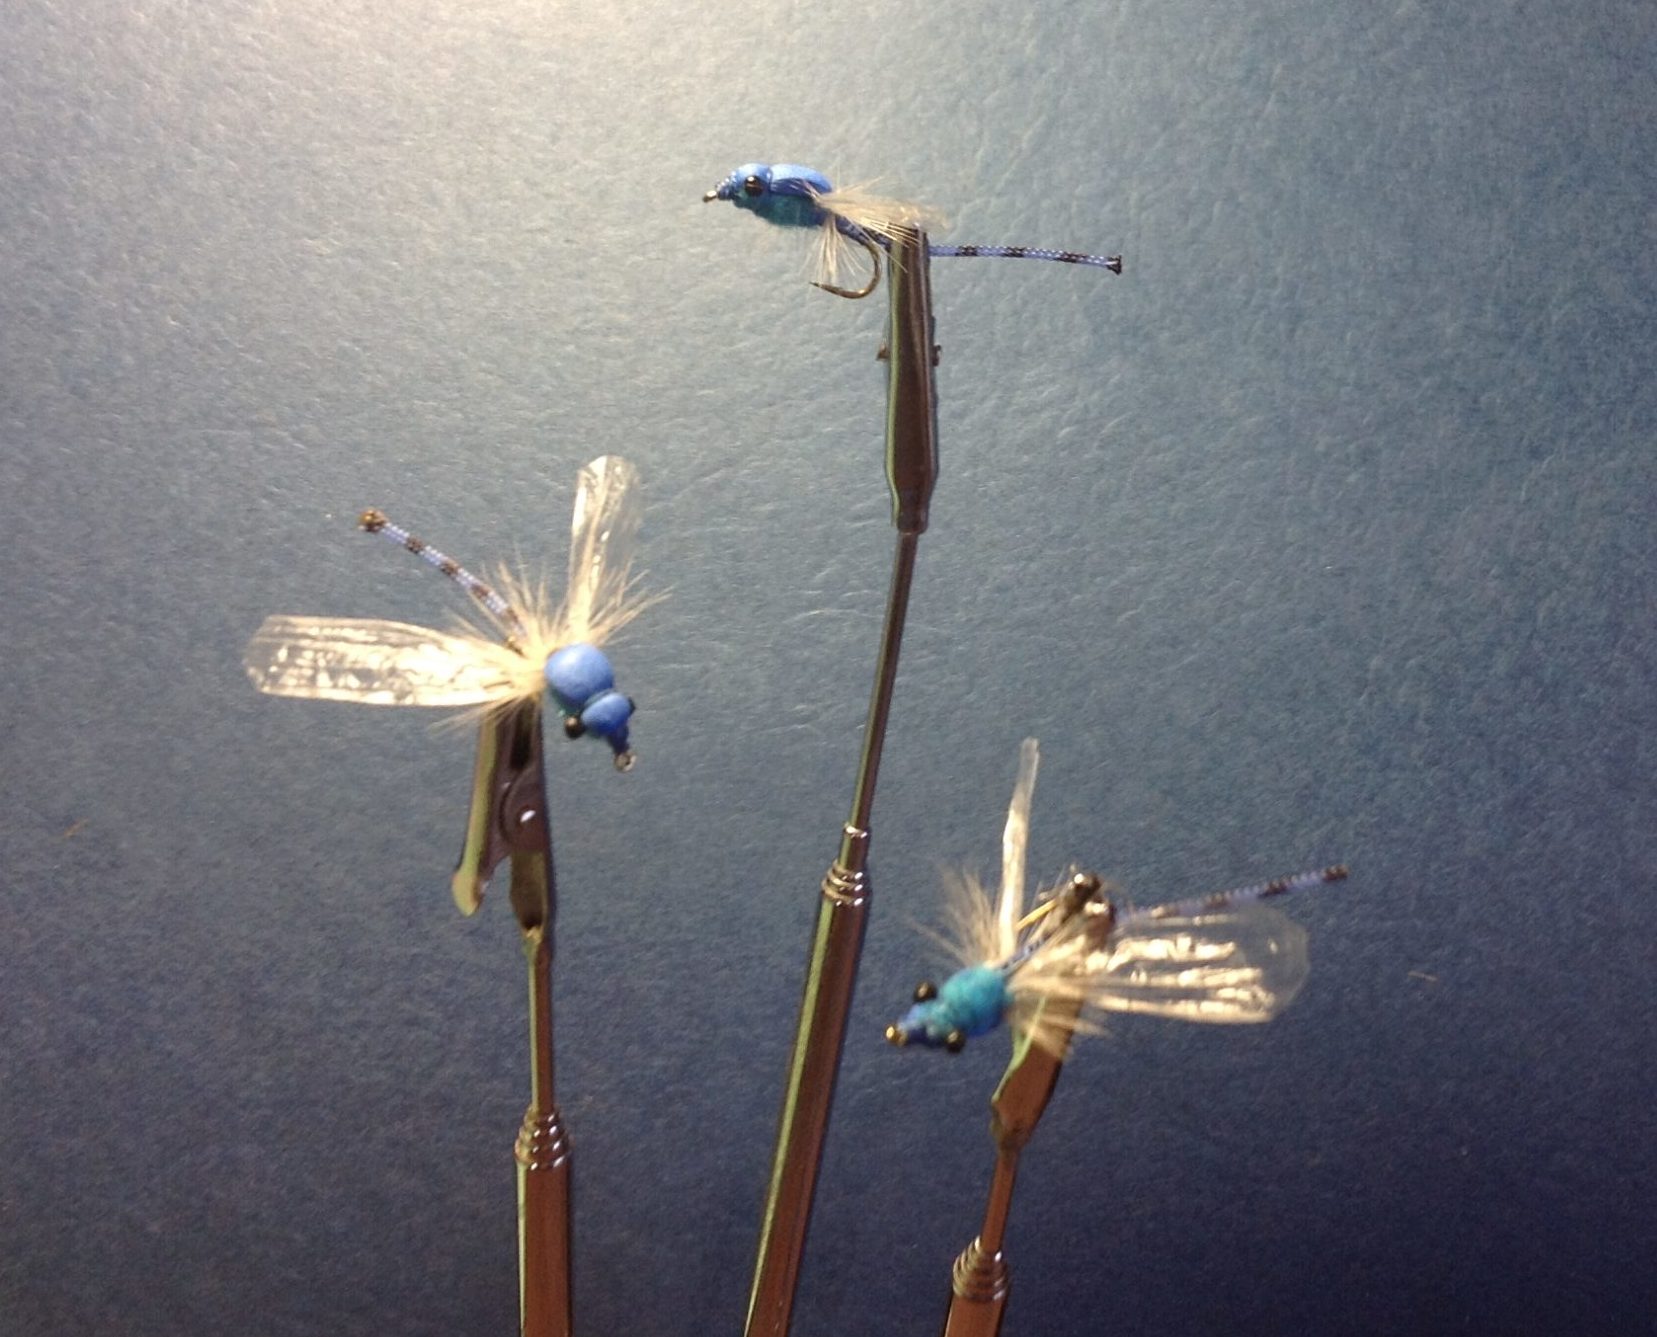
In late spring and eairly summer, damsels migrate from the debths of ponds and lakes becoming very vulnerable to trout and bass. As adults they flutter around vegetation that sticks out of the water. They end up in the water from mating rituals and the wind. Fish will sometimes come out of the water to take them from the air or off vegetation. Do check out http://Vimeo.com/85147880.
Hook: TMC 5262 size 12
Thread: 6/0 royal blue Damsels often come in tan. Just change all the materials to tan to imitate them.
Abdomen: “Adult Damsel Body” or “Braided Butt Damsel” in blue. These are braided monofilament. And a black Sharpie pen.
Eyes: Pre-made black monofilament eyes OR make your own from plastic hairbrush bristle. Holding a 5/8″ piece in the center with hemostats, melt each end with a flame, forming a barbell shape.
Thorax: blue 2mm closed cell foam
Hackle: dun saddle or neck
Thorax: blue superfine dubbing
Head: blue foam as above
1. Crimp barb.
2. Attach thread behind eye. Touching wraps to rear of shank.
3. Prepare abdomen. Cut 1 1/8″ long. With hemostats, hold 1/16″ from tip. Melt end with flame. Mark with Sharpie 6 times starting at tip. Note: some of this will be covered, leaving 4-5 exposed marks. Lay on top of shank, melted end to rear,other end to mid shank. Tie in place. Advance thread to 3 hook eye lengths behind eye.
4. Position barbell eyes 2 1/2 hook eye lengths behind hook eye. Attach to top of shank with figure 8 wraps so it’s at right angle to shank. Apply drop of Super Glue” or the like.
5. Cut 3/16″ of foam. With one end behind eyes, attach snugly to top of shank back to mid shank or a touch more.
6. Cut wing strip 2″ X 3/8″, round ends. Twist center and attach to top of shank infront of extending foam with figure 8 wraps so that wings extend outward.
7. Select hackle with barbs 2 times hook gap. Cut off fuzzy end. Cut 5-6 barbs short on each side of stem forming a “crew cut”. Lay crew cut on top of shank infront of extending foam with tip to rear. Tie in place.
8. Dub thorax up to and a little around barbell eyes ending infront of extending foam.
9. Holding hackle, foam and wings upright, wrap thread all the way around base of all 3 over shank leaving thread hang on your side. Holding wings downward, make 3-5 hackle wraps around base of foam then leave hanging infront of hanging thread. Bring thread upward, make 3-4 wraps around base of foam. Cut excess hackle. Cut hackle barbs short in front of foam. Apply small amount of dubbing to thread and wrap to behind barbell eyes.
10. Pull foam forward. Tie snugly in place with several wraps. Advance thread to infront of barbells, pull foam forward. Tie in place with several wraps. Pulling on foam, cut foam short.
11. Snugly wrap down foam stub. Whip finish. Cut thread. Apply glue.
Posted on February 27th, 2021
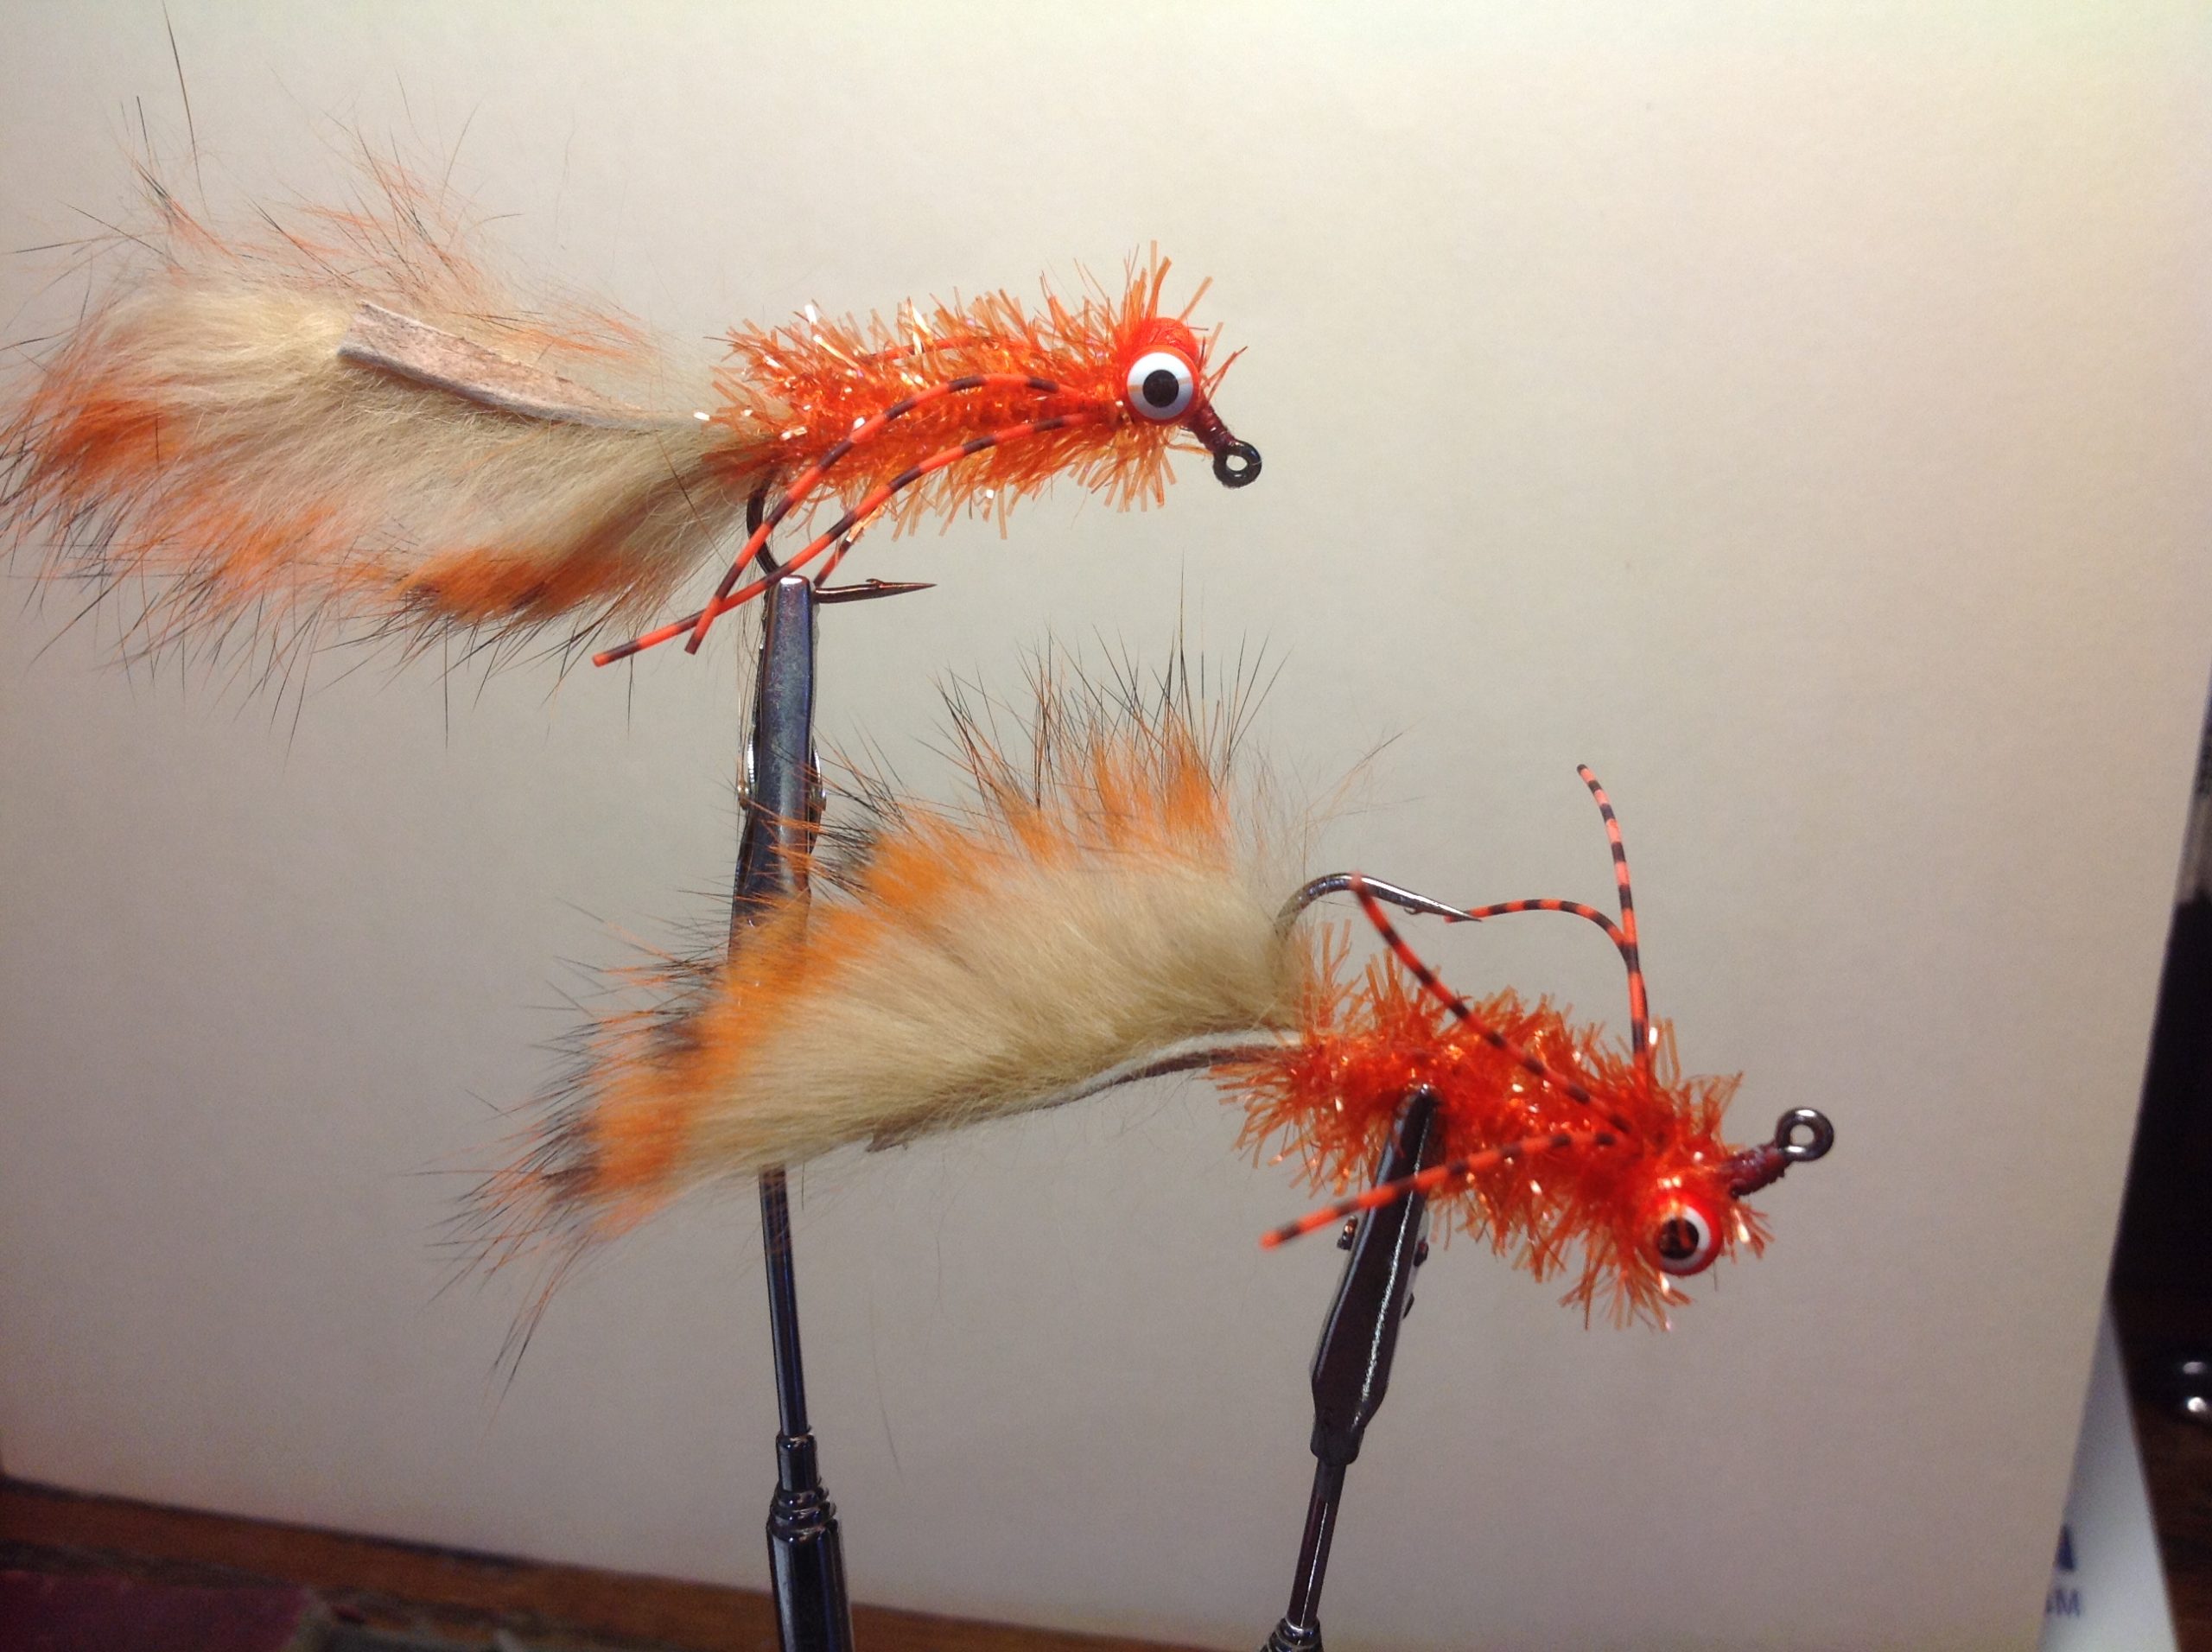
Using Poppers on the surface for bass is a kick and a half, but sometimes they won’t come up and you half to go down and dirty. Here is a great way to get their attention. This fly will automatically turn upside down when fishing, which is what the picture on the right demonstrates. Directions are for an orange fly. Other color options: white, purple, black, crawfish, green.
Hook: TFS 5444 or AREX TP650, size 2
Thread: white flat waxed nylon or Danvile 140 denier
Eyes: orange, Hairline, double purple lead eyes, size med.
Tail: black/orange over tan, tiger barred rabbit strip,
Body: orange Estas chenille, size med.
Legs: orange and black Crazy Legs, or similar
Glue: Zap-A-Gap, Super Glue, or similar
Sharpie Permanent Marker (optional) , orange
1. Crimp barb.
2. Attach thread slightly down nose. Touching wraps to 1/4 in. back on shank.
3. Attach eyes on top of shank just behind bend of nose. Use figure 8 wraps, then circular wraps pulled snugly. Repeat several times. Wrap thread to above barb. Apply glue to eye thread wraps.
4. Cut rabbit strip 1 and 1/4 inch long. Note: devide hair fibers before cutting. With nap of hairs to rear and hide upward, attach about 1/4 inch to top of shank.
5. Tie in chenille at rear of shank. Wrap forward with touching wraps while stroking fibers back with each wrap. Last wrap snugly up against rear of eyes. Tie off, but don’t cut. Make one half hitch. Turn hook upside down.
6. Using one 6 inch strand of rubber legs, cut in half. Stack. Tie in center of both with 2 wraps. Fold forward legs to rear. Snugly tie in place so that 2 legs extend outward on each side.
7. Advance thread to infront of eyes. Wrap chenille once over legs, then between eyes. Tie off, cut excess. Trim whiskers, then tie stubs down to hide. Whip finish. Cut thread. (Optional) using Sharpie, color thread to match body. Apply glue.
Posted on February 18th, 2021
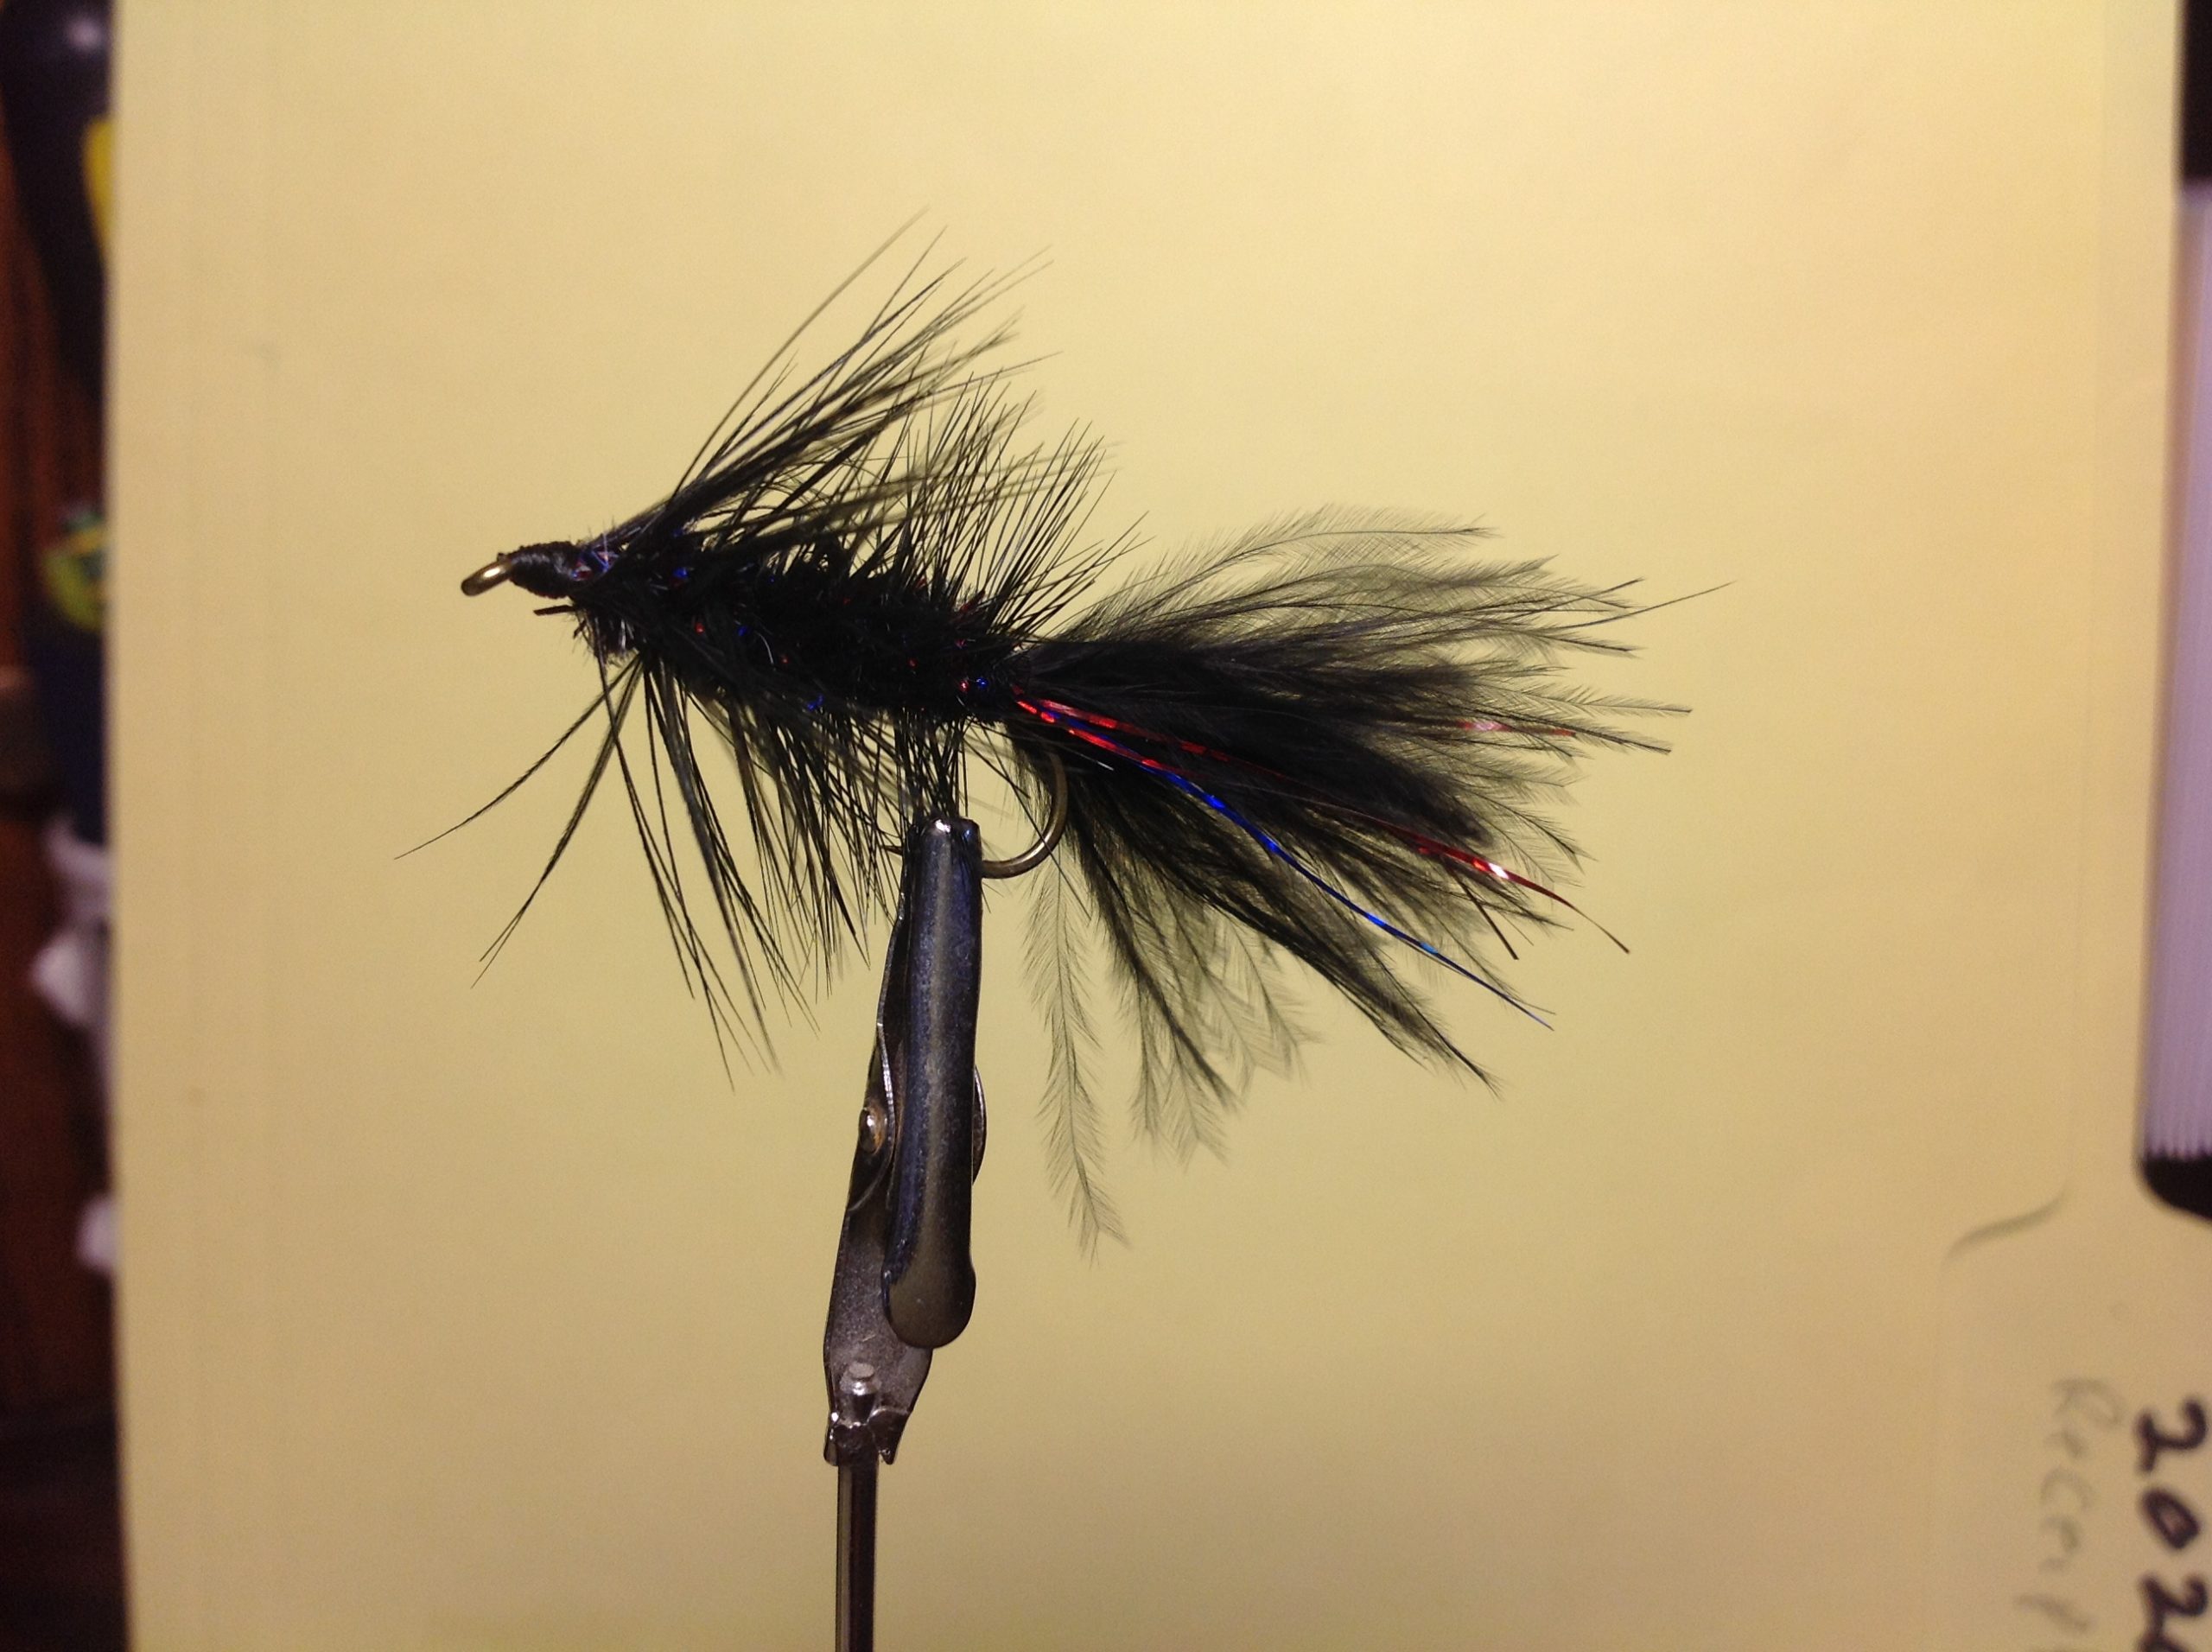
Hook: TMC 5263 or TMC 200R Sizes 6 (at Pyramid ) -12. Adjust materials for the smaller flies.
Thread: black 6/0
Tail: Black marabou with fluffy tips ( straight tips can be broken off )
Tail Flash: both red and blue Flashabou
Hackle: Black strung hackle, AKA India hen back.
Body: Speckled midnight fire chenille ( black chenille with short projections of both red and blue flash )
1. Crimp barb.
2. Attach thread behind eye. Wrap to above hook barb, then forward to mid shank.
3. Note: moisten marabou for easy handling. Cut moderately large clump from stem. If barbs are not at least 2 shank lengths long, tie in at rear of shank. Lay on top of shank, butt ends 2 eye lengths behind eye. Tie in place to top of entire shank. Advance thread 1/4 inch. Shorten length of tail, by pinching not cutting, to length of hook (some prefer a tail half that length).
4. Holding one strand of both red and blue Flashabou together, moisten for easy handling, cut in half. Tie center of all strands to top of shank with a couple wraps. Holding half on far side of tail and half on near side, tie in place back to rear of shank. Cut to length of tail.
5. Holding tip of hackle, stroke all other barbs against the grain. Tie tip to rear of shank with shiny side facing you. Advance thread to 1-2 eye lengths behind eye.
6. Strip 1/4 ” chenille from center threads. Tie threads to shank. With touching wraps, wrap to rear of shank then forward to tie in. Tie of, cut excess.
7. Spiral (palmar) hackle forward in about 8 wraps, stroking barbs backward with each wrap. Tie off, cut excess.
8. Holding barbs back, wrap thread head. Whip finish. Cut thread. Apply Zap-A-Gap glue or similar.
Posted on January 28th, 2021
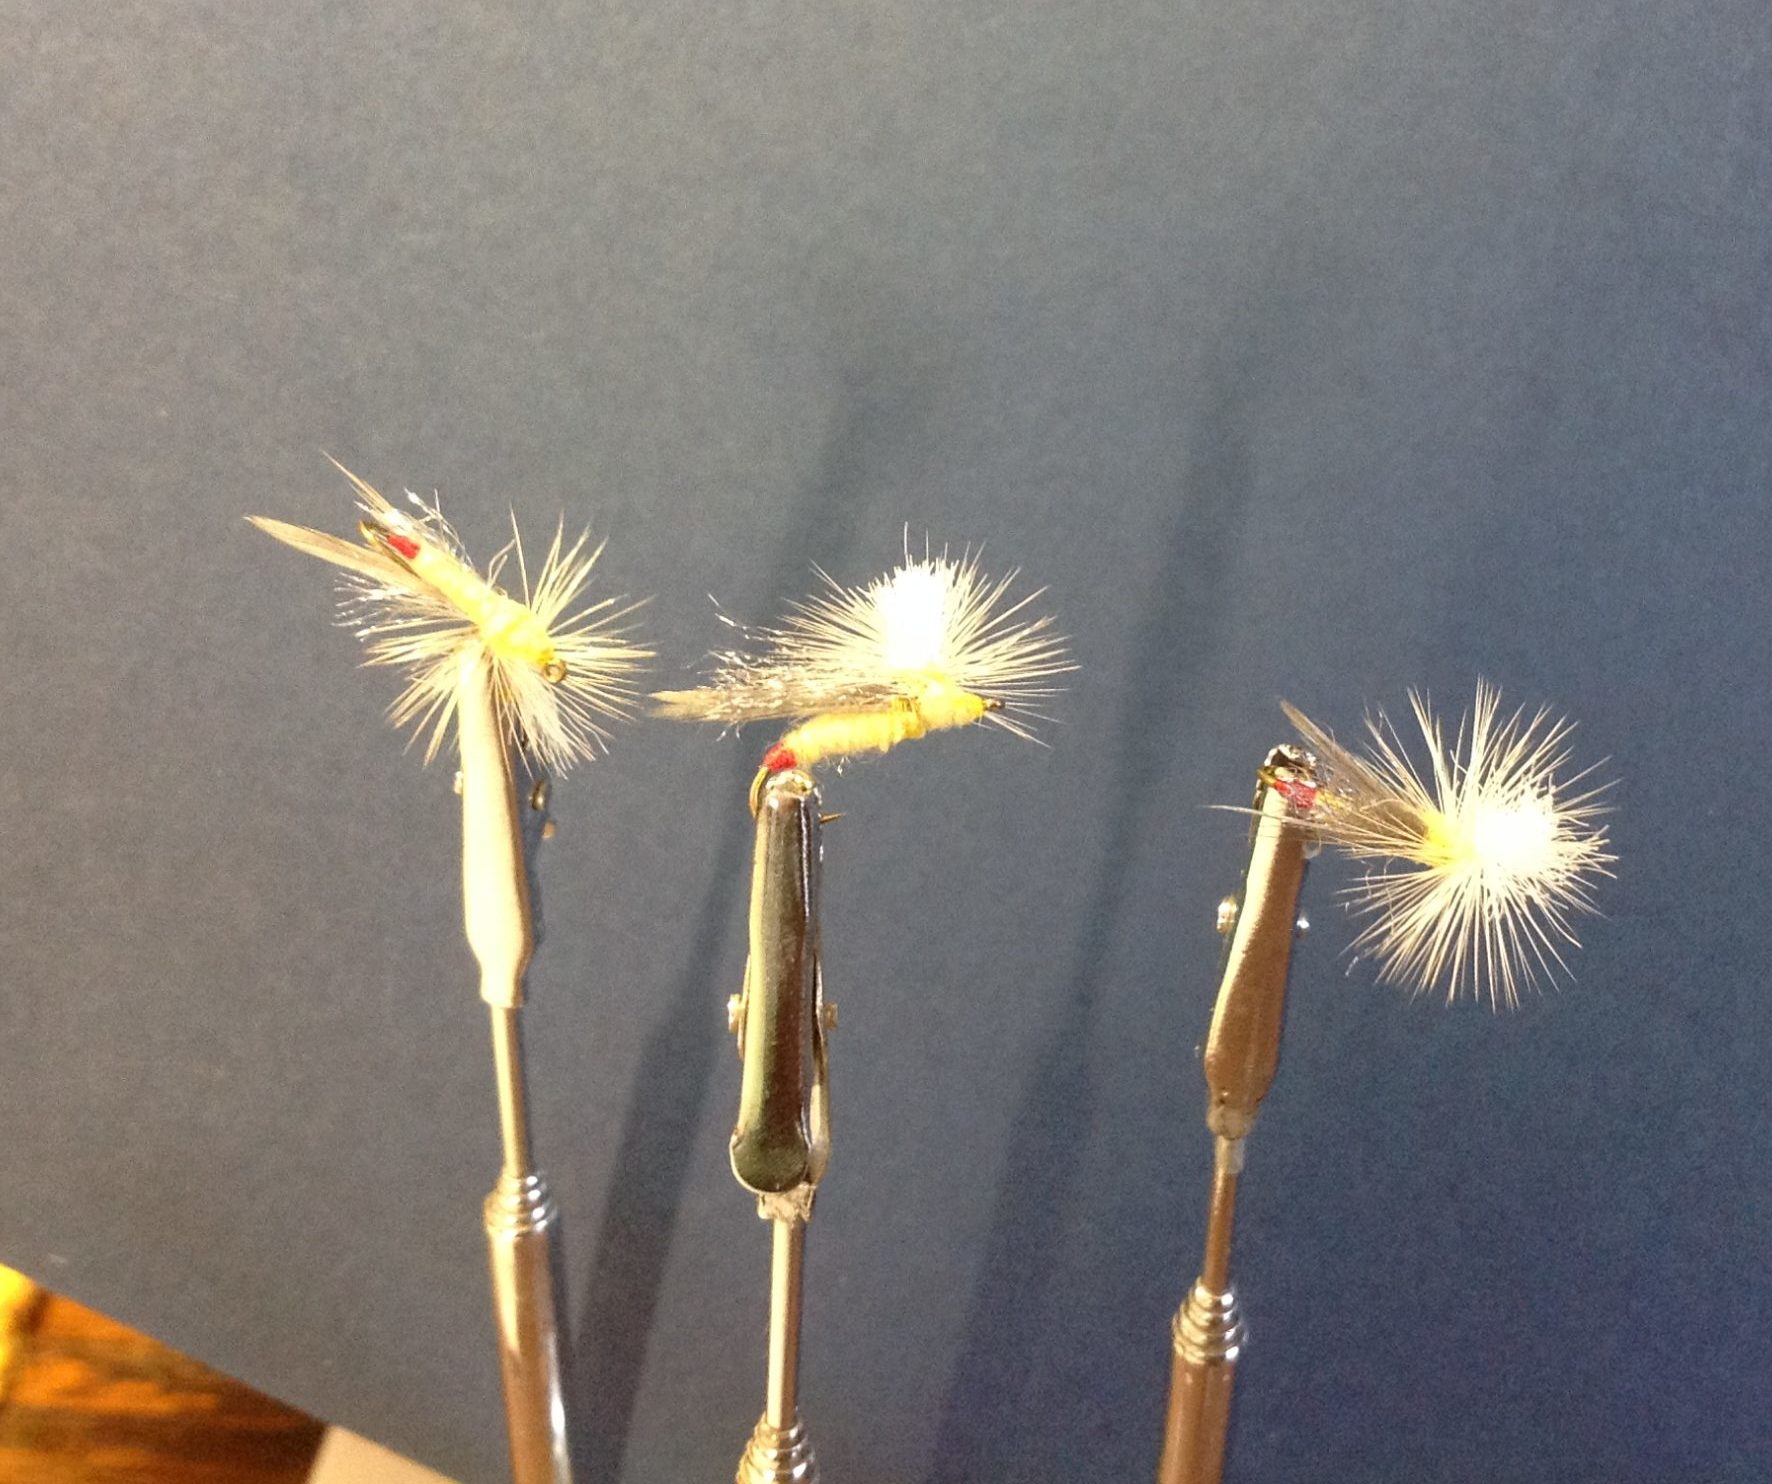
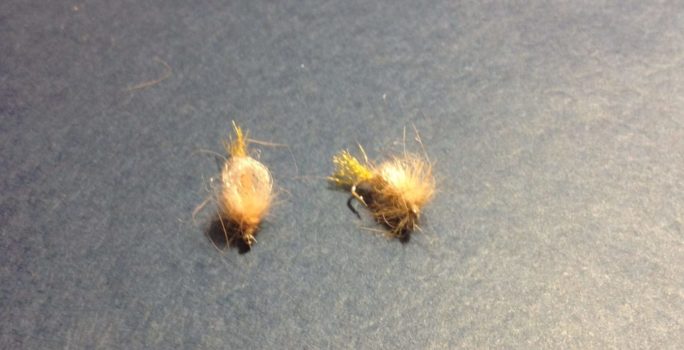
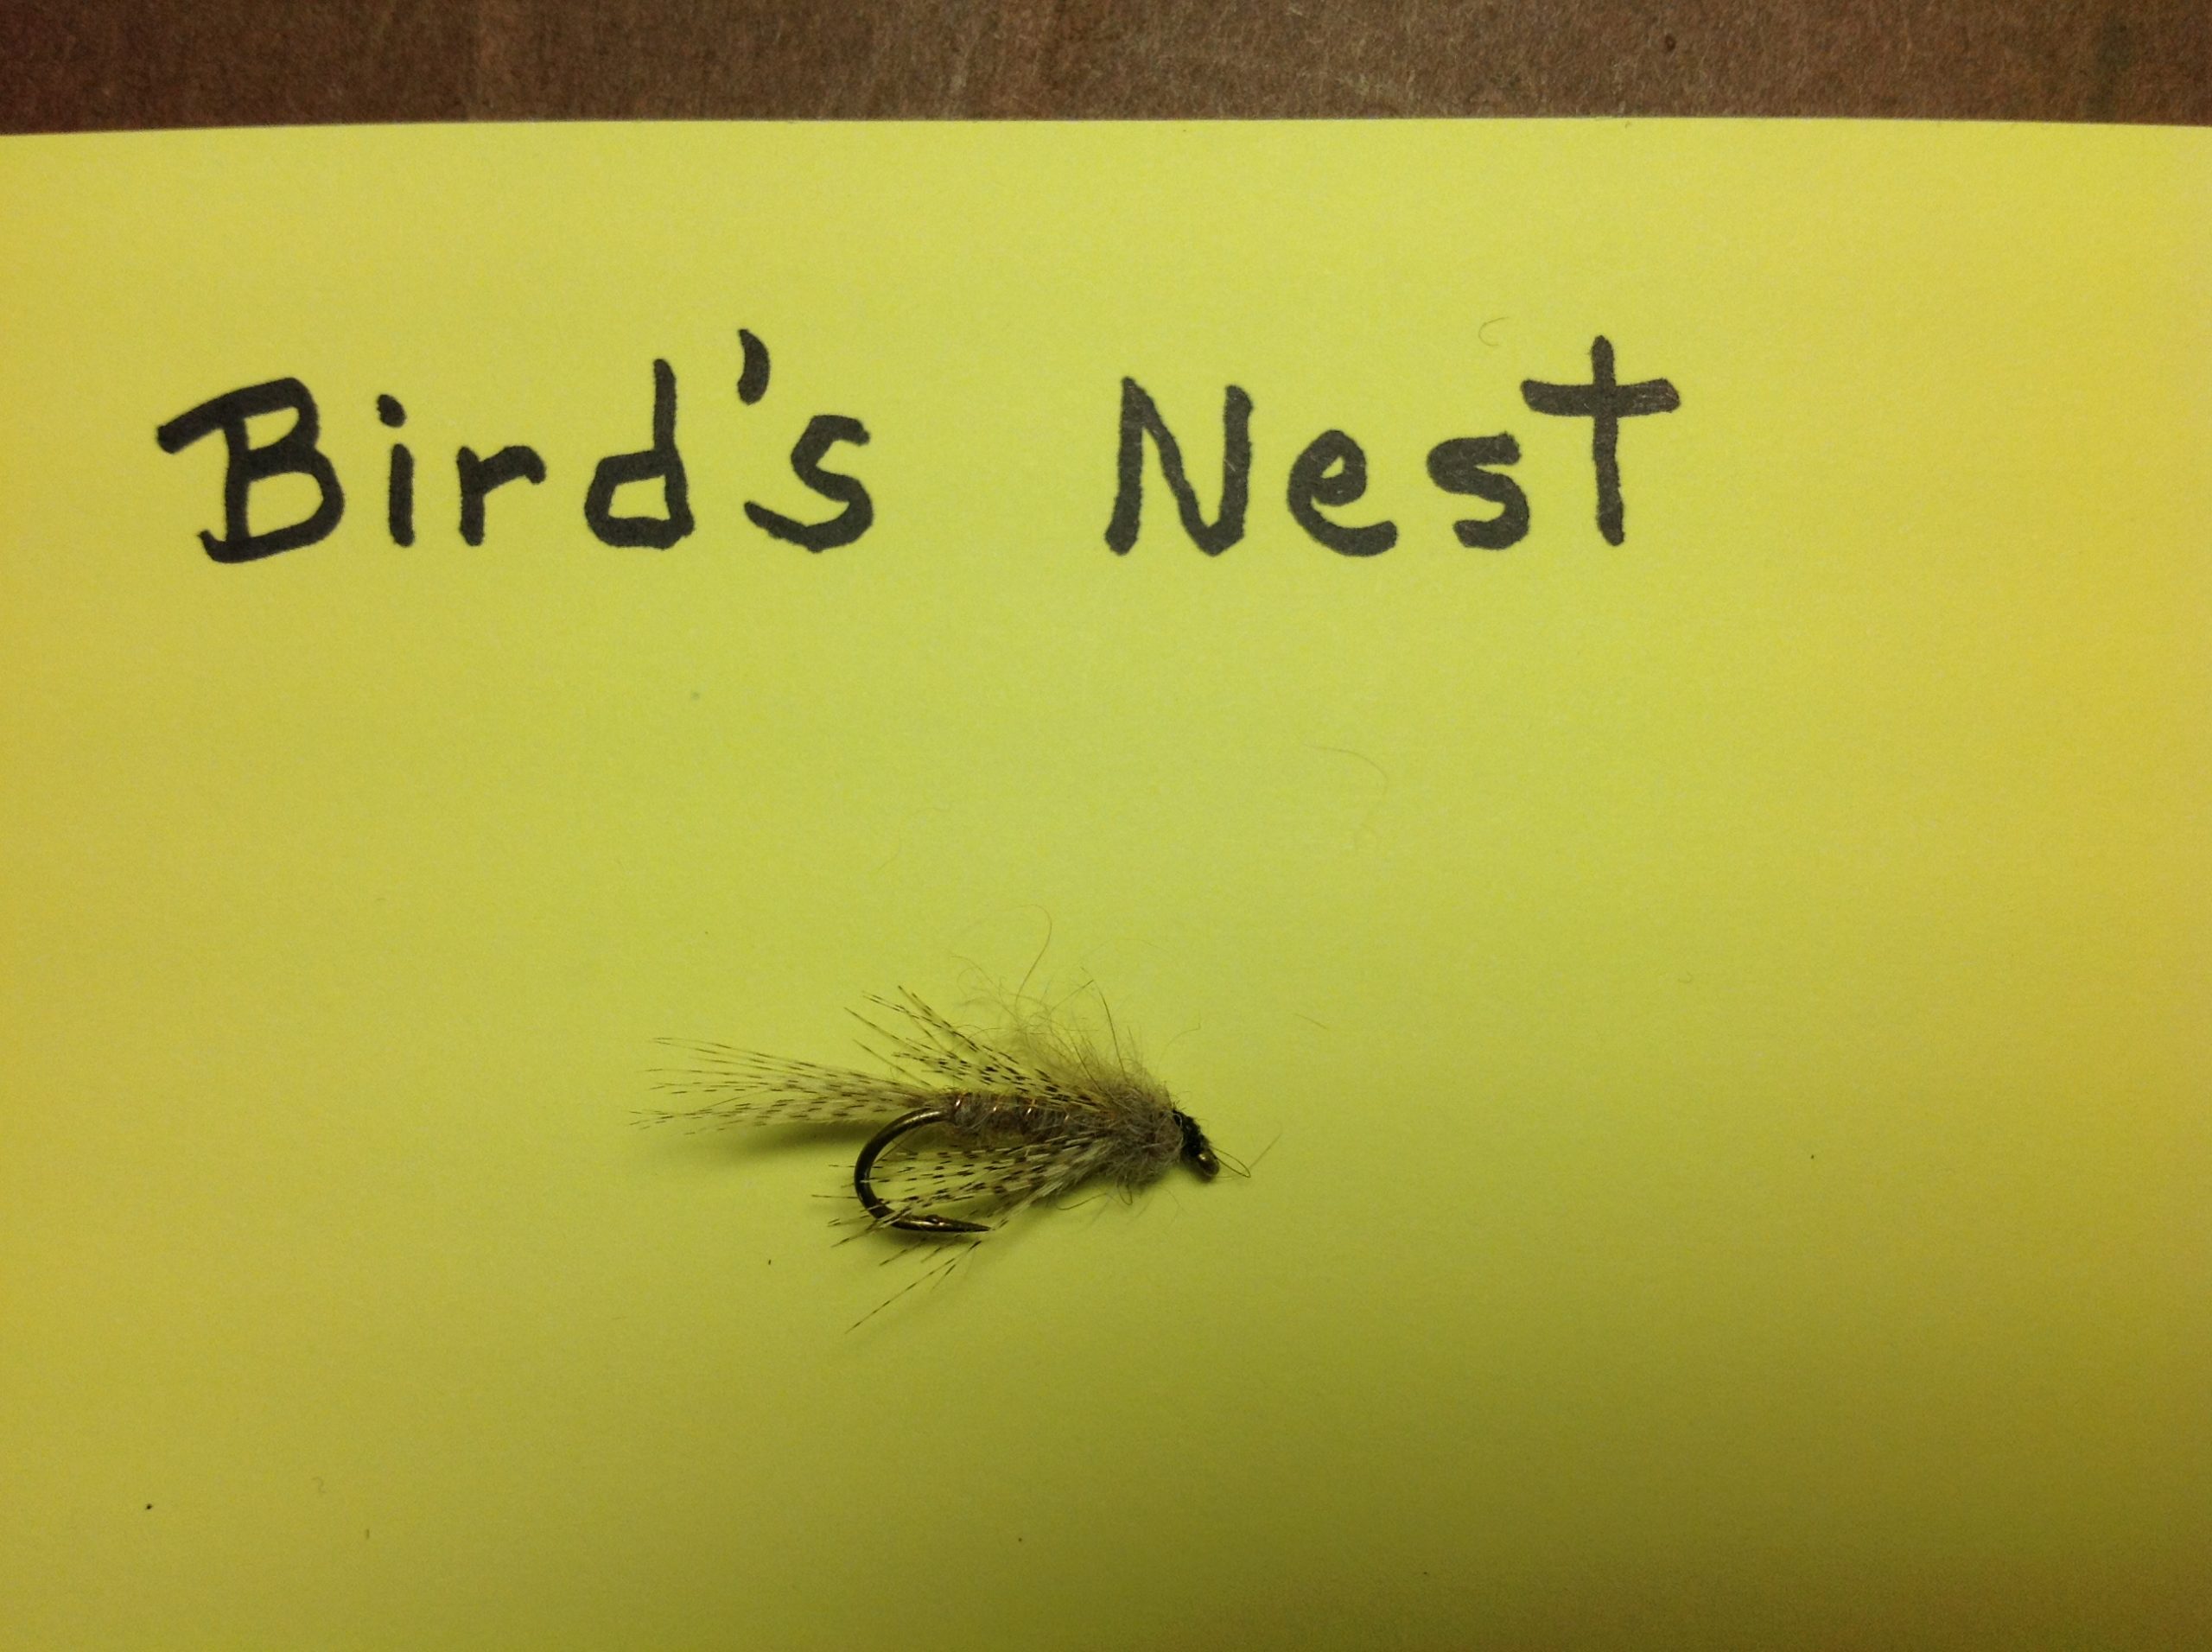
This pattern was orininated by Jeff Henkemyer and simulates the emerging stage of a midge. Midges are a very important food source for trout in the winter. They are imparative to have in your fly box when fishing tailwaters and spring creeks throughout the year. Apply floatent and use a floating line with 4x, 5x or 6x tippet, depending on size of fish? If unable to see when fishing, trail a foot or 18 inches behind a fly more visible. A simple fly to tie, with few materials. Magnification for this very small fly is most important to get the details of the fly accurate. With small flies, every wrap of thread counts. Don’t bulk up the fly.
Hook: TMC 2487 Sizes 18-22
Thread: black 8/0
Tail (shuck): grizzly hen hackle tip
Body: black thread
Hackle: grizzly
1. Crimp barb.
2. Attach thread 1/3 back on hook shank. Touching wraps to beyond barb, then touching wraps to above barb.
3. Select a very small hen neck feather. Position on top of shank so it extends hook length to rear. With touching wraps forward, tie in up to hook point. Cut excess.
4. Moisten fibers at end of Zelon, pull to straighten a little. Make cut straight across. Pinch fibers, then tie to top of shank with touching wraps to one eye length behind eye. Cut excess. Tie down butt ends. Cut off any stray fibers. Tilt hook back in vise a little.
5. Select hackle with barbs 1 and 1/2 hook gap. At butt end, cut about 4 barbs short on each side of the stem “crew cut”. With dull side facing you, tie in “crew cut”with touching wraps back to wing. Using touching hackle turns forward, forcing thread forward with each turn, end up one eye length behind eye. Tie off cut excess.
6. While holding hackle back out of the way, wrap small thread head. Whip finish, cut thread. Cut off any whiskers.
Posted on December 30th, 2020
Hook: Mustad 3906 or TMC 3769 (substitution , TMC 5262). Sizes 12-16
Thread: black 6/0, but I prefer 8/0
Rib: small gold wire
Tail: lemon wood duck flank feathers
Abdomen: Australian possum dubbing ( substitution, grey rabbit dubbing )
Legs: same as tail
Thorax: same as abdomen
1. Attach thread 1/3 back on shank.
2. Position wire under shank. Wrap in place to rear of shank. NOTE: wire under shank prevents it from repositioning tail when spiraling it forward.
3. Line up tips of feather out to side of stem. Cut about 8 from stem. Tie to top of shank, tips extending about 2/3’s shank length beyond shank. Cut excess mid shank.
4. Dub a slightly tapered body 2/3’s shank forward.
5. Spiral rib forward in about 5 wraps. Tie off. Twist wire to break. NOTE: wire dulls scissors.
6. Using one feather, line up tips just beyond rear of hook. Fold feather around hook shank. Tie in place with a couple wraps. Check to see if barbs extend backward all the way around shank. Make a couple more thread wraps. Cut excess.
7. Using dubbing loop, wrap a generous fuzzy thorax.
8. Holding fuzz back, wrap a sm. thread head. Tie off. Cut excess.
Posted on November 24th, 2020
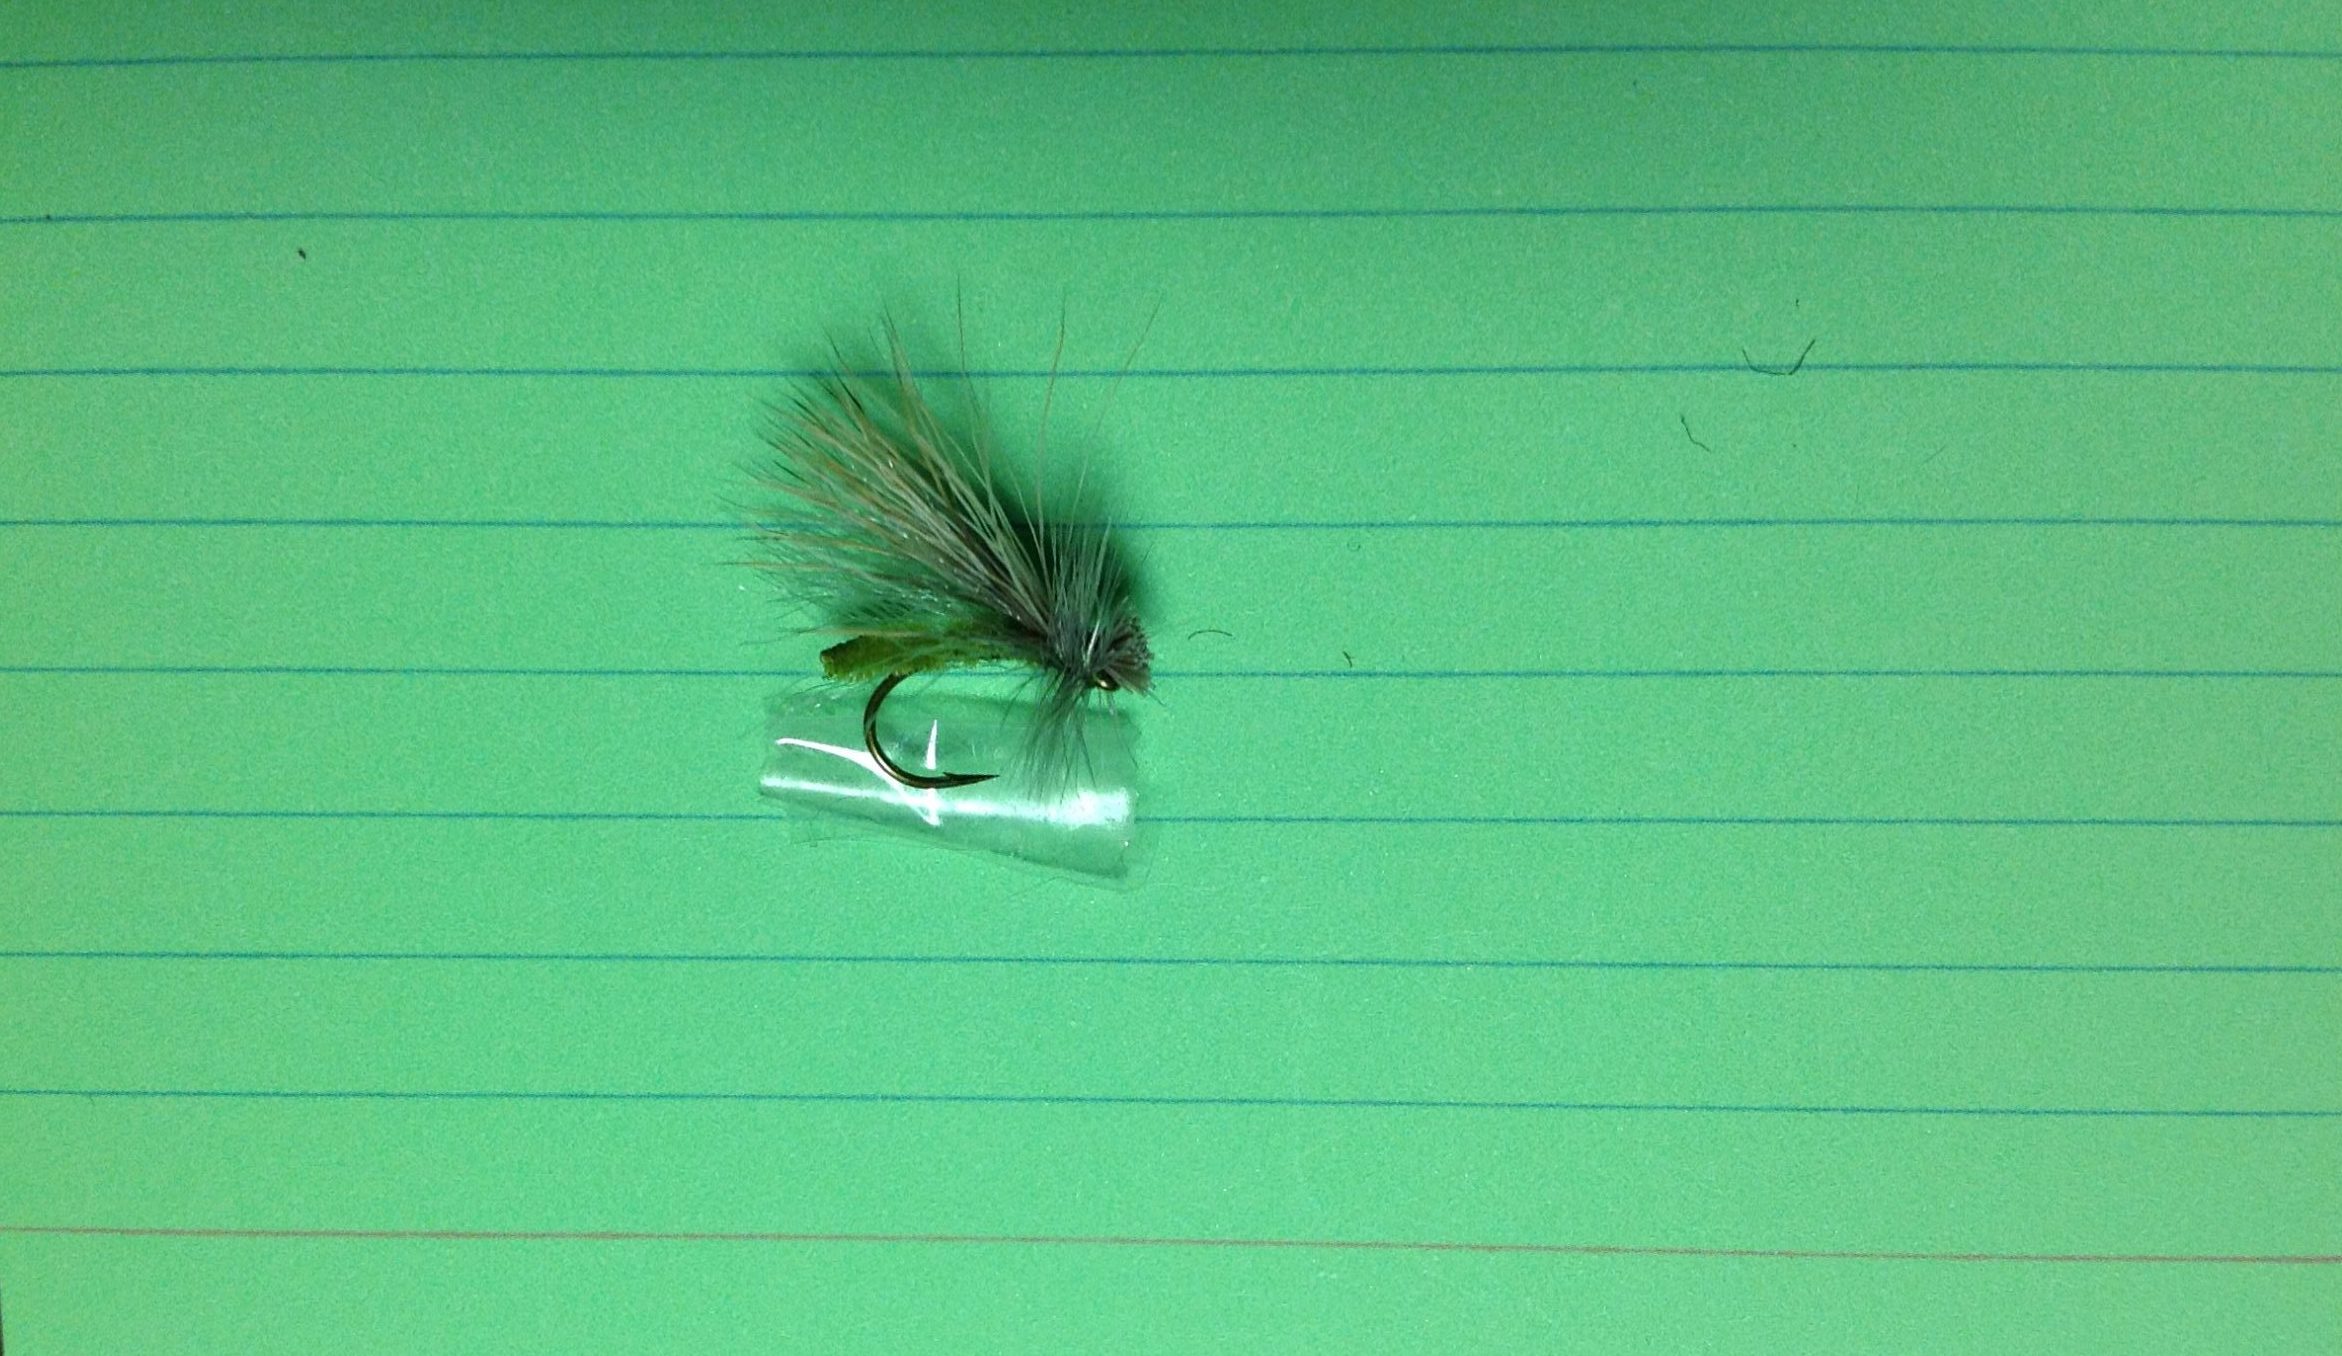
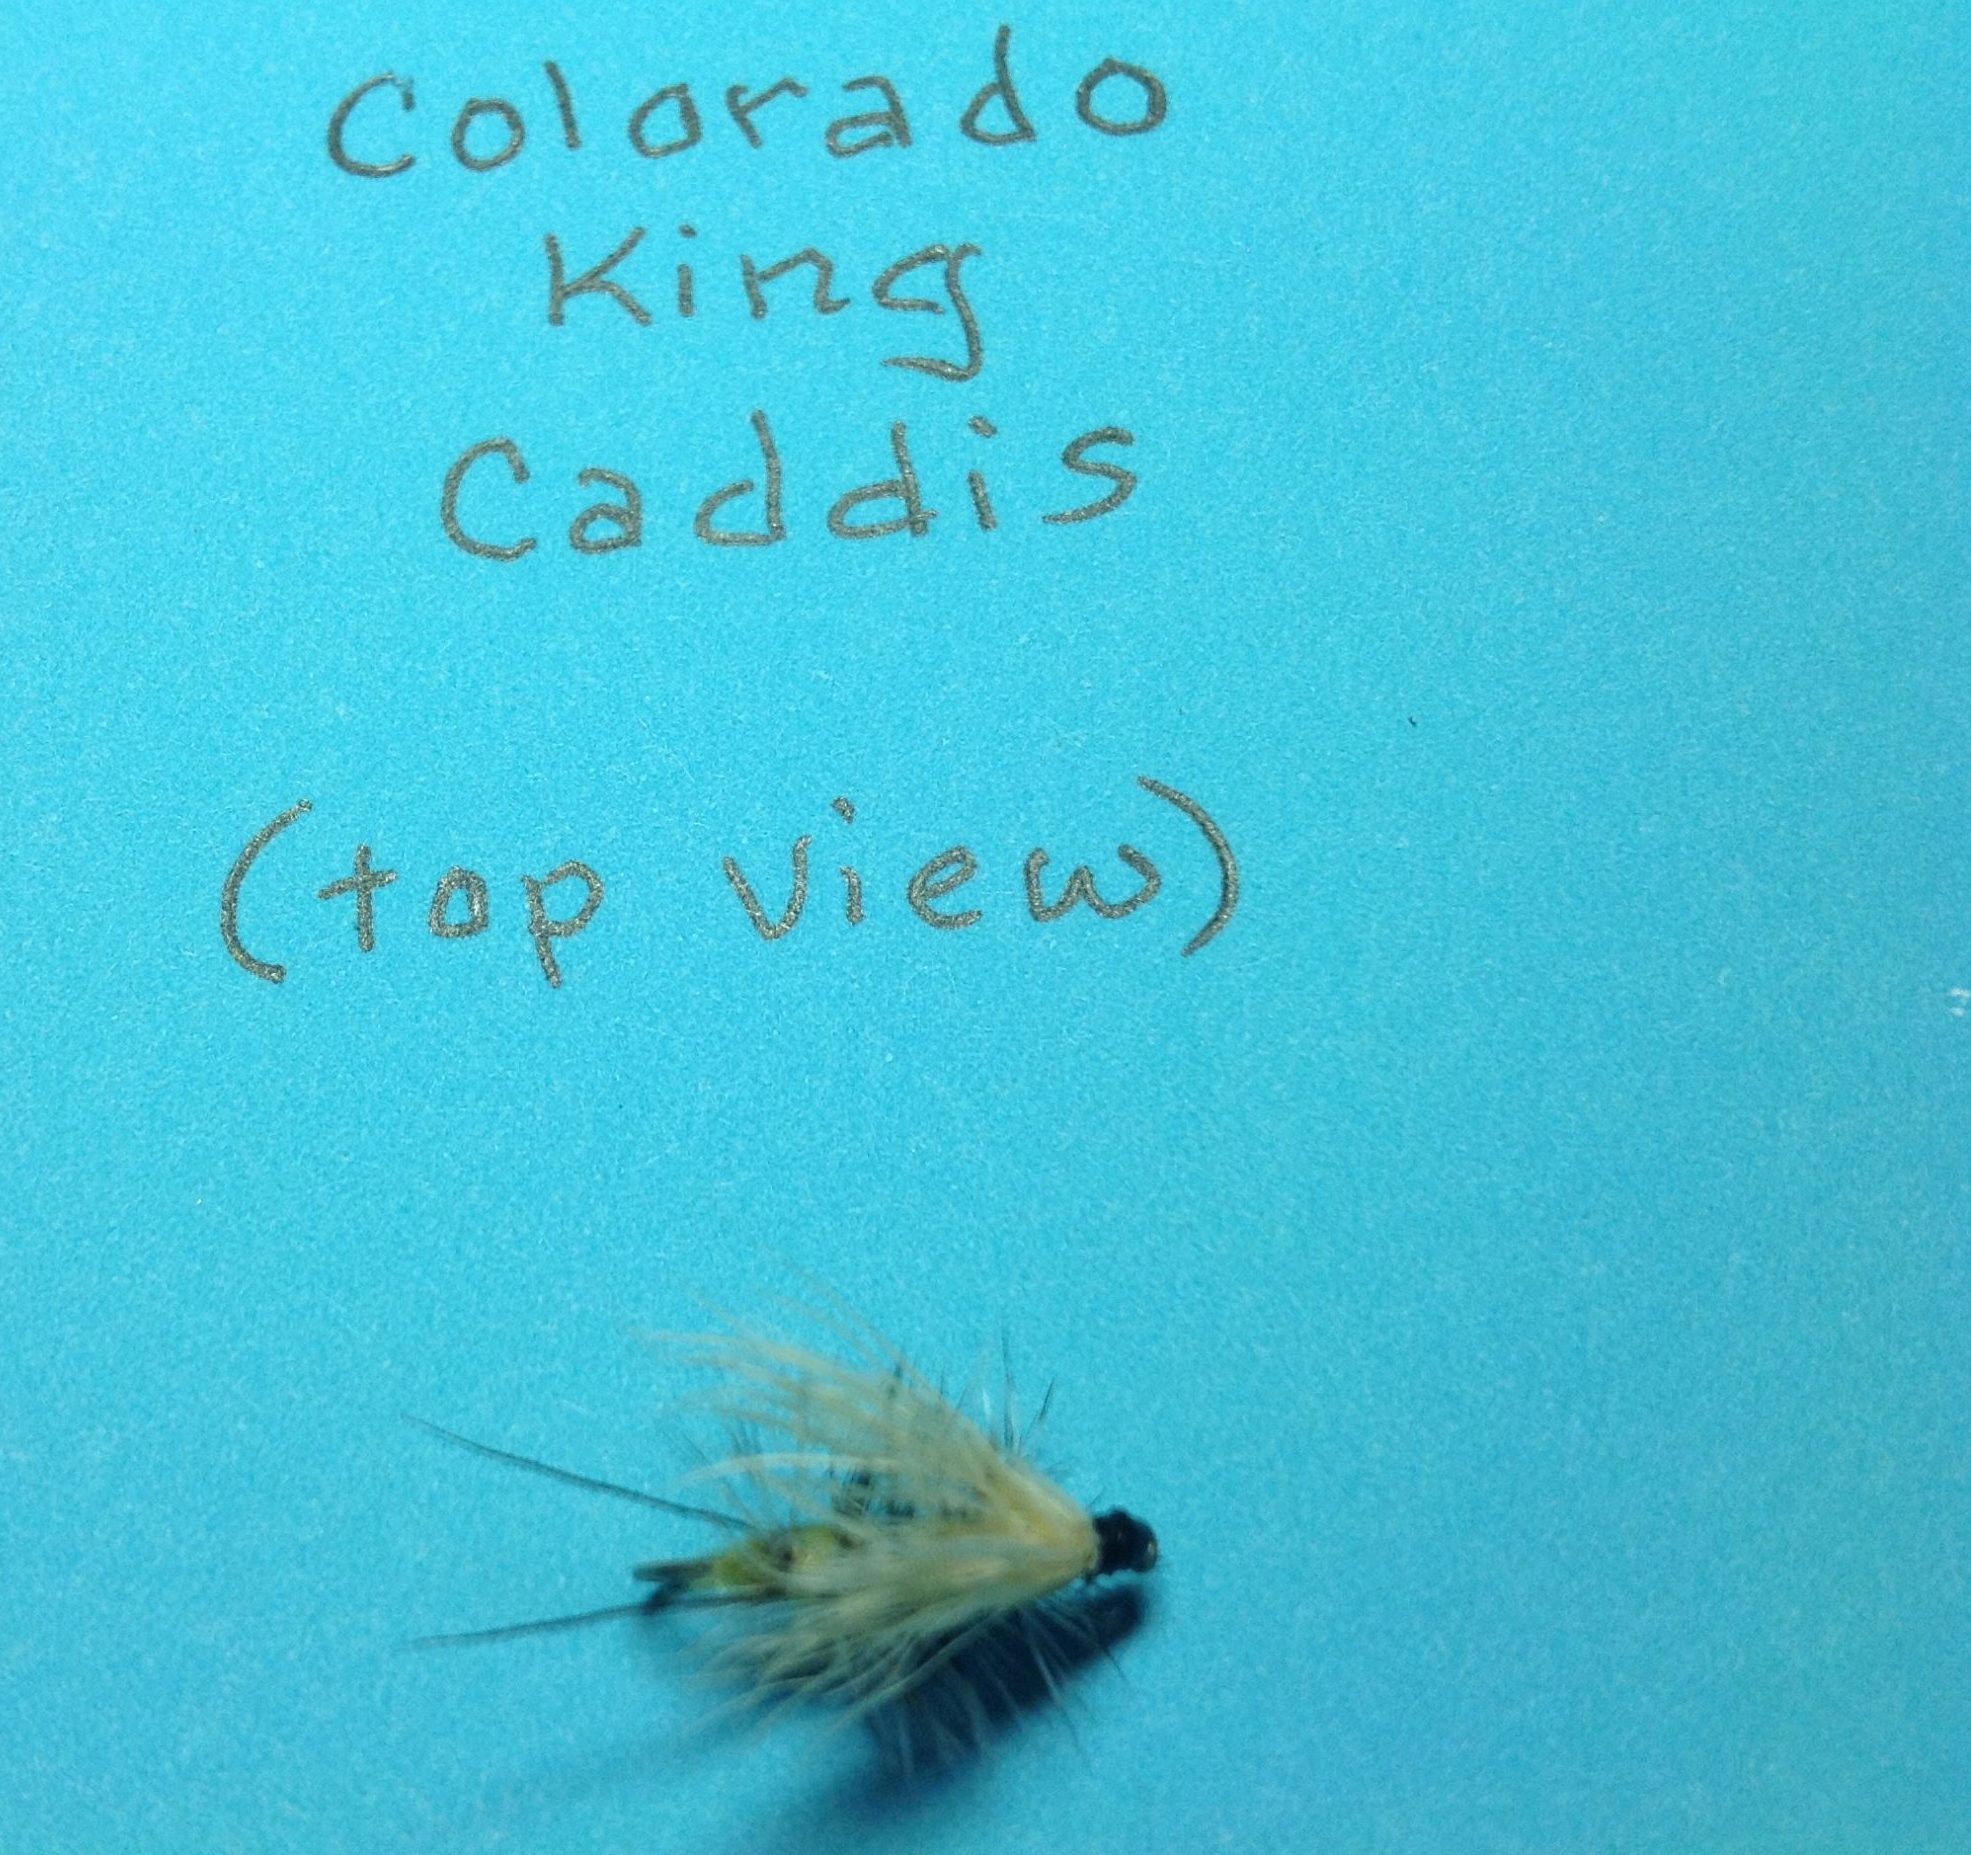
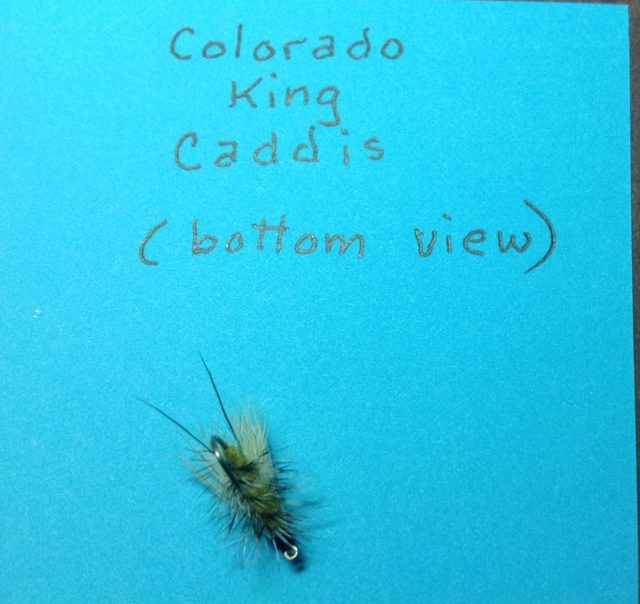
This is one of my “go to flies”. A caddis hatch does not need to be occurring for trout to gobble this one up. The larger sizes work well for the Rocky Mountains, smaller for the Sierra. Fish with a floating line, drag free, in moving water.
Hook: TMC or TFS 2487 (or similar scud hook ) , sizes 12-16
Thread: olive or olive dun, 8/0
Body: olive (vernille, ultra chenille, or velvet chenille), size small or standard (depending on brand). Super Glue or Zap-A-Gap.
Underwing: dun spooled Antron, light or dark
Hackle: dun, light or dark to match underwing, barbs equal to slightly less than hook gap
Wing: light or light tipped deer hair
1. Position hook in vise so that straight lower portion is parallel to table. Crimp barb.
2. Attach thread behind eye. Wrap to rear, with touching wraps to above hook point.
3. Round end of body material using a candle. Carefully melt the end buy placing it near the base of the flame. Apply glue to thread wraps. Position on top of shank, tip above rear of hook. Tie in place with spiral wraps up to 2 eye lengths behind eye. Cut excess.
4. Cut end of underwing material to even fibers. Lay on top of body with tips slightly beyond end of body. Tie down infront of body while splaying fibers. Cut excess. Tie butt ends down up to eye.
5. Prep hackle by removing fuzzy end then cutting 4-5 barbs short on each side of butt end of stem (crew cut). Position crew cut under shank, tip of feather to rear. Tie in place back to body then forward to eye.
6. Cut match stick size bundal of hair, clean and stack tips. Position tips at rear of Antron. Tie in place with first wrap around HAIR ONLY, then firmly around hair and shank a couple times to splay fibers. Stroke butt hairs into bundal over eye forming start of head. Wrap a thread collar back to body. Advance thread back to head. Make one loose thread wrap around bundle of hair above eye, then one around collar. Trim head at an angle (see photo).
7. Make several wraps of hackle up to head. Tie off cut excess. Finish with half hitches under head , behind eye. Small amount glue to tie off threads.
Posted on October 28th, 2020
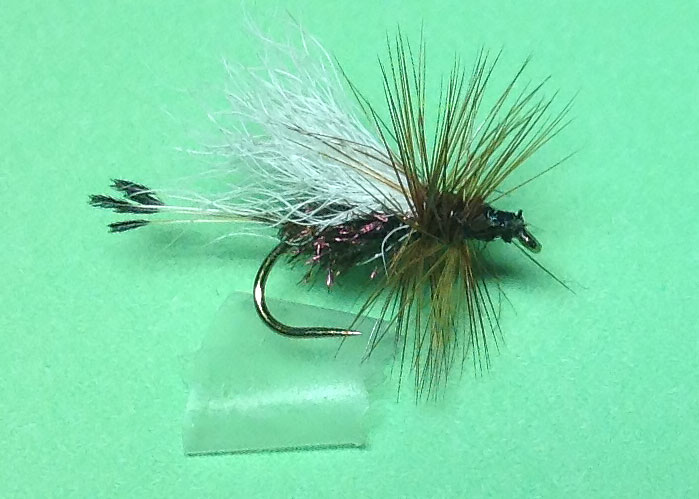
Although caddis don’t have tails, this pattern includes two stabilizing peccary. I’m not sure what trout make of these, but it’s a very effective pattern. Due to the coloring it may represent a bee to the fish. Apply floatent, fish drag free or with an occasional skitter.
HOOK: TMC or TFC 100, sizes 8-18. Crimp Barb.
THREAD: black 8/0. Attach mid shank. Wrap to rear of shank.
BODY: yellow or golden/yellow , superfine or rabbit dubbing. Dub a small ball at rear of shank. Leave thread hanging in front of ball.
TAIL: 2 black peccary hairs or can substitute other coarse black hair such as moose main or body. Position one hair on far side of ball, tip extending hook length to rear. Make 3 wraps. Pull on butt end of hair until it extends hook shank to rear or a little shorter. Tie in place. Cut excess.
HACKLE: grizzly. Select feather with barbs equal to one or one and a quarter hook gap. Cut several barbs short on each side of base of stem (crew cut). Tie crew cut in infront of ball, light side facing you.
BODY CONT. : same dubbing. Dub a non tapered body forward to 2 eye lengths behind eye.
HACKLE: same feather. Palmer forward in about 5 wraps. Tie off, cut excess.
WING: bleached or light deer hair, with med. fine hairs. Cut a sm. clump an effectiveof hair from hide. Clean out fuzz. Stack tips. Position on top of shank, tips extending to mid tail. Make first thread wrap around only the hair, the second wrap around both hair and shank. Make several snug wraps , making hairs flare. Cut hair butts short at an angle. Wrap thread head covering all hair stubs. Whip finish, cut thread. Apply Zap-A-Gap or similar. If any hairs remain exposed in thread head, use black Sharpie.
Posted on September 25th, 2020
This is my number one “go to” dry fly for trout in either still or moving water. Very important to follow these directions carefully when it comes to proportions, thread wraps and handling and positioning materials. Some helpful hints (tips) will be included that can be applied for tying other flys.
Hook: TMC or TFS 100, or equivalent standard dry fly hook. Sizes 12-16
Thread: black 8/0, 12/0 for size 16 hooks if you wish.
Tail: golden phesant tippet (5-6 barbs) (Tip: Names of the parts of a feather: stem- projection from skin, Barb- projection from stem, barbule- projection from Barb which are difficult to see in most feathers.)
Body: peacock herl with long, easy to see barbules (2-3) (Tip: Herl is fragile , test by gently pulling on tip. If it breaks further than one inch down, discard. Whole feathers are usually better than packaged. Have found whole feathers at the farmers market in Aptos.).
Wing: white calf tail (crinkly, not straight hairs)
Hackle: brown saddle. Tip: Saddle hackle feathers are long, have soft stems, and barb lengths are the same. Best used for dry flies, popper necks, and some buggers. Neck hackle feathers are short, have stiff stems, barbs become shorter near tip. Best used for streamers, popper legs and tails, some buggers, barbs of side feathers for tails on dry flies.
Glue: Zap-A-Gap, Supper Glue, or similar
1. Crimp barb.
2. Attach thread mid shank, leave hanging NO further forward.
3. Tie tail to top of shank, extending shank length beyond shank. Cut any butt ends at MID shank.Position thread at rear of shank.
4. Attach herl tips. Using dubbing hook, form loop with herl, advance thread to MID shank, twist tomake chenille, wrap forward to MID shank. Tie off, cut excess.
5. Wing will be made with 2 small clumps of hairs. Holding tips, cut one clump from tail. (Tip: always cut hair VERY close to hide.) Clean out all under fur. Using large stacker, stack TIPS. Remove any more underfur or short hairs. Position on top of shank, tips above mid tail, make one thread wrap around hair only. Then one around both hair and shank, 2 more snug wraps- each one BEHIND the last. Cut butt ends at an angle, tie down butts. Apply sm. amt. glue, using tip of bodkin, to thread wraps and tied down hair. ( Tip: A moderate amount of glue placed in a plastic lid will not set up for quite awhile. This makes application of sm. amts. glue with bodkin easy.) Position thread right in front of wing. Repeat above with 2nd clump of hair. Position thread right infront of wing.
6. Splay barbs at butt end of hackle. Cut 4-5 short on both sides of stem forming a crew cut. Tie in crew cut. Position thread right in front of wing. Make 3-5 close hackle wraps forward forcing thread forward. Tie off, cut excess. Trim any whiskers. Wrap thread head if not already formed while tying in materials. Tie off. Sm. amt. glue to head.
Posted on July 29th, 2020
This bugger pattern is very effective when twitched or stripped using a sinking line in stillwater. It can be varied in size and color. You will find this easy to tie. Hooks: 4-12. Body Colors: solid black, mottled black/olive, mottled black/brown, mottled black/tan, mottled brown/tan. Tail, Hackle and Thread: color to match one of body colors. My favorite is as follows.
1. Crimp barb.
2. Attach thread behind hook eye. Touching wraps to 1/3 back then forward to one hook eye length behind eye.
3. Attach bead chain eyes on top of shank with multiple crisis-cross wraps then wraps around under side of balls but on top of shank. Repeat several times. Apply glue. Position thread mid shank.
4. Position marabou on top of shank, tips extending hook length to rear of shank. Tie in place up to bead chain then back to rear of shank. Cut butts behind bead chain.
5. Holding tip of hackle, stroke bars so they stand out at right angles to stem. Tie in tip.
6. Pull fibers off 1/4 inch of end of chenille. Tie in exposed strings.
7. Position thread behind eyes. Wrap chenille forward in touching wraps. Tie off, cut excess. Palmer hackle forward in 6 wraps. Tie off, cut excess.
8. Wrap thread head in front of eyes. Whip finish. Cut thread. Apply glue.
Posted on April 26th, 2020
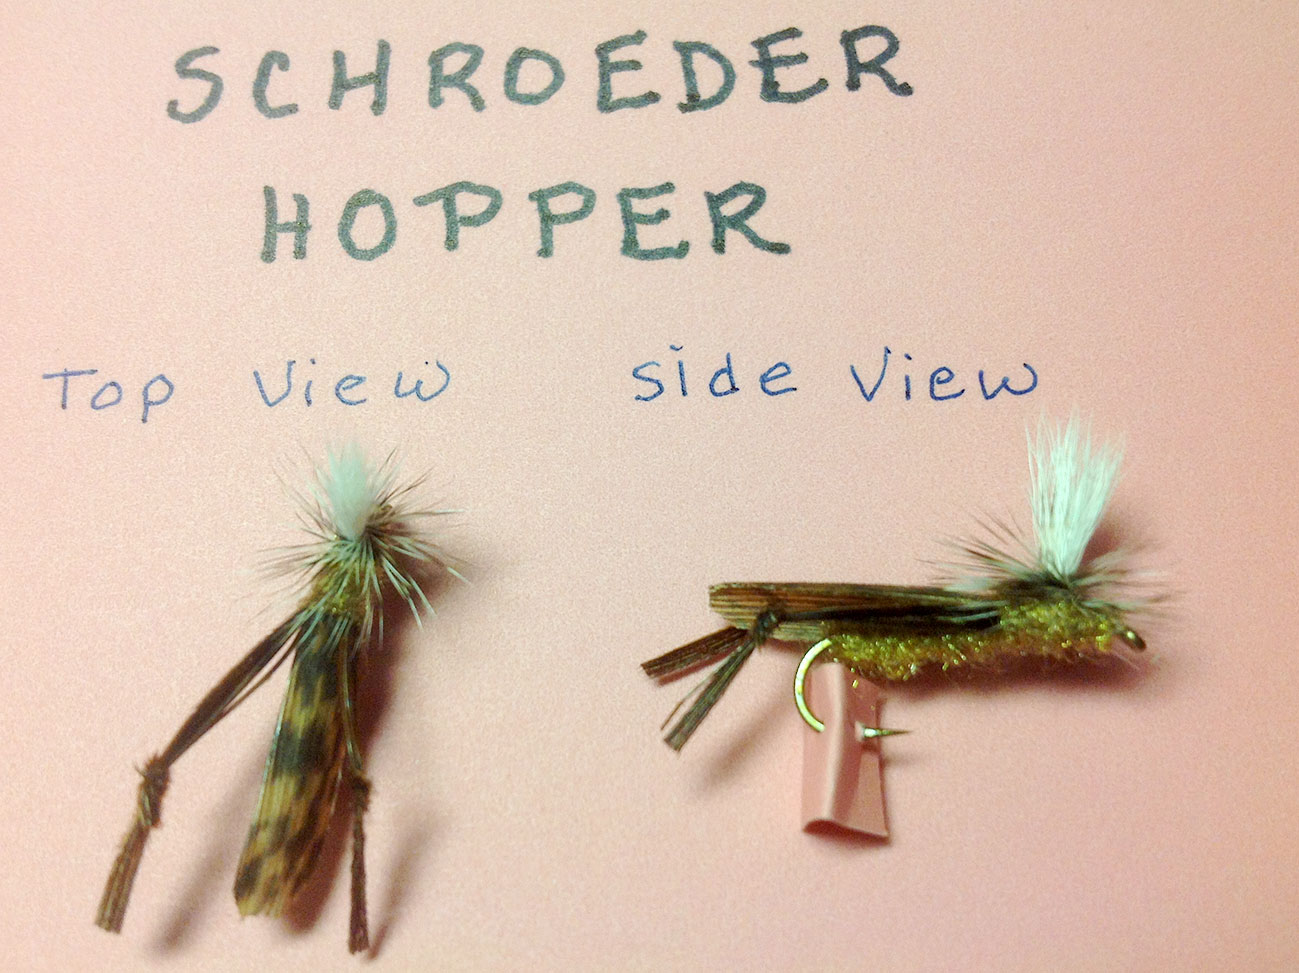
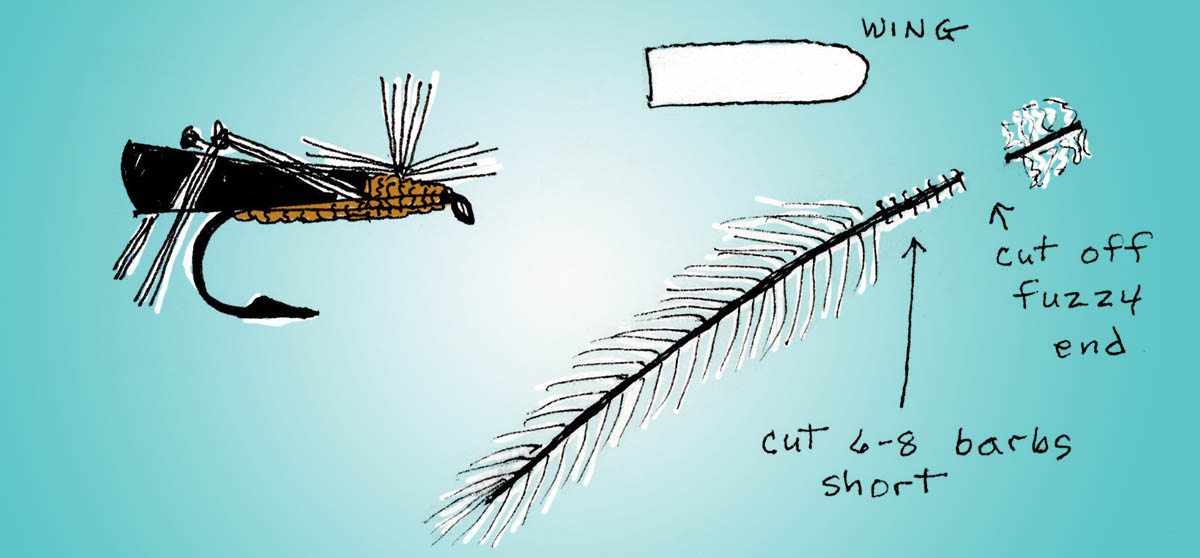
This grasshopper pattern has been around for many years and the trout sure like it. Most hopper patterns today feature foam bodies and rubber legs, which are easier to tie and are more durable. There are times when the foam flies don’t work and the fish gobble the Schroeder imitation up. Since hoppers come in a variety of colors, the fly can be tied with wings in tan or cream. The body in tan, cream, yellow, brown, green or orange.
1. Coat or spray wing feather. Allow to dry.
2. Crimp barb.
3. Attach thread behind eye. Wrap to 1/3 back on shank.
4. Cut small clump calf hair from hide. Remove underfur. Stack tips. Position on top of shank, tips 1/2 shank length forward. Make several wraps to secure. Cut excess buts at an angle. Wrap down butts. Hold post upright, making many thread wraps in front of it to hold position. To secure, make several wraps around base, then pull thread to rear and make several wraps around shank. Repeat a couple times.
5. Wrap thread to rear of shank. Dub generous tapered body forward to 1/8 in. Behind post.
6. Separate barbs on quill wing making section equal to hook gap. Cut from stem.cut butt end straight across. Round the other end. Length equal to hook length. Place butt against post. Tie in place.
7. I like to prepare many ahead. Cut 4 barbs from stem and tie knot in center for each leg. This is tricky to do. Look on U-tube for various techniques, or buy them already prepared. Coat to reinforce. Tie in one on each side of wing. Knee should be near bend of hook. Trim length (see sample). Dub more over wing and leg tie in section.
8. Prepare butt end of hackle with crew cut. Tie in crew cut in front of post. Holding upright, make a couple thread wraps to hold in place. Dub generous thorax from eye to post. Wrap thread clockwise around post leaving it hanging on your side of fly. Wrap hackle clockwise around base of post 3 times. Holding hackle toward you and slightly down, bring thread up infront of hackle stem, then around base of post 3 times, then forward to eye. Tie off, cut excess. Cut excess hackle. Apply sm. Amt. glue to final thread wraps and base of post.
Posted on March 25th, 2020
It’s never too early to get ready for summer with a few hoppers. This old pattern continues to be very effective and has an entirely different profile than foam patterns.
Hook: TMC 5262 or 5612, sizes 6 – 12
Thread: Tan 8/0
Post: White calf body
Body: Golden brown Antron dubbing
Wing: Mottled turkey quill feather
Legs: Ringneck Pheasant tail feather
Hackle: Grizzly, barbs 1 1/2 – 2 times hook gap
Thorax: Same as body
Posted on March 22nd, 2020
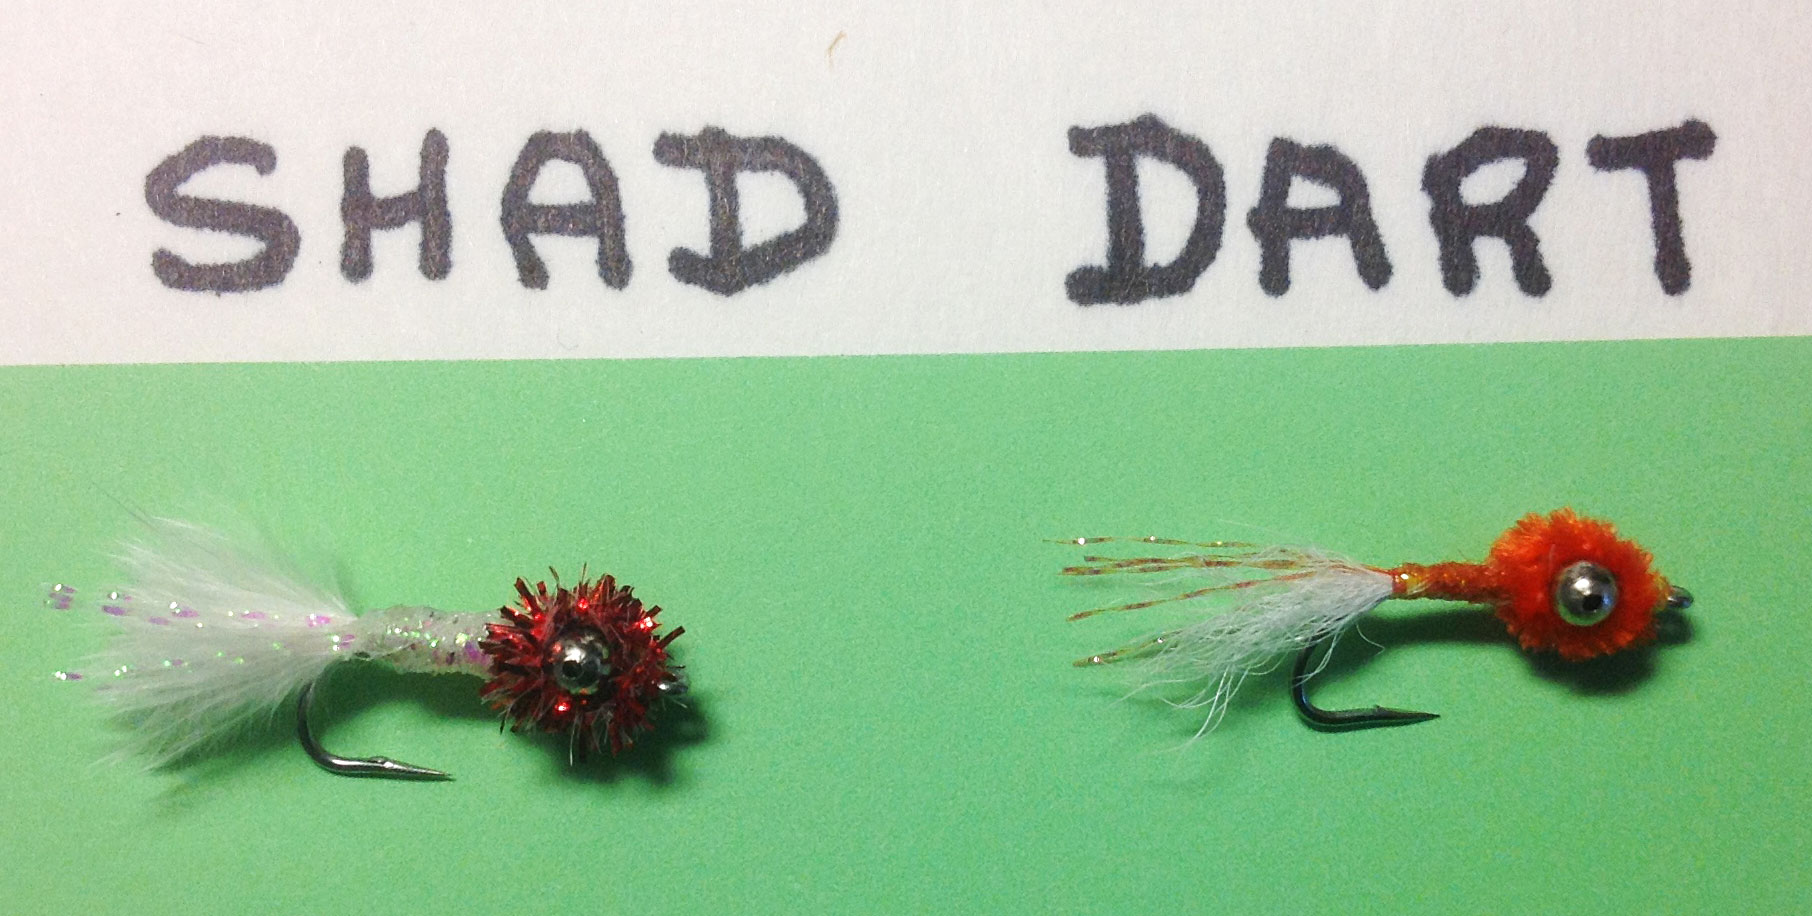
This, easy to tie, fly pattern has many material and color variations. Try using it for shad in rivers or perch in the surf. Shad fishing is right around the corner. And of course perch can be targeted usually in spring, summer and fall. Our surf fishouts will begin soon and may be an acceptable CDC outing due to the ability to practice social distancing of 6 feet or more.
Posted on March 17th, 2020