Posted on November 29th, 2023
Tying instructions and materials needed to tie a specific fly. Often the fly that is going to be tied in the upcoming month’s fly tying class.
Posted on November 29th, 2023
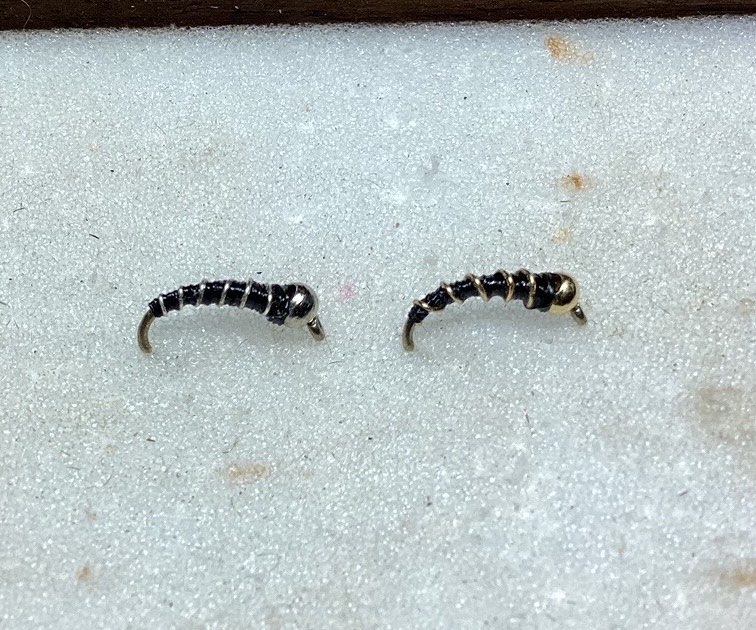
Midges are the most abundant food for trout. During the winter, it is their main source of food. They come in a great variety of sizes and colors. This pattern simulate the midge pupa stage, therefore is fish subsurface. The bead usually represents the air bubble that brings them to the surface to hatch out. These two particular patterns are very commonly used and are very effective. Their size has nothing to do with the size fish they catch.
HOOK: TMC 2457 or similar scud hook Sizes 16-22
Crimp barb.
BEAD: silver for zebra midge, gold for tiger midge. Use size chart online for comparison of hook size to bed size.
Feed bead onto hook, small opening first.
THREAD: black 6/0, 8/0 or 12/0 depending on size of hook.
Attach behind bead. Touching wraps to part way around bend of hook (see picture). Wrap back to bead.
RIB: silver for zebra midge, gold for tiger midge. Size medium, small, or fine, depending on size of hook.
Place on near side of hook shank, wrap in place back to rear thread wraps. make two thread wraps behind rib.
BODY: thread as above
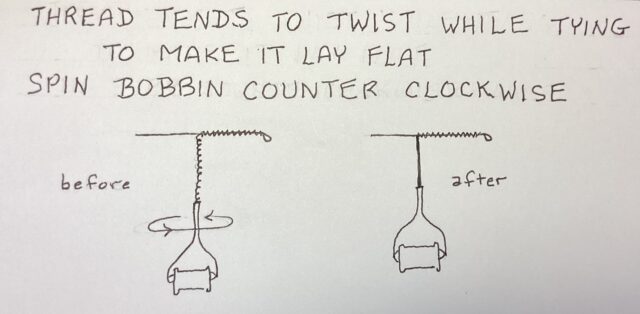
At this point in going forward, spin bobbin counter clockwise to make thread lie flat. Wrap forward, beginning in front of wire up to bead with touching wraps. Wrap thread backward 3/4 of shank then forward to bead again. Then halfway back, then 1/4 back leaving thread, hanging behind bead.
RIB (continued) spiral wrap forward in about five wraps, each getting slightly further apart than the last. Tie off with several wraps behind wire and several in front of wire then one behind wire and one in front of wire. Twist wire in awinterhelicopter type motion to cut. Never use good scissors.
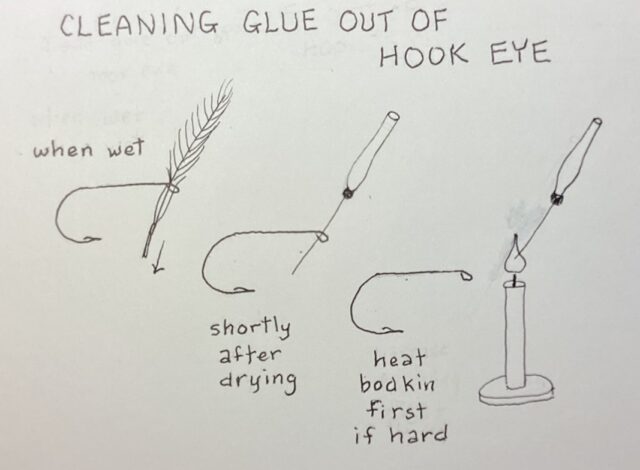
FINISH: make multiple thread wraps behind bead and covering tied off wire rib. Whip finish. Cut thread. Apply glue. Coat body with UV resin, or glue, or sally Hansen hard as nails.
Posted on October 26th, 2023
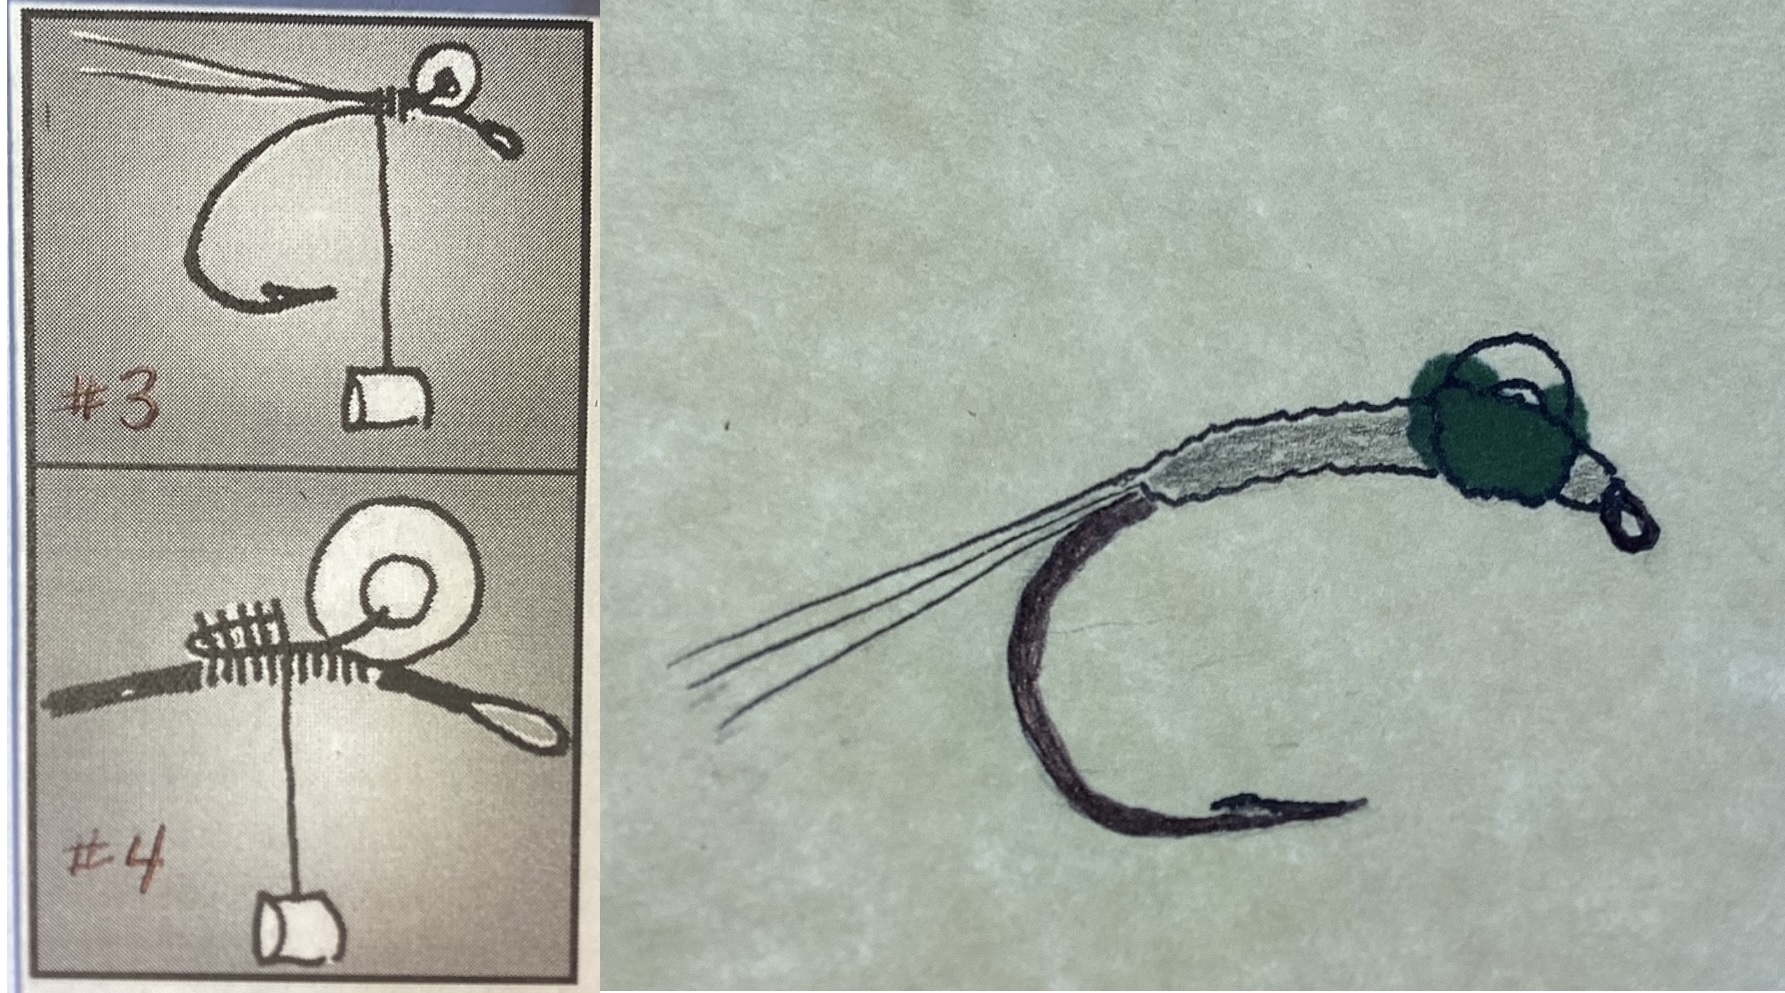
This fly imitates a midge sending to the surface. The air bubble (bead) is making the ascension possible. Midges hatch throughout the year and most still waters and moving waters. It’s best finished using an indicator. Take this fly, and the October caddis that will be taught at the flytying class to the upper Sacramento and McLeod rivers in late October to mid November.
Hook: Size 16-24 (TMC, TFS 2487).
Thread: black 8/0
Bubble: One petite or extra small, clear glass bead plus 5X tippet.
Tail: dark rust, stiff bird, hackle
Thorax: Dark olive, super find dubbing.
Head: Black thread
1. Crimp barb. NOTE: end of shank is above barb
2. Attach thread 2/5 back on shank with about six wraps. Leave bobbin hanging at rear of wraps.
3. Slip bead onto tippet and position in the center. Fold backward and hold strands together. Place on hook shank, bead forward of eye, tippet to rear, make several thread wraps. Pull on tippet to move bed into position. Makes several snug thread wraps 1/8 inch to rear.
4. Bend tippet toward eye and snuggly tie down up to behind bead. Cut excess.
5. Cut about 12 barbs off stem of hackle keeping tips aligned. Lay on top of shank, tips extending about two hook lengths to rear of shank. Secure to shank behind bed with wraps to mid shank. Pull on barb butts positioning tips so they are hook shank length beyond shank. Attached to shank with touching wraps back to slightly beyond end of hook shank. Cut excess hackle butts behind bed.
6. Wrap thread forward, forming slender tapered body up to bead.
7. Wrap a small thorax, two wraps behind bead, one in front, two around base of bead.
8. Wrap a small thread head, whip finish, cut thread.
Posted on September 5th, 2023
This dry fly is an absolute must for the upcoming fishout to Mammoth Lakes. Be sure to use this in the high Sierra streams, Hot Creek,, and the upper Owens. don’t hesitate to use this fly throughout the west and the north east as well. The fish in the Rockies particularly like the larger flies. This thorax fly tying style was developed around 75 years ago by Vince Marinaro for the limestone streams of the Northeast.
HOOK: TMC 10o (standard dry fly) size is 12–18. The small flies work well in spring creeks and tail waters.
Crimp Barb.
THREAD: Olive 8/0.
Attach thread, mid shank, and leave hanging 1/3 back from eye.
WING: light, gray, turkey flat.
Select a bunch of turkey, flat, barbs, lining up tips and cutting from stem. Measure turkey flat barbs equal in length to hook shank and tie and on top of shank with Tips extending beyond eye. Cut bar butts off at an angle. Stand wing upright, making several wraps as a dam to hold barbs vertical. Return thread to cut Barb butts.
TAIL: light dun hackle fibers. (Side feather from chicken neck that has stiffer barbs).
Select 10–12 hackle barbs, line up tips, tie in so tips are one hook shank length beyond the end of the shank. Last wrap under tail to keep from bending downward. Cut, butts even with cut wing butts.
BODY: Olive, superfine dubbing. ( the natural insect varies in color from olive, to pale olive gray, to yellow olive green, to rusty olive).
Dub a slender body up to mid shank.
HACKLE: light dun neck, or saddle
Select hackle with barbs 1 1/2 hook gap long. Remove any fuzz at butt end, stroke barbs against grain at butt end. Cut several barbs short off each side of butt end. Lay that section on side of shank, tip to rear and tie in place. dub remainder of hook to one eye length behind eye. Spiral hackle forward in three turns behind wing and three turns in front of wing. Tie off cut access. Wrap, a small thread head, whip finish, cut thread, and seal with his cement, if desired.
Posted on April 29th, 2023
This dry fly pattern has been around for decades. It is an effective attractor, easy to tie, easy to see.
1. HOOK: TMC 100 (or any standard dry fly hook). Size 10-18
Crimp barb.
2. THREAD: Black 6/0, or 8/0 depending on size of hook.
Attach thread, 3/4 back on shank.
3. TAG: small or find flat gold tinsel.
Tie in back to above barb with silver side facing you. Hand wrap tinsel around 1/3 of curve of hook and back to starting point.
NOTE: that will expose gold side of tinsel. Tie off cut access.
4. REAR HACKLE: brown or grizzly Barbs equal to 1 1/4 to 1 1/2 times hook gap. Remove any fuzz at base of stem. Cut 4 to 5 barbs short on each side of stem (crew cut). Tie crew cut in with feather tip to the rear and light side of feather facing you. Advance thread 1/4 back on shank. Wrap feather forward to thread with close wraps and tie off. Cut excess.
5. BODY: peacock herl.
Using 2 to 4 strands, break off fragile tips. Tie in tips. Reinforce hurl with thread loop and dubbing tool. Advance thread to 1/4 back on shank. Twist thread loop forming a chenille. Wrap chenille forward forming a generous body. Tie off cut access.
6. FORWARD HACKLE: white or cream grizzly Barbs equal two 1 1/2 to 2 times hook gap.
Prepare feather the same as above. Move thread to one by length behind eye. Wrap feather forward with close wraps. Tie off, cut excess. Wrap small thread head. Tie off, cut thread. Apply superglue, if using a large hook.
Posted on April 21st, 2023
This is one of my “go to flies”. A caddis hatch does not need to be occurring for trout to gobble it up. The larger size works well in the Rocky Mountains, smaller in the Sierras. Fish with a floating line, and drag free drift in moving water.
HOOK: TMC 2487, sizes 14–16.
Crip barb.
THREAD: olive or dun olive. size 8/0 for 14 hooks, 10 or 12/0 for size 16
Attach 2 eye lengths behind eye.
Touching wraps to above barb.
BODY: Olive: vernille, ultra chenille, or velvet chenille in size small or fine. Super glue or the like.
Using a candle, carefully melt end of strand by placing it near the base of flam to round the end. It takes very little exposure to the
heat.
Apply super glue using bodkin to thread wraps.
Place on top of shank, melted end above rear of hook.
One wrap to secure.
Spiral wraps to mid shank.
Cut excess.
Tie down stub.
UNDER-WING: dun spooled Antron
Position thread in front of body.
Cut to even fibers.
Lay on top of body with tip slightly beyond end of body.
Tie in place.
Cut excess.
Tie down butt ends up to eye.
Splay fibers.
HACKLE: medium dun
Select feather with barbs equal to hook gap.
Prep butt end: cut off fuzz, stroke barbs against grain, cut 5 to 6 barbs short on each side of stem “crewcut”.
Position:
Tip to rear.
Dark side facing you
Butt end behind eye.
Tie in place back to body.
WING: light deer hair with fine fibers
Cut fibers from hide so that bundle is width of a matchstick or slightly less.
Clean out underfur stack tips.
Position on top of shank, tips extend into ends of underwing.
Tie in place, first thread wrap around hair only, then several snugly around fibers and shank., to splay fibers.
Touching wraps up to eye.
Stroke butt hairs into bundle over eye at 45° angle upward.
Make two wraps around base of bundle.
HACKLE (cont.).
Make 3 to 5 Hackle wraps forward.
Tie off, cut access.
Half-hitch behind eye and under hair fibers.
Cut thread.
Cut head on an angle. “See photo”.
Apply glue to final thread wraps, using bodkin.
Cut short, any stray fibers.
Posted on March 19th, 2023
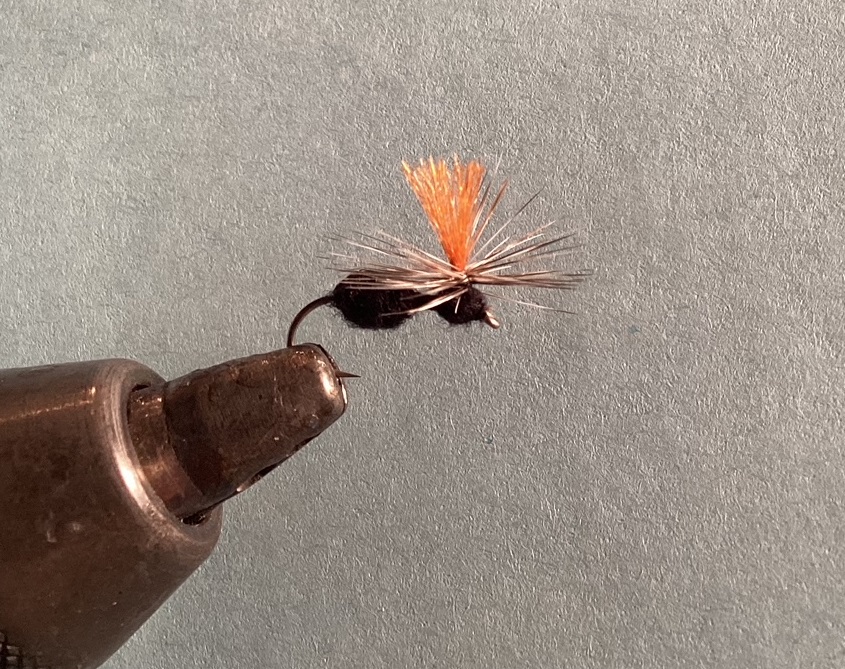
There are many ant patterns, most of which are hard to see on the surface of the water. Posting them makes them far easier to see, particularly if post is orange in color. Ant patterns are most effective mid summer on, and are more available to fish on windy days. Add floatant and fish with a drag free presentation. Good in still water as well.
HOOK: TMC 100 – sizes 12 to 16.
Crimp barb.
THREAD: black 8/0.
Attach mid shank. Make a few wraps toward the rear.
BACK: Orange spooled Antron.
Using about a 2 inch strand, attach to top of shank back to above barb.
REAR BODY: Black, superfine dubbing — black Sharpie marking pen.
Dub bulbous rear body up to mid shank. Pull Antron forward and tie down.
MID BODY: Antron, and black thread.
With touching wraps, attach Antron to top of shank up to 1/4 back on shank. If tying size 14 or 16 hooks, additional touching thread
wraps back to rear body, then forward again. Using Sharpie pen, darken Antron over rear body.
POST: continuation of orange Antron.
Holding Antron upright, wrap, touching thread wraps around Antron in 5 to 6 wraps up, then down in 5 to 6 to shank. Make a
couple of wraps in front of post to hold it upright. Trim Antron equal to hook length.
HACKLE: grizzly equal to one and a half to 2 times hook gap.
Prepare hackle by cutting off fuzzy end, then cut about six barbs short on each side at bottom of stem. Place shiny side against shank, tip to rear, and cut barbs at base of post. Tie in place in front and behind post. Hold hackle upright, post upward with 4 to 5 wraps then back down again.
FORE-BODY: Black, super fine dubbing.
Dub a small fore-body from eye back to the middle of the mid body.
HACKLE continued.
Reposition thread by wrapping around base of post. Start behind post and let thread hang in front of post on your side. Using
hackle pliers, wrap hackle around base of post about 3-4 times and leave hanging down from shank on your side. Bring the thread up in-front of hackle, parallel to table, and wrap around post through hackle 3 to 4 times. Half hitch 3 to 4 times behind eye. Cut thread. Cut excess hackle. Cut Antron so it is hook shank length above shank. Push up on hackle barbs from beneath to be sure they are parallel to the table. Cut any that hang below.
Posted on March 9th, 2023
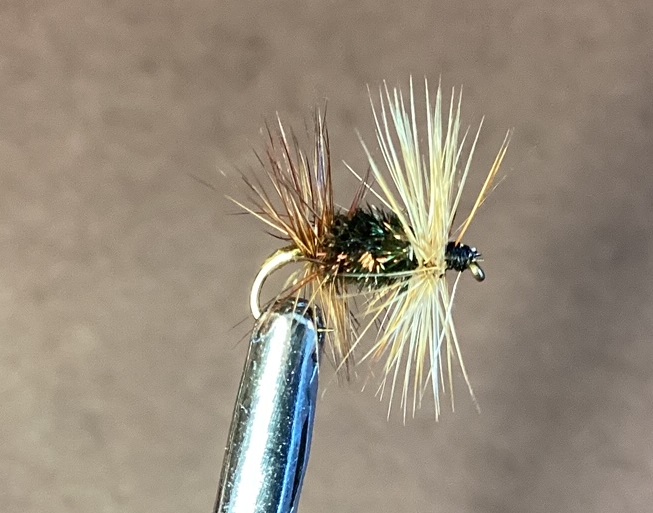
This caddis is imitation represents the insect emerging from the water to become an adult. Its body hangs below the water surface, the thorax and lower hackle barbs in the surface film and the wing upright out of the water. Apply saliva to the body, floatant to remainder of the fly. I have modified this pattern to make it easier to tie smaller sizes, and not quite so complicated. If you wish to see the original version, check on YouTube.
HOOK: TMC 2487 or 200 R ,(original Partridge GRS 15 ST, which is hard to find ). Sizes 8-18. Crimp barb.
THREAD: 8/0 color to match body (grey, tan, or black).
Attached thread one eye length behind eye. Spiral wrap to rear of hook and partway around bend. Spiral wrap back up to two eye
lengths behind eye. Reposition hook in vice with tip upright.
WING (POST ): White, yellow, or orange spooled Antron
Stack two 1 inch long pieces of Antron. Position center on top of shank. Made two thread wraps. Hold all fibers upright. Make several wraps
around base,working up about 1/8 inch. then back to shank. This is called “posting “. Cut wing equal to hook gap.
HACKLE: dun, brown or chestnut , or black (depending on thread color )
Select hackle with barbs equal to 1 1/2 to 2 hook gaps. Prepare but end by cutting off fuzz , cut 6 to 8 barbs short on both sides of stem. This
is called a “crew cut”. Tie crew cut in at base of wing and post up about 1/8 inch. Dull side should face wing.
BODY: Gray, tan or brown, or black Super fine dubbing.
Dub a thin layer back to rear thread wraps. Then a thin tapered body up to wing.
THORAX: peacock hurl.
Select one or two strands depending on size of hook. Break off fragile tips. Tied in tips add base of wing. Make chenille out of hurl .
Position thread in front of post. Wrap chenille around base of post to make a thorax. Tie off, cut access.
HACKLE ( cont.).
Re-position thread in clockwise direction around base of wing and leave hanging on your side of hook. Wrap hackle around wing 3 to 4 times,
each wrap closer to thorax. Hold hackle tip down on your side, bring thread up parallel to table at shank level, make three clockwise
thread wraps around wing between barbs and thorax. Advance thread to eye. Wrap small head with half hitches. Tie off with half hitches,
cut thread, cut excess hackle feather. Trim any barbs that hang below shank.
Posted on February 24th, 2023
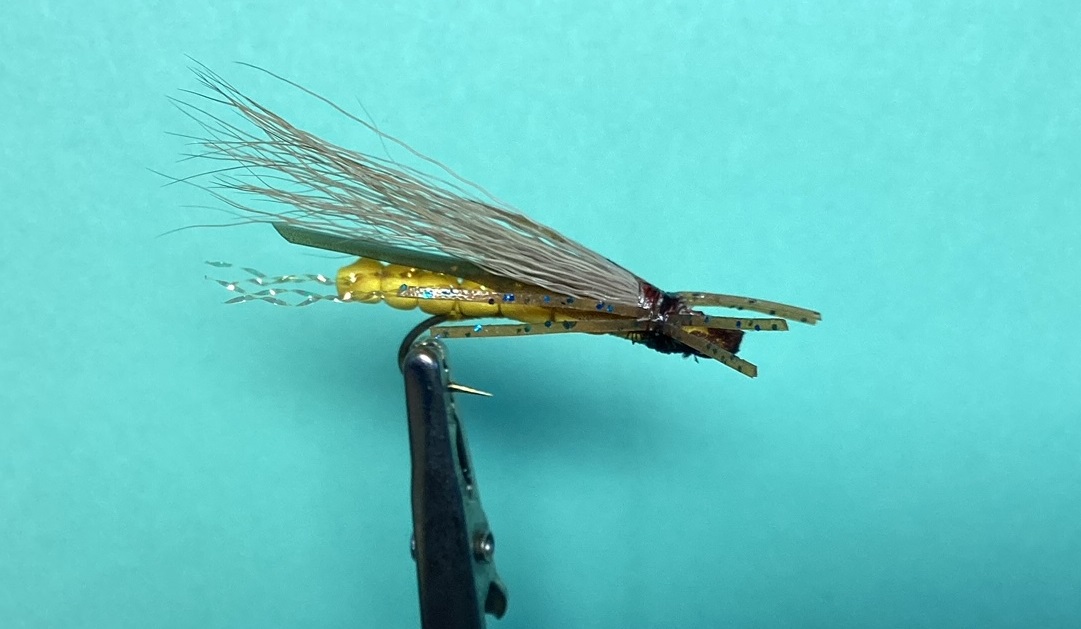
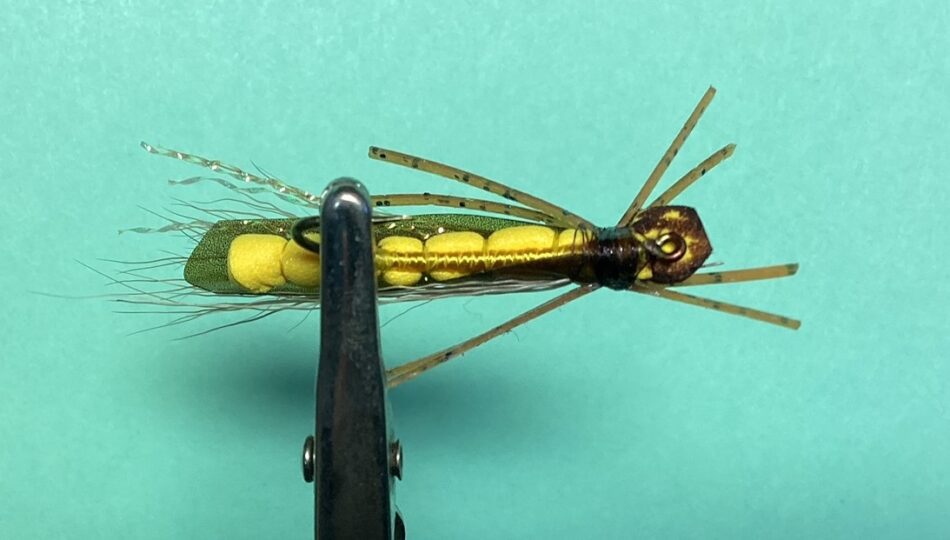
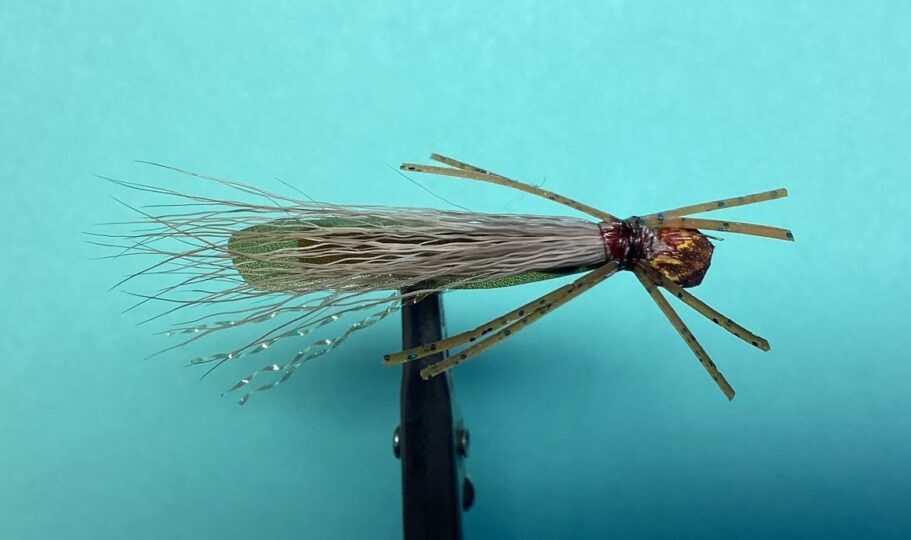
Stoneflies emerge from rivers or streams by crawling across the bottom and out onto structure. Then break out of their nymphal shuck into an adult and fly around to find a mate. They usually emerge at lower elevations first starting in late June or early July, then at higher elevations slightly later. They are awkward flyers and often end up in the water providing a large amount of protein for trout.
1. HOOK: TMC 200R , yellow floss
Crimp barb.
Attach floss behind eye, touching wraps to rear of shank, then forward to near hook eye, tie off behind eye. Apply small amount glue to tie off.
2. BODY: yellow 8/0 thread, 2 mm thick yellow foam, hat pin
Cut foam strip 1/4 inch wide. Round end.
Place hat pin in vise point forward.
Attach thread in center of hat pin.
Place foam on top with rounded end 1/8 inch beyond hanging thread.
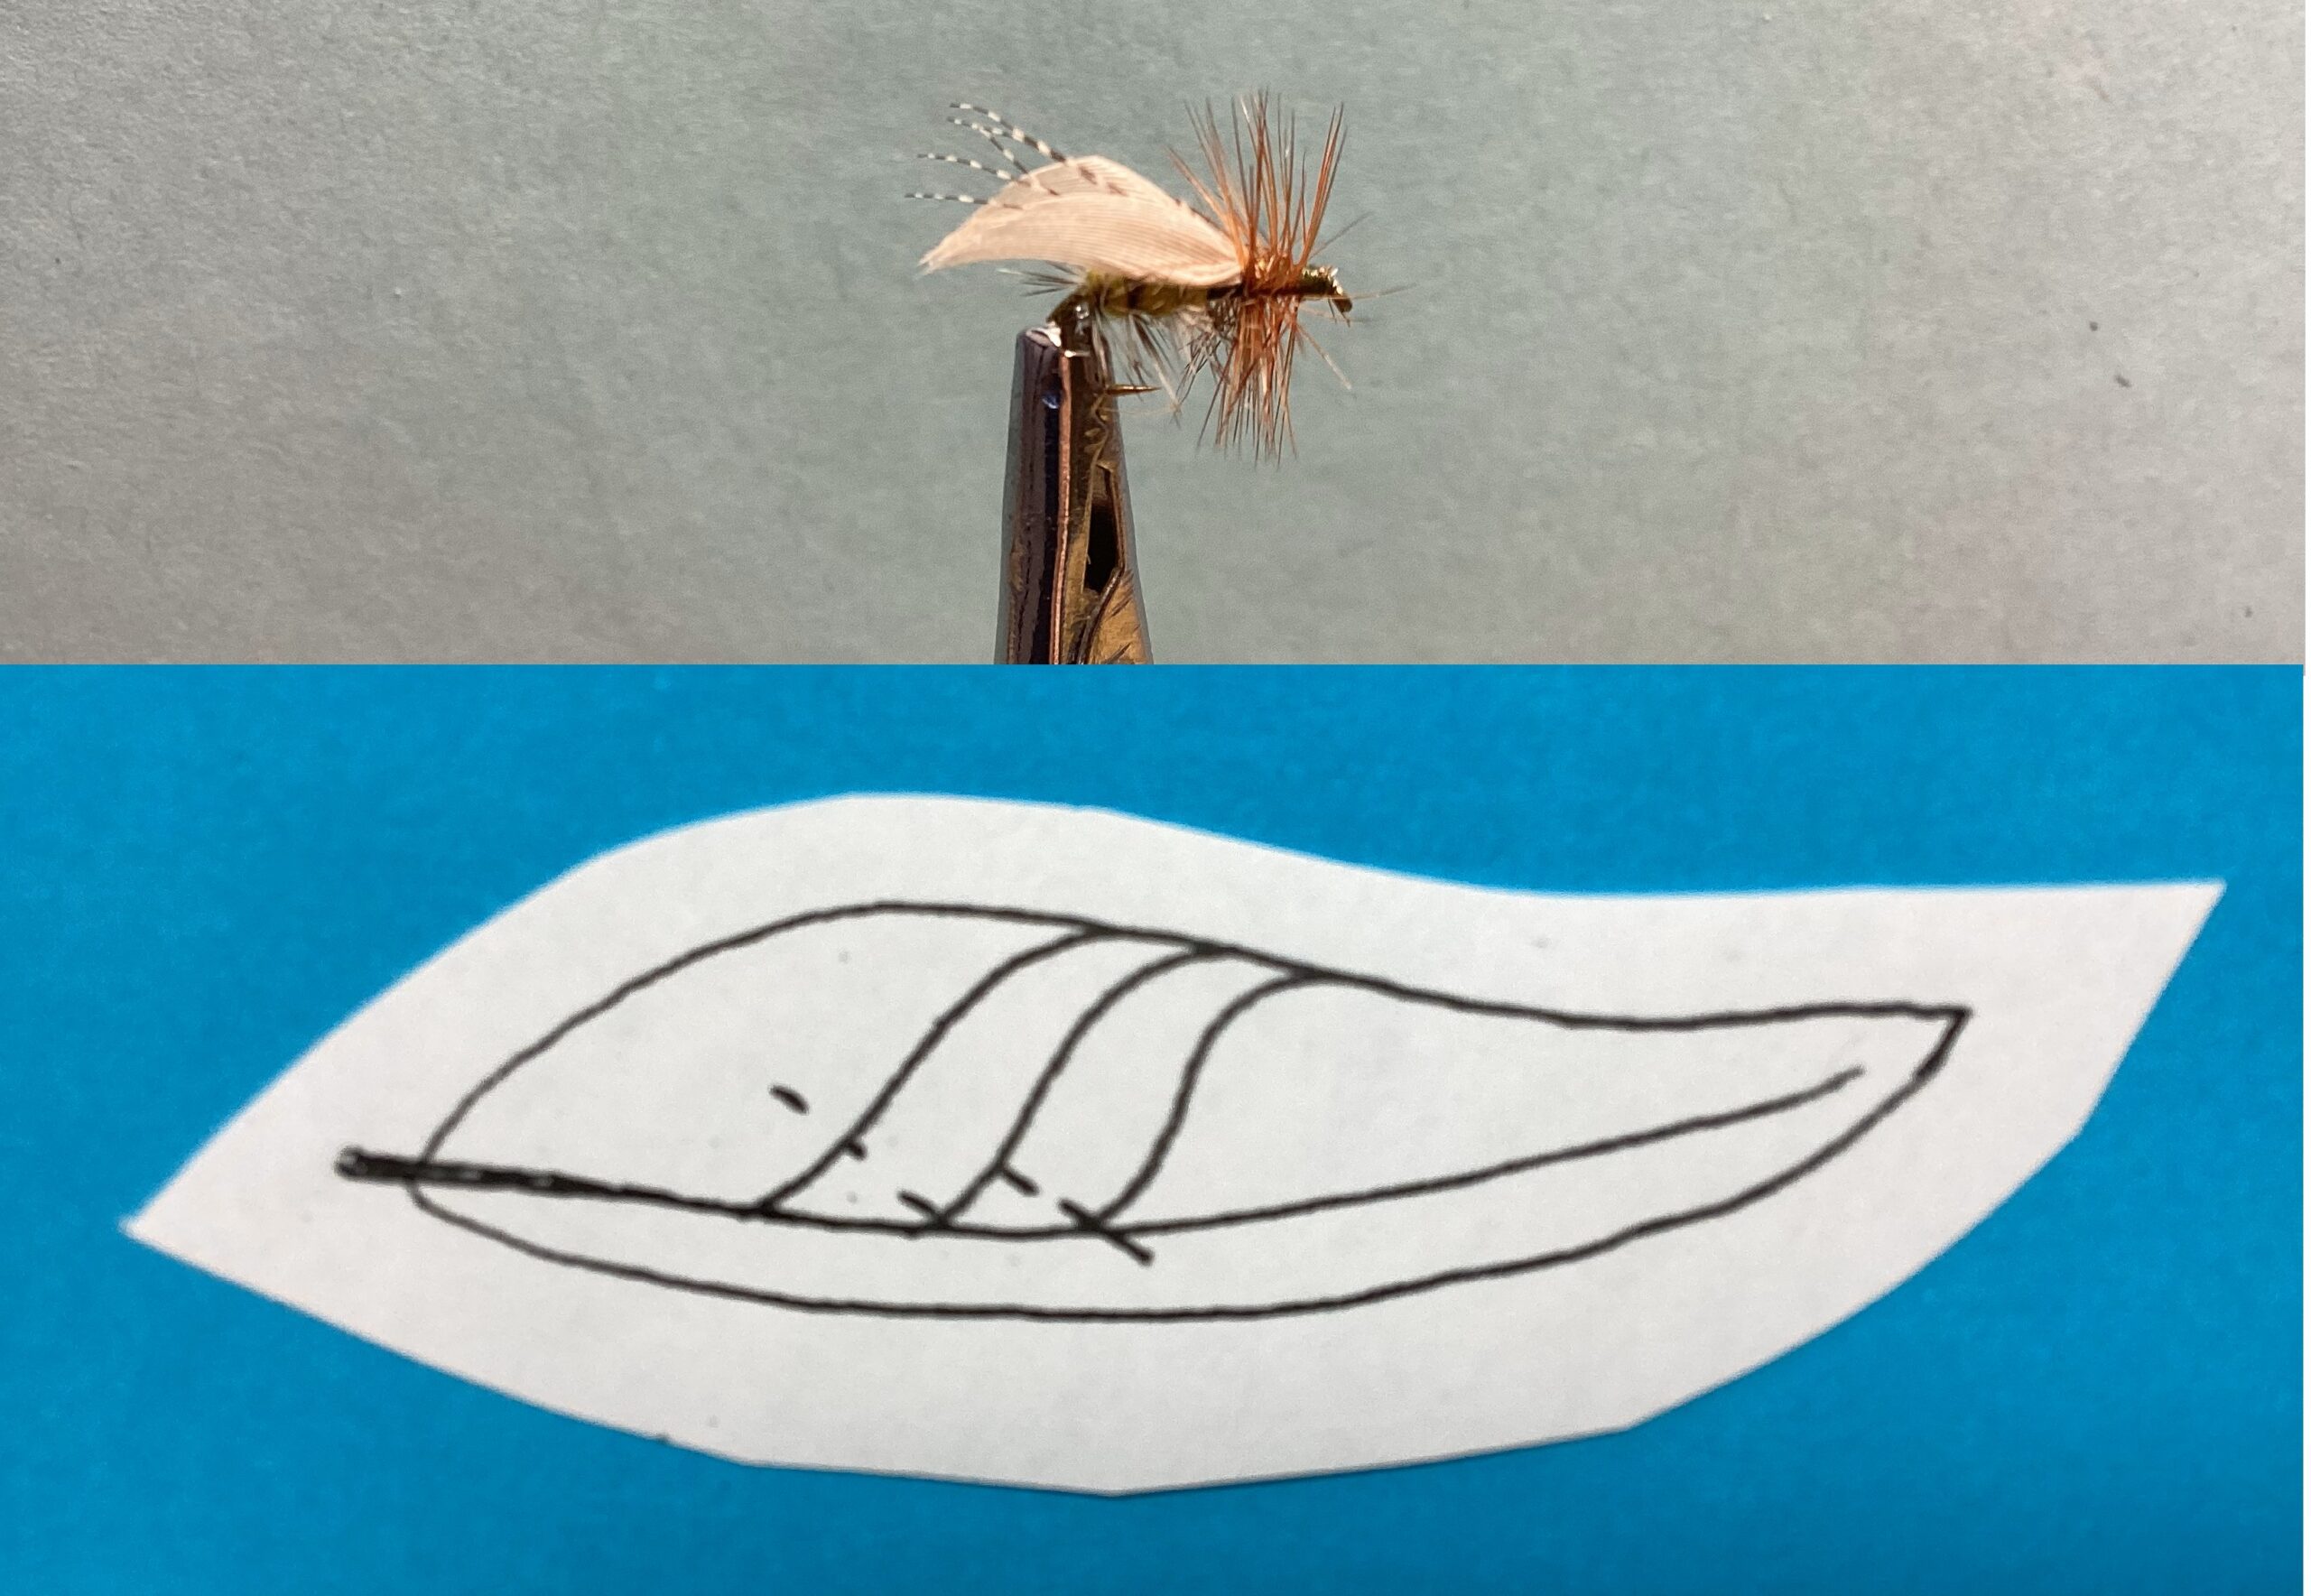
While squeezing foam around hat pin make several snug thread wraps. Lift foam, make one thread wrap forward 1/8 inch, squeeze foam down again around hat pin and repeat process forward until there are 7 segments. Whip finish around foam and hook.Cut thread. Pull foam off hat pin. Form rounded head with remaining foam( see diagram ).
Attached thread to rear of shank.
Put foam body on top of shank with three sections extending to the rear and cut edges on top. Tie in place. Lift body. Advance. Lift body. Advance thread forward to next segment, tie in place. Then repeat process up to head.
Tie off under head.
Cut thread.
3. THREAD: Brown 8/0.
Attached behind head.
4. FLASH: yellow Krystal Flash
Using one strand, cut in half, tie center on top of body with 2 wraps.
Fold to rear, tie down back to center of last segment. Cut 1/4 inch beyond body.
5. WING: olive/brown, cream, clear, or yellow Thin Skin.
Advanced thread to just behind head.
Cut strip 1/4” wide and 2 inches long. Round one end.
Place on top of body rounded and 1/8 inch beyond rear body.
Tie in place back to middle of segment. Cut excess. Tie down stub.
6. OVER WING: Elk hairs from abdomen which have fine shafts
Clean out under hair stack tips.
Position on top of body, tips extending to end of crystal flesh.
Tie in place, first wrap of thread around only hair,then around both hair and body. Several wraps backward to center of segment.
Cut but ends short. Return bed thread to behind head.
7. LEGS: Crazy Legs- Golden brown,clear, or cream, with speckles or not
Using one strand, cut in half, then in half again.
Tie center of two segments on far side, then two segments on your side.
Tie off under head. Cut thread.
8. FINISHING TOUCHES:
Using brown Sharpie marking pen color head.
Apply glue to neck area top and bottom.
Posted on February 24th, 2023
This adult Caddis pattern is designed for moving water but also works in stillwater for trout. Apply floatant and allow a drag free drift.
HOOK: TMC 100 size 12-20.
Crimp barb.
THREAD: Olive 8/0.
Apply 1/3 back on shank. Wrap to rear of shank.
RIB: grizzly Hackle, barbs equal to hook gap.
Cut off fuzzy end. Stroke barbs so that they stand out sideways. Cut 5 to 6 short on each side of the stem forming a “crew cut”.
Tie in “crew cut “ to rear of shank with dull side toward you and tip to the rear.
BODY: light olive super fine dubbing
Dub a cigar shaped body 2/3 forward on shank. Palmer grizzly forward in about four wraps. Tie off, cut excess. Cut off tops of
barbs at an angle leaving shorter stubs at head end.
UNDERWING: Lemon wood duck or mallard flank feather (well barred)
Even up tips of barbs and cut out 6–8. Tie in on top of shank, in front of body, with tips extending hook gap length beyond body.
Cut butt ends, tie down.
OVERWING: mallard wing quill. Light or medium gray. Seagull feathers also work. Some caddis are tan with modeled wings. So a variety of birds can work. Do not use primary feathers. Select a soft feather with narrow barbs. Look for sections of feather that will form a nice taper (not to pointed or blunt) when one section is removed. See picture.
Prepare quill by spraying with clear, fast drying lacquer and allow to dry. Most authorities will recommend using two feathers, one from each side of the bird to have mirror image curves. If using flat quills, that isn’t necessary. Using a bodkin, separate two segments that are about hook gap wide at the stem end. Cut near stem. If tips are too pointed, trim to shape. Place one segment on each side with bottom edge of wing at shank level. Tips extending almost to end of underwing, and tips down. Use pinch method twice to tie in place
in front of body. Cut but ends, tie down. NOTE: The quail barbs will separate as you fish the fly. This will only make it more attractive to the fish.
HACKLE: Brown, barbs one and a half hook gap.
Prepare the same as grizzly hackle. Tie “crew cut” to top of shank in front of wing with shiny side toward you and tip to the rear.
Wrap hackle forward, forcing thread as you go, with about 4 touching wraps up to one eye length behind eye.Tie off, cut excess.
Apply a small amount of glue to head.
Posted on February 24th, 2023
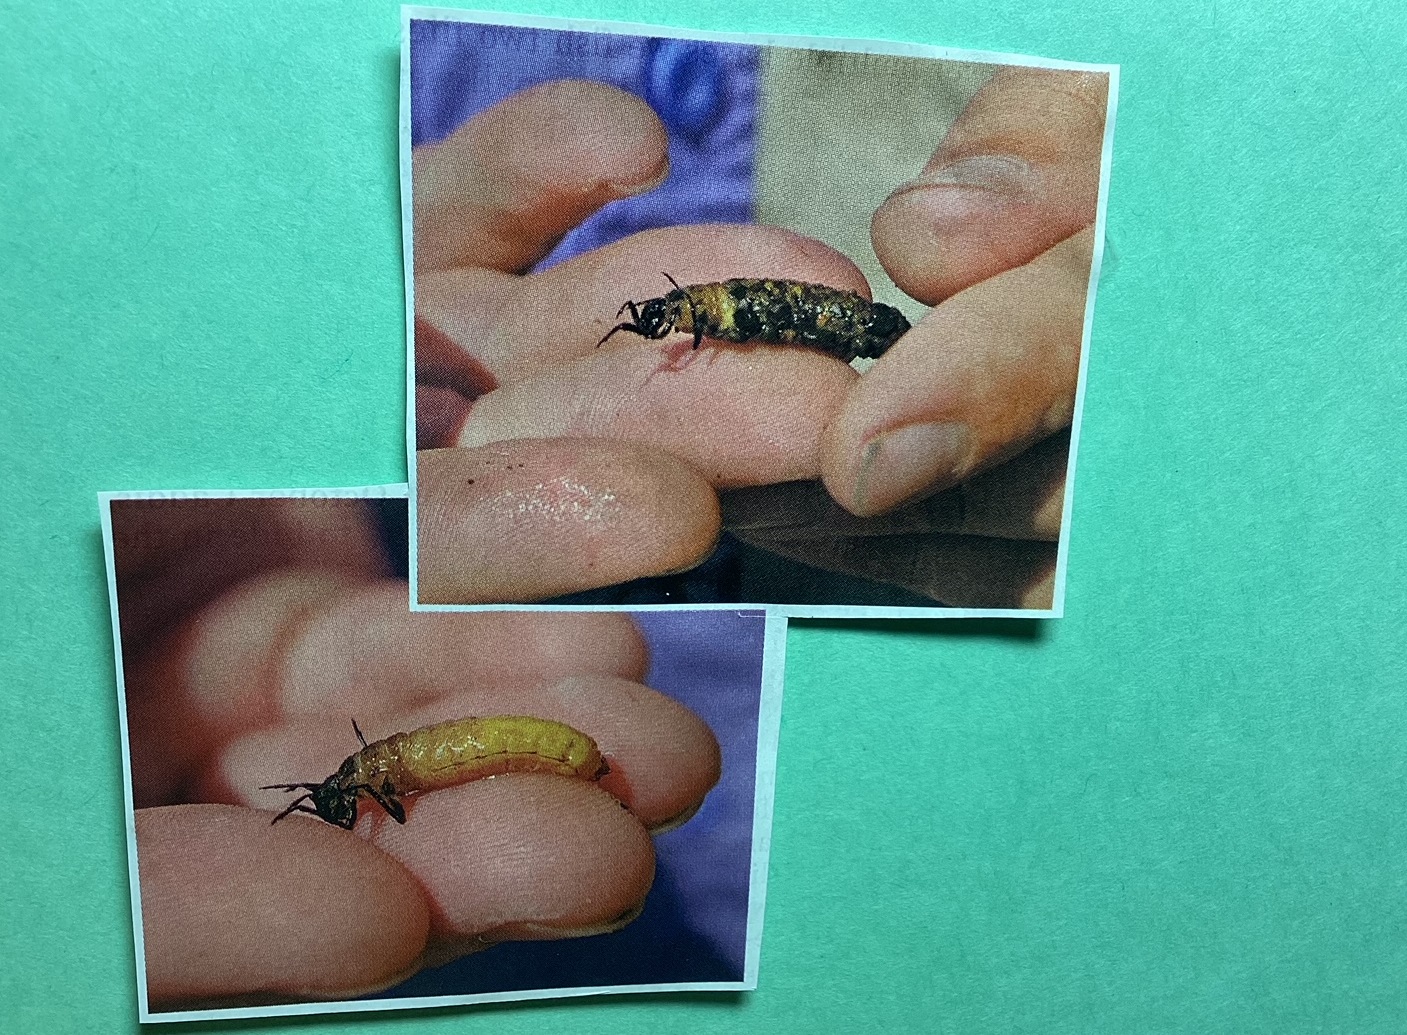
Caddis larva are available to trout year-round. They protect themselves in an interesting way. They surround their bodies with pebbles or twigs and move around with their heads and legs sticking out the front of this tube. This pattern simulates the larva out of its protective casing which occurs when they have outgrown their last one or they are ready to ascend to the surface as a pupa. Some caddis larva are free floating without a case. The PVC in the name of this pattern originated on the lower Owens River when former club member, Walt Robinson, speared one while fishing. We sat down and devise this fly then went out and successfully fished it all week. The type of thread used for the body is very important. Because of its thickness and shinny properties.
HOOK: TMC 200,2312, or 100 sizes 14–18. Crimp barb
THREAD: kevlar, in natural (light cream)or olive color.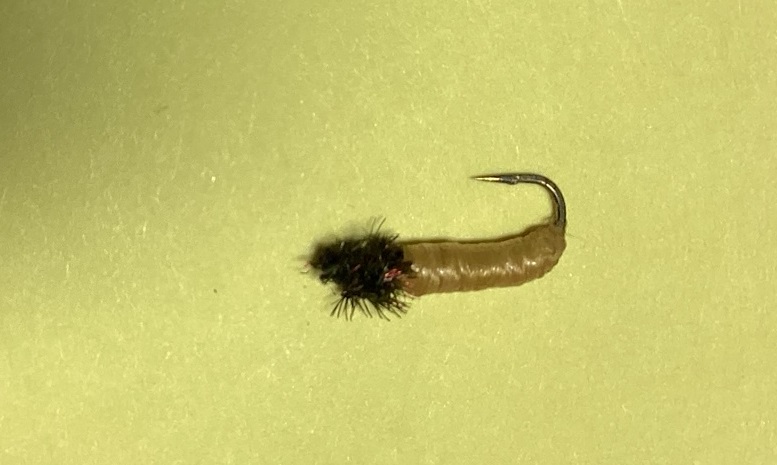
Posted on December 31st, 2022
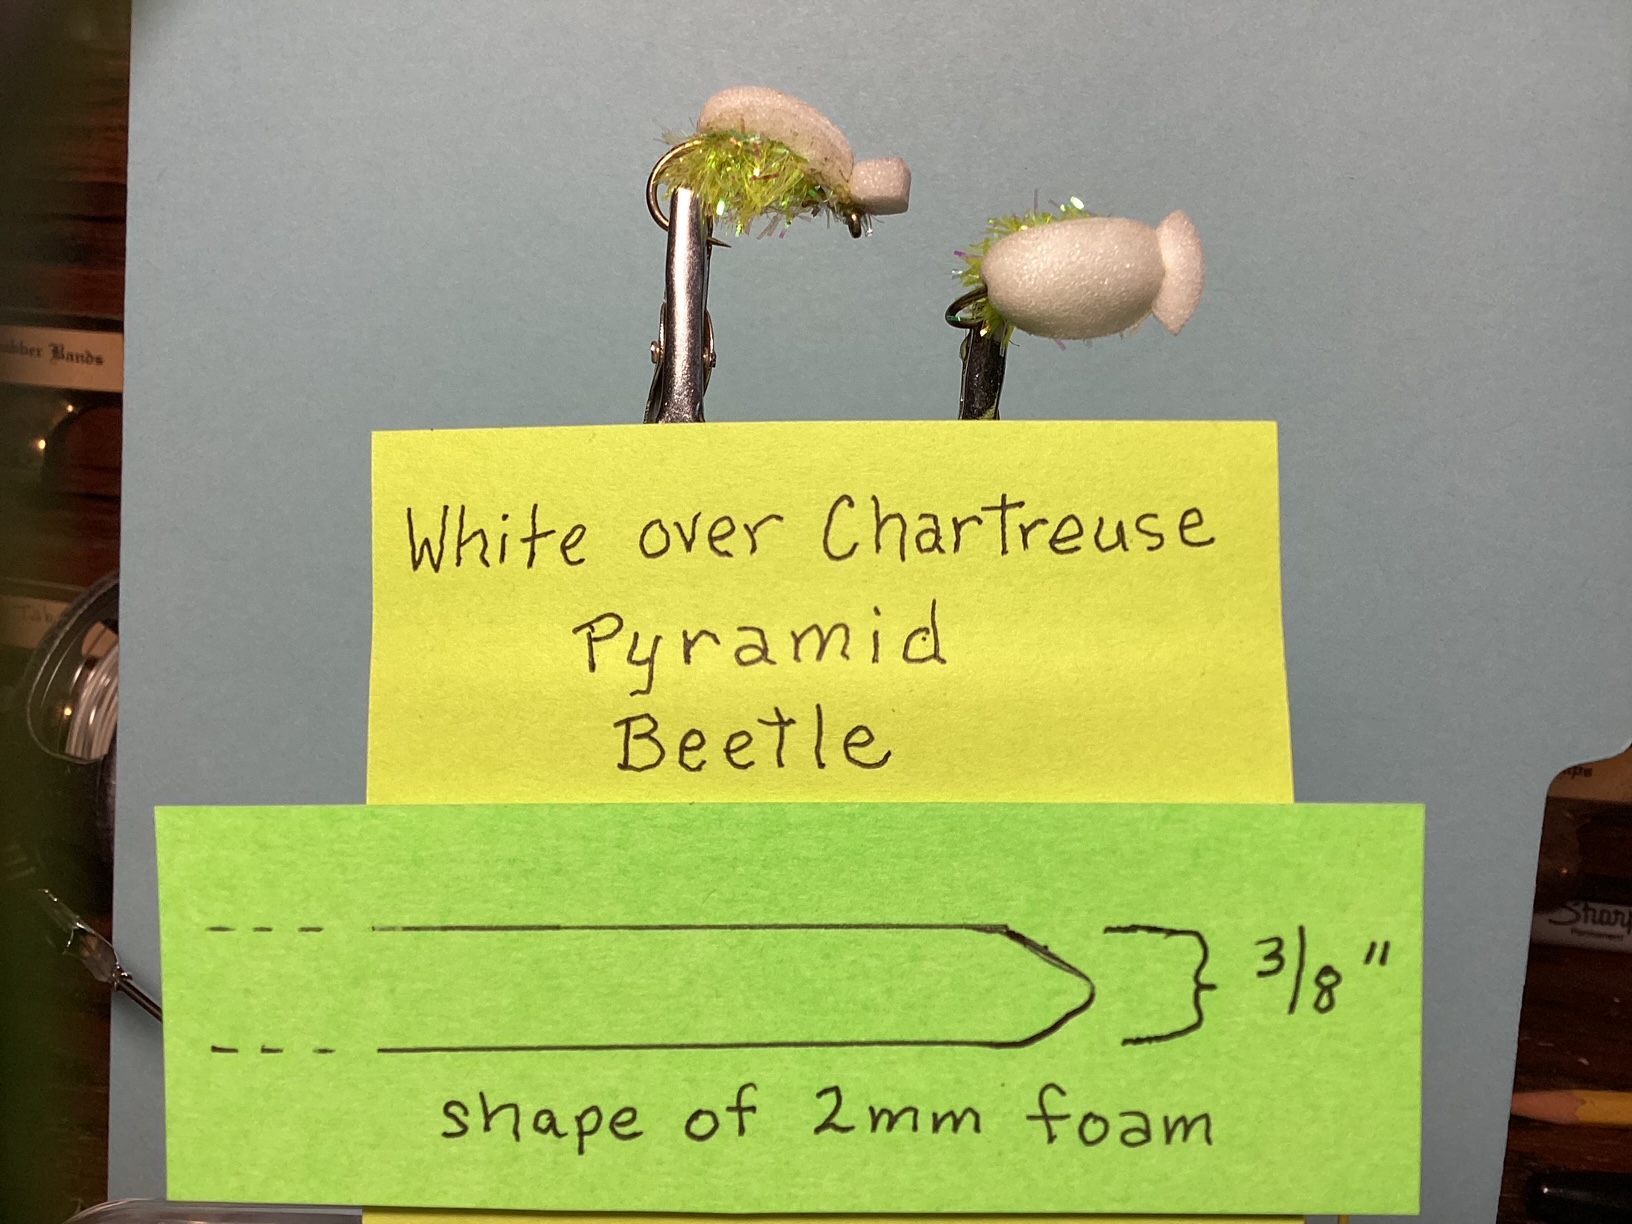
Pyramid lake has a particular beetle with these colors that goes to the bottom of the lake then ascends to the surface to take a breath. Then repeat this process over and over. Because this fly is made of foam and is used on a sinking line, when you strip it descends and when you pause it starts to rise up, which imitates the actual beetle. This is a simple fly to tie and if you’re going to Pyramid you must have one in your box. NOTE: Photo colors are not true, use color descriptions in instructions.
Hook: TMC 2457 size 6.
Thread: white 3/0 monochord or equivalent.
Overbody: white close cell foam, 2 mm thick.
Underbody: cactus chartreuse chenille.
1. Crimp barb.
2. Attach thread behind eye, wrap to above barb with touching wraps.
3. Cut foam in shape shown in diagram.
4. Wrap thread forward and touching wraps to two eye lengths behind eye.
5. Place tapered end of foam on top of shank positioning point toward the front where the thread hangs.
6. Wrap foam snuggly to top of shank back to above barb, then thread wraps forward to two eye lengths behind eye.
7. Tie in chenille. Wrap backward, each wrap against the last until above barb. Then forward in same manner to hanging thread. Tie off, cut access.
8. Pull foam forward till snugly against top of chenille. Make several snug thread wraps.
9. Whip finish under foam and behind hook eye. Cut thread.
10. Cut off excess foam, leaving 1/4 inch in front of thread wraps.
11. Apply Zap-A-Gap or similar glue to thread wraps.
Posted on December 3rd, 2022
Ever wonder what to do with that small plastic container you get when you buy flies? A piece of fuzzy fabric glued to the inside bottom works well when trying to contain beads and hold them in place while threading a bead onto a hook.
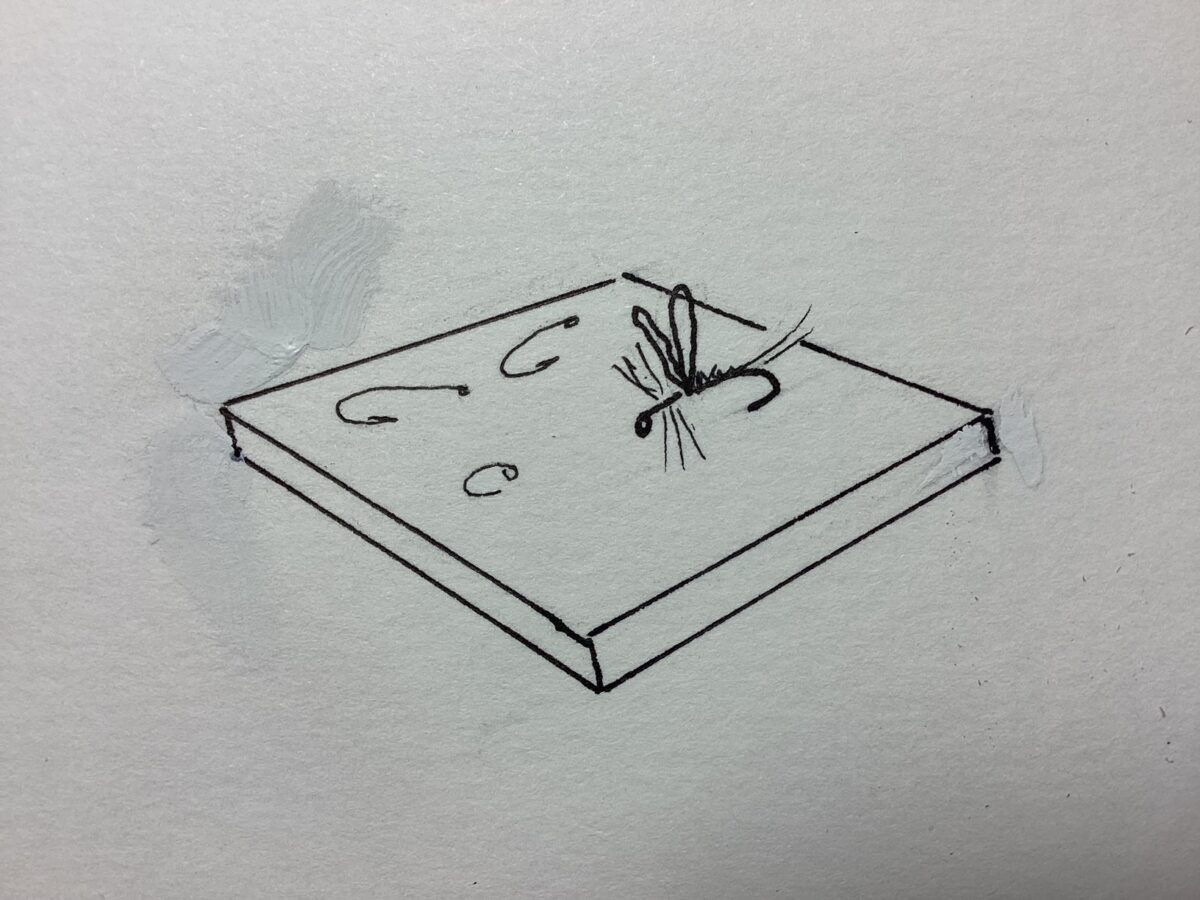
Having trouble keeping track of your hooks and flies at your fly tying desk? A magnet like those that come in hook packages can solve this problem. Just glue it to the base of
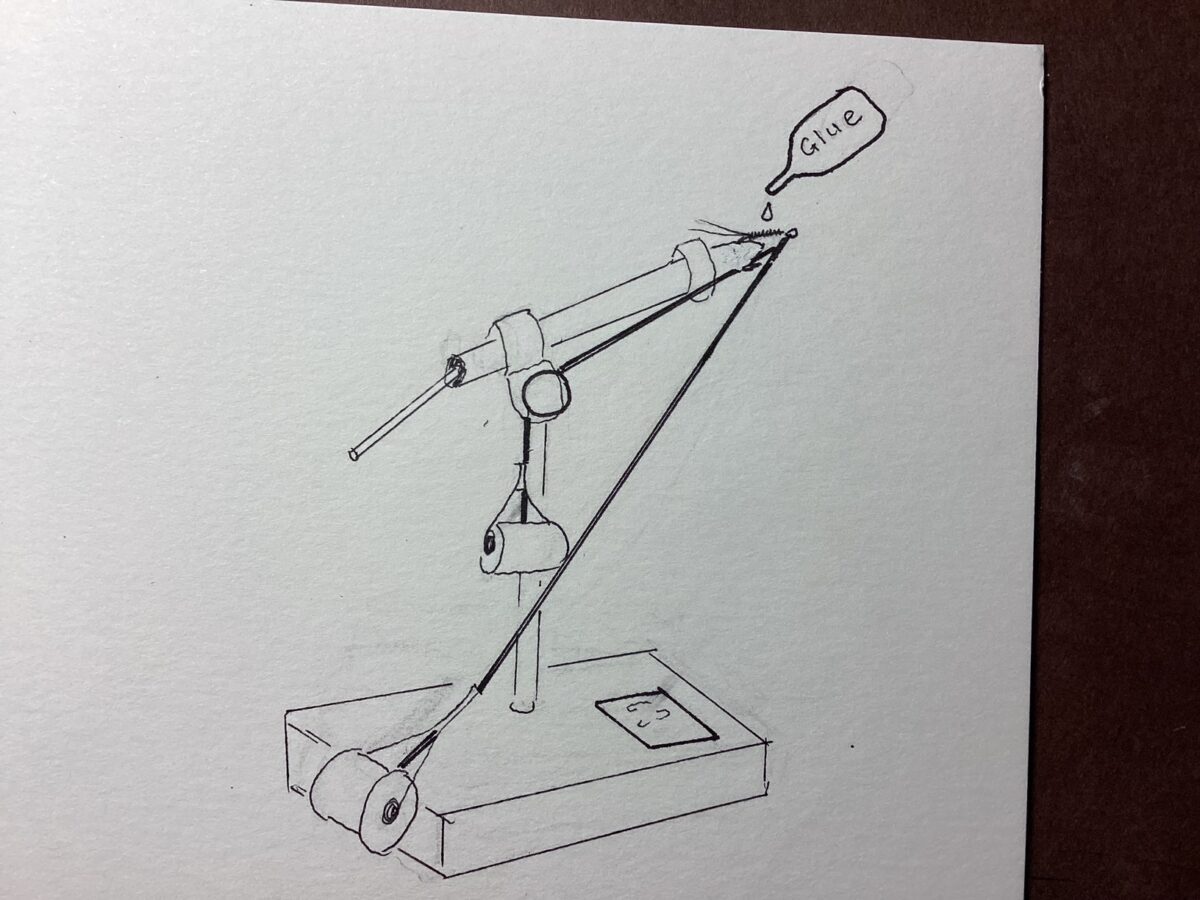
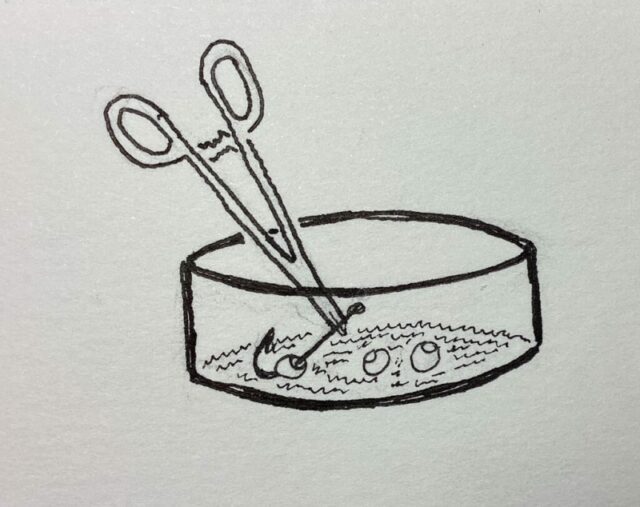
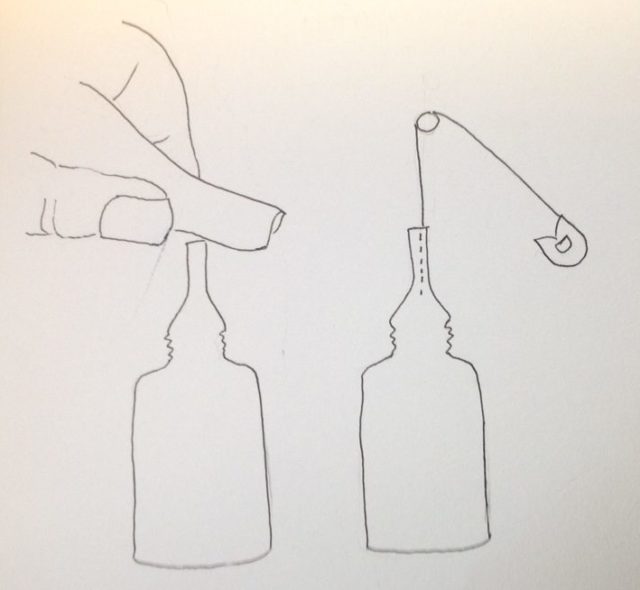
When applying glue to a hook that you are in the process of tying materials to, the last thing you want is for the glue to drop down into your bobbin which ruins the tool. Here are a couple of ways to suspend it off to the side.
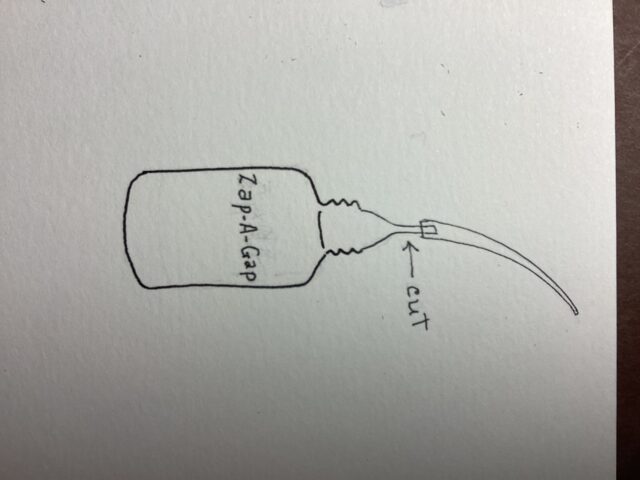
Do you if you like Zap-A-Gap glue but get tired of it clogging up, here are a few suggestions:
1. When you first use the container, uncap and attach the narrow plastic funnel to the top. (Save the cap) amazingly no need to recap because for some reason it doesn’t solidify in the narrow opening between uses.
2. When the above fails, remove funnel and use in the normal way, recapping between uses. Do wipe end off with soft cloth before capping.
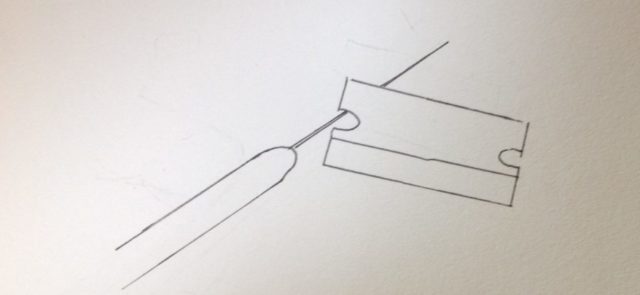
3. When the above starts clogging use a safety pin to open the hole.
4. Finally when the above fails, cut off the tip. (See diagram)
These techniques will probably get you through the whole bottle.
Posted on November 28th, 2022
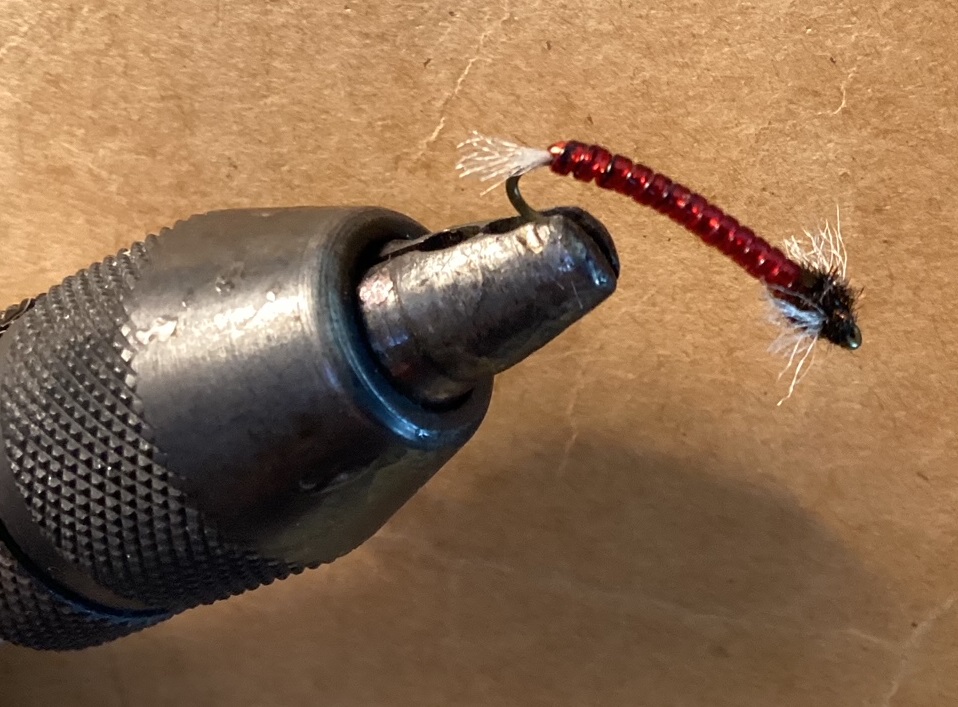
Chironomid’s are more commonly called midges. They are the most abundant food source for trout and can be found in any freshwater , but most abundant in still water. They are available to trout year-round. This pattern simulates a midge in its pupa stage which is between larva and adult. Best fished under an indicator.
HOOK: TMC 200, Dai-Riki 270, Daiichi 1270. Sizes 12-18.
Crimp Barb.
THREAD: Black 6/0.
Attach behind hook eye. Touching wraps to 2 eye lengths behind eye. NOTE: frequently spin bobbin counter clockwise to keep thread flat.
TAIL and GILLS: White High-Vis or Darlon or similar. (Same material for both. Gills in front of hook, tail in rear, )
Separate fibers with bodkin. Use about 15 to 20 strands. Lay bundle on top of shank extending about hook shank length beyond eye. Tie in place with touching wraps back to slightly past rear of shank. Cut bundle about hook shank length beyond rear of hook.
BODY: red Flashabou under red vinyl D-Rib (choose size to match size of hook). OR. Pearl Flashabou under amber vinyl D-Rib.
Attach Flashabou extending to the rear. Thread wraps 2 eye lengths forward. Cut piece of D-Rib 3” long. Cut one end at an angle. Position D-Rib, flat side down, extending to rear, and point where thread hangs. Tie in with snug touching wraps back to tail. Advance thread forward in one wrap to the D-Rib tie in. Using touching thread wraps, wrap forward to gill tie in, then back to the D-Rib tie in, then forward to gill tie in again. This will form a body with uniform thickness. Wrap Flashabou forward with touching or overlapping wraps to cover thread. Tie off cut access. Make one half hitch. While gently pulling on the rib material, make first wrap behind prior wraps then forward with touching wraps to gill tie in. Tie off cut access.
THORAX: peacock herl.
Divide gill fibers and pull out to each side of shank. Make criss cross thread wraps to hold in place. Using 1-3 pieces of herl depending on size of hook, pull off fragile tips. Tie tips in behind gills. Make dubbing loop, insert hurl, then twist to make chenille. Advance thread to behind eye. Wrap chenille behind and in front of gills. Tie off, cut excess. Wrap small thread head. Whip finish, cut thread. Cut out a few tail fibers. Trim gills and tail. (See photo)
Posted on September 6th, 2022
HOOK: Mustad 34007 size 1/0 or 2/0
THREAD: white flat waxed nylon
EYES: barbell eyes-white with black pupil
BELLY: 1.Doug’s Bugs Motion Flash-pearl (similar to Krystal Flash or Mega Baitfish Emulator. These are thicker strands. So use fewer.)
2. Gold craft fur.
3. White or cream craft fur.
BACK: Zap-A-Gap or similar glue.
Having clousers to fish for stripers is essential. Here’s one to try next time you go for these powerful fish.
Posted on August 25th, 2022
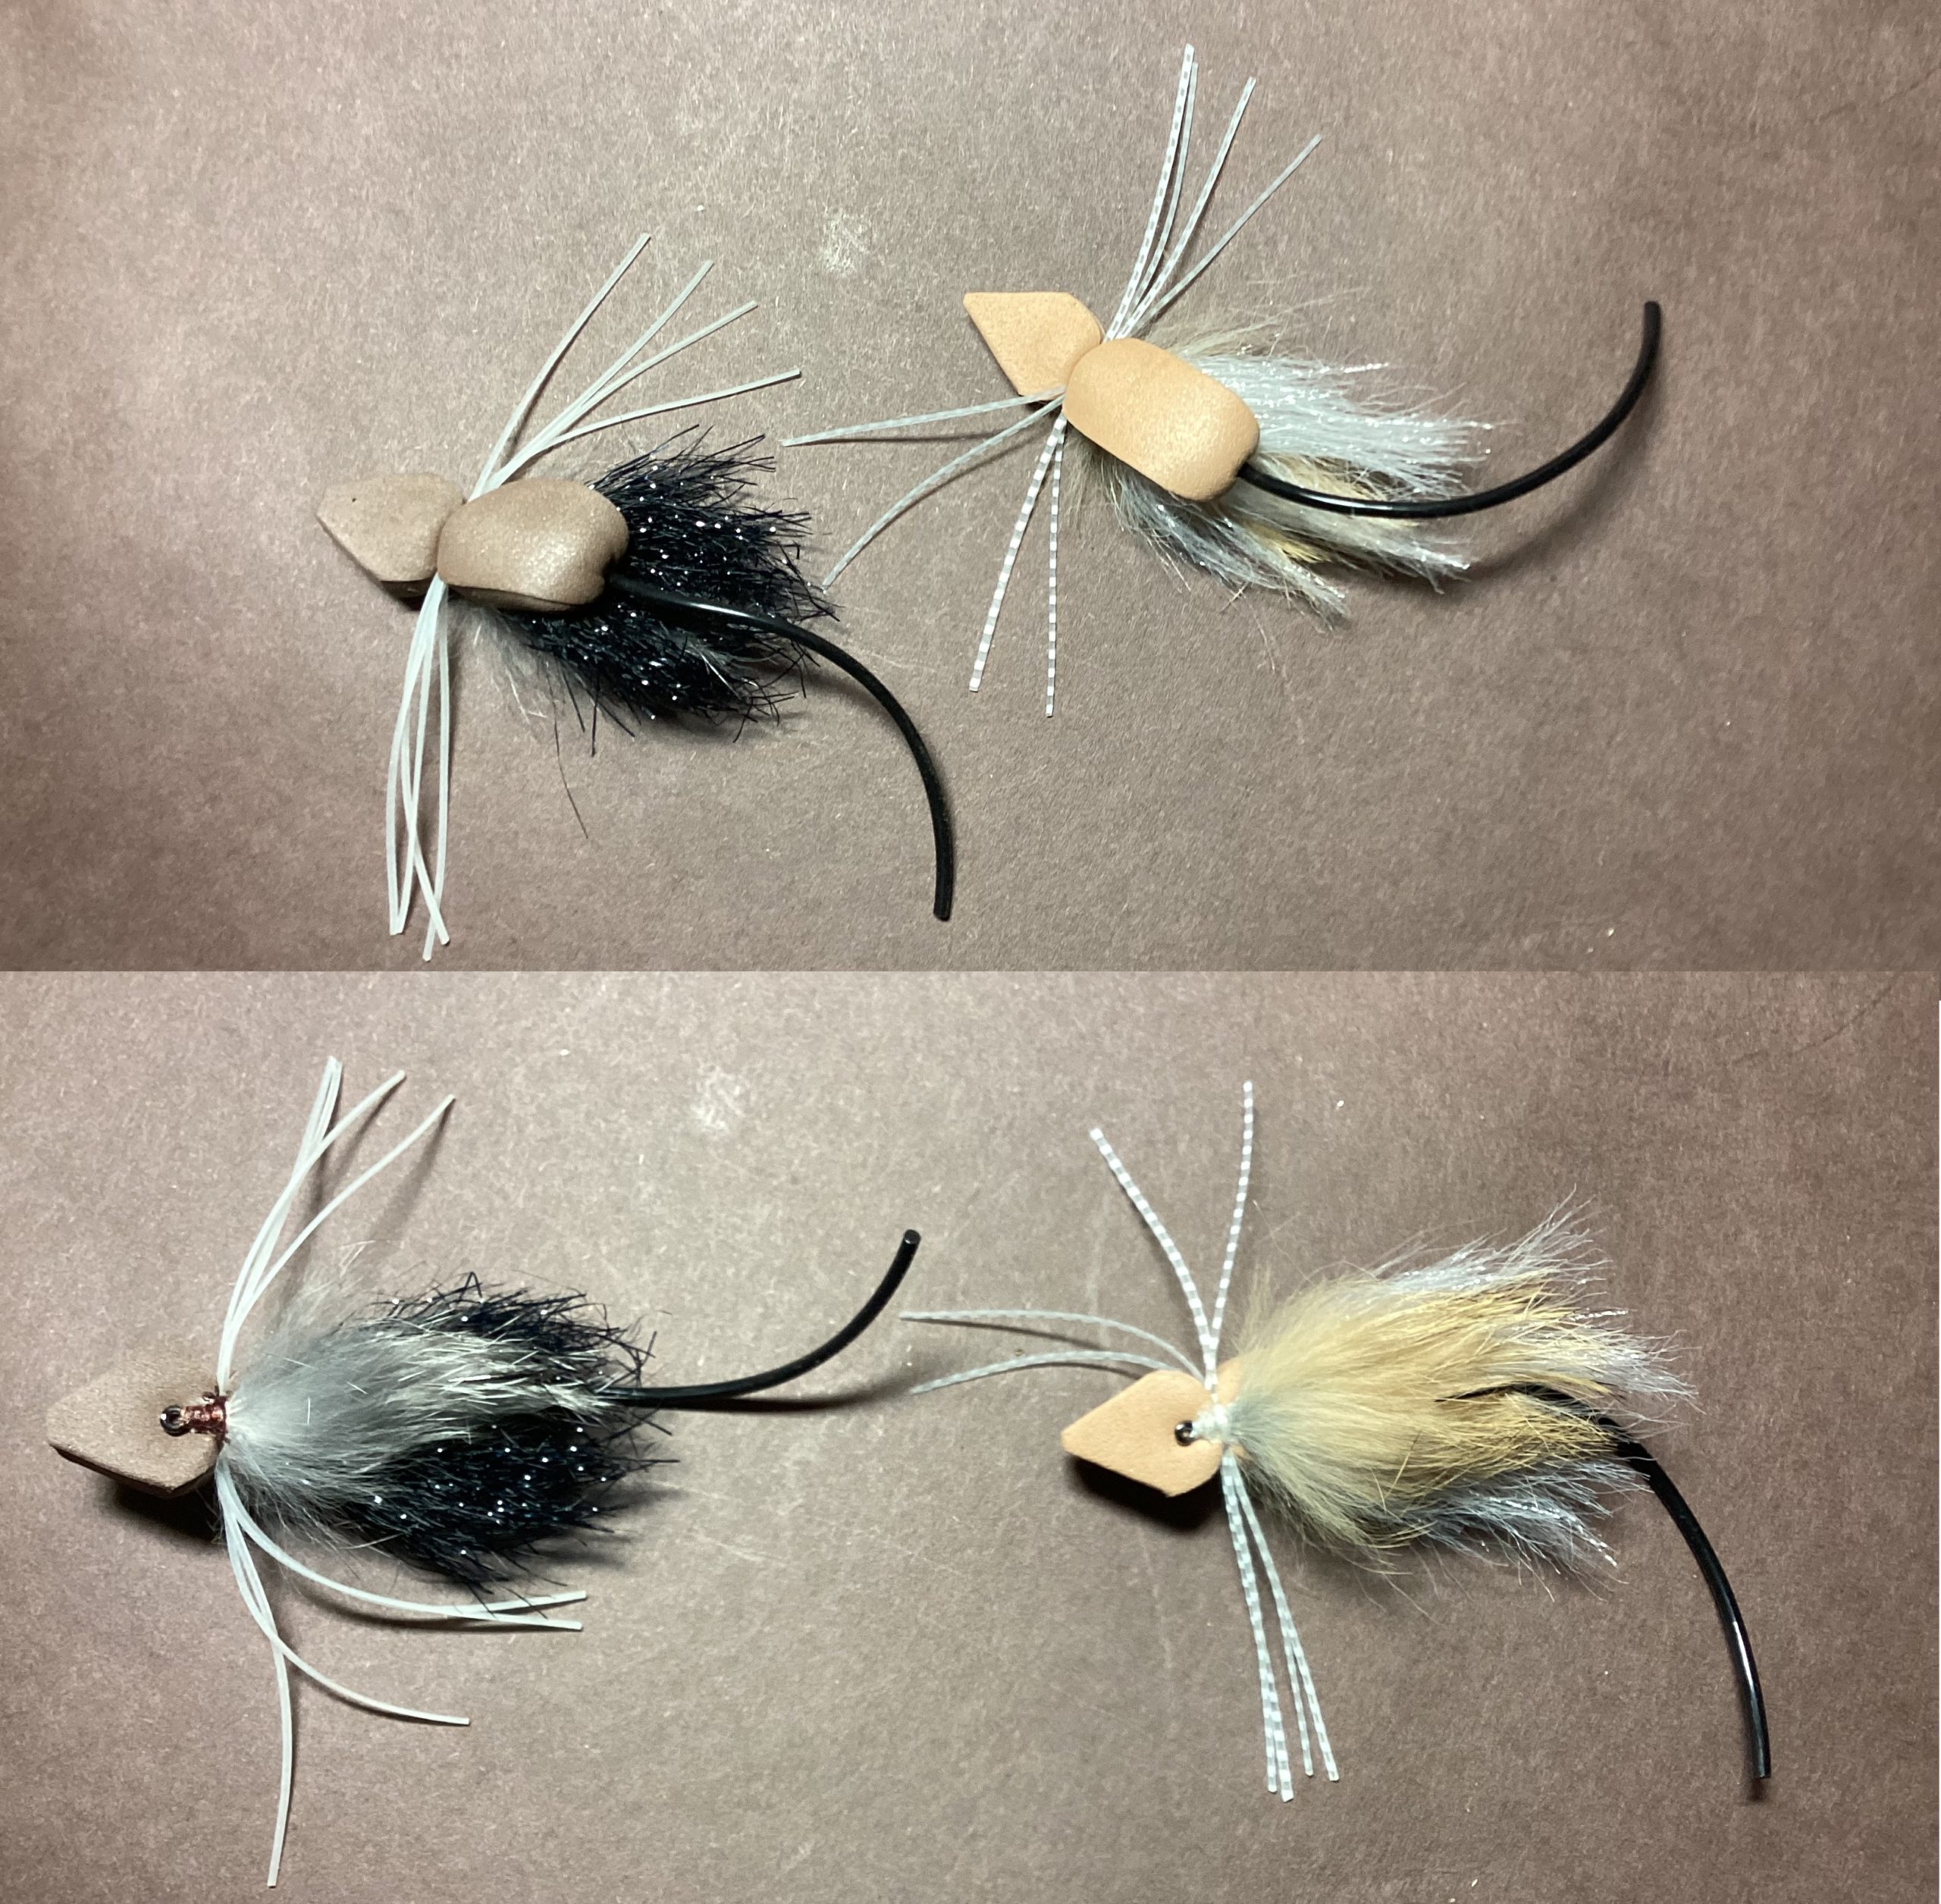
This is a large fly that can target large brown trout or large mouth bass. These flies can be fished during the day but will prove most effective at night with both these types of fish. This fly can be tied in either brown or tan. The fly was designed by Brett Smith who you can find on YouTube.
HOOK: Partridge D3ST size 4.
Crimp Barb.
THREAD: Flad wax nylon. Brown or tan
Attach mid shank. Wrap back to above hook point.
TAIL: Black rubber bracelet material that can be found at Walmart or hobby stores.
Using a 3 inch piece of material, tie in tip mid shank, while pulling a little on material, wrap back to above hook point.
BODY: Brown or tan foam. 5 mm thick. Can be found in fly shops and hobby shops.
Cut a strip one half inch wide and 4-5 inches long. At one end cut a tapered, blunt point.
Apply Zap-A-Gap or similar glue to entire shank. Advance thread to two hook eye lengths behind eye. Position foam on top of shank, pointed end two eye lengths behind hook eye. Attach and spiral wrap, with only moderate tension (don’t compress), using about 6 spirals, back to tail. Hold foam upright to be sure it’s wrapped far enough back. There should be no thread wraps visible on tail. Spiral wrap thread forward in about six wraps up to two eye lengths behind eye.
LARGE KRYSTAL HACKLE – BROWN OR DUN
Return thread back to tail. Tie in hackle.. Advance thread up to two eye lengths behind eye. Wrap hackle forward using touching wraps and stroking fibers to the rear with each wrap. Tie off, cut access. Brush hackle to get out excess fibers. Stroke fibers out to each side so that they are in the same plane.
BODY continued:
Place glue on top rib of body. Pull on foam and bring it forward. Pinch it from side to side were thread hangs hold it for a minute. Make two snug thread wraps, then let glue set a little longer. Make several more thread wraps around neck. Brush hackle out to sides again.
ARTIC FOX: grey or tan.
Turn hook upside down. Cut hide side of arctic fox into peace 3/16 of an inch by 3/4 of an inch. Position hide against under side of body with one end at neck. Attach with several snug thread wraps. Apply glue to underside of body. Press hide down and hold until glue sets.
LEGS: Magnum Predator Legs -Grizzly Barred – Root Beer Colored or Dun.
turn hook right side up. Using two legs on each side, attached centers to neck area. Trim legs so that they extend a little beyond hook bend. Tie off behind Eye. Apply glue.
HEAD: Continuation of foam body.
Cut a blunted pointed head. See picture.
Finish by stroking hackle to rear.
Posted on June 27th, 2022
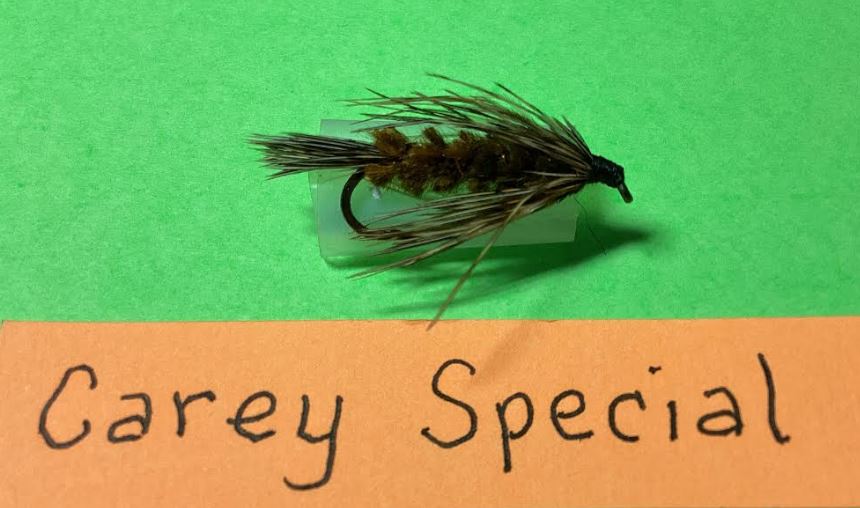
The Carrie is a searching wet fly. Extremely successful in lakes. Use on a sinking line and twitch or strip to entice the mighty fish. It’s a good fly to use with a trailer. There are various options in tying this fly. I personally prefer sizes 10 or 12 on 3X long hooks, with back feathers of the Ring neck Pheasant for tail and hackle.
HOOK: Many hooks will work. TMC 5262, 5263, 300. Mustad 9672.
Crimp barb.
THREAD: Black 6/0
Attach to mid hook and wrap to rear of shank.
TAIL: Ring neck pheasant. Rear feathers for a brown fly, back feathers for an olive blue fly. NOTE: Rear feathers are longer than back feathers.
Remove fuzz from stem of one feather. Stroke all barbs toward tip and feather. Measure from tips to 1/2 hook length. Attach that spot to rear of shank. Tips will extend beyond hook bend. Attach feather to hook shank up to two eyed lengths behind eye. Cut access in front of thread wraps.
RIB: Medium sized copper wire which is optional.
Attached to top of mid shank, allowing a short tip to be bent backward. Snuggly attach back to rear of shank.
BODY: Dark olive chenille
Strip 1/4 inch of chenille off inner threads. Attach threads to rear of shank. Wrap thread forward to 2 eye lengths behind eye. Wrap chenille forward using touching wraps. Tie off, cut excess. Wrap wire forward, in opposite direction as chenille, in about six wraps. Then 2 final wraps of wire on shank, 1 on top of the other. Twist to break.
HACKLE: Ringneck Pheasant — Rear feather for brown Carrie. Back feather for olive/blue Carey. NOTE:Rear feathers are longer than back feathers.
Select feather with barbs at least a little longer than hook shank but up to 1 1/2 times hook length. Remove fuzz from stem. Cut stem short to one 8th inch from barbs. Attached stem behind eye with shinny side towards you. Positions thread behind eye. Tie one or two have hitches, let’s thread hang. Attach heckle pliers to several barbs at tip. Wrap hackle around shank 2-3 times, stroking barbs to rear with each wrap. Tie off, DON’T cut excess. Stroke all barbs to rear then wrap in place by forming a thread head. With finish, cut thread.
Posted on May 15th, 2022
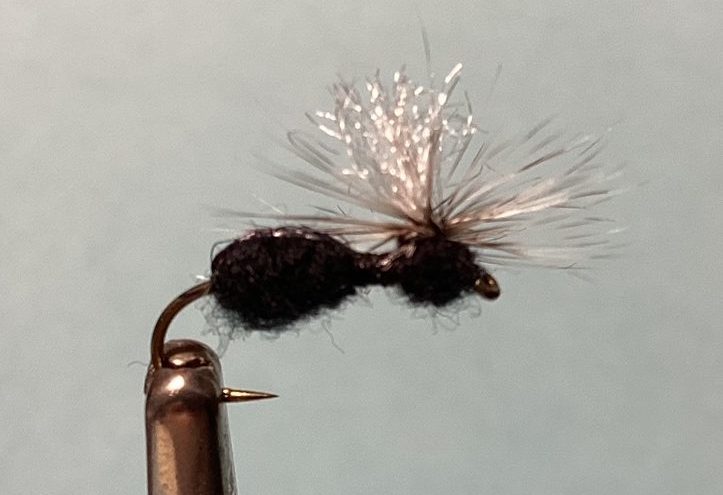
There are many and patterns, most of which are hard to see on the surface of the water. Here is one with a nice white post. Ants are most effective mid summer on and are more available to fish on windy days. Add floatant and fish with drag free presentation. They are good on lakes as well.
HOOK: TMC 100 Sizes 12 to 16.
THREAD: Black 8/0. Attach mid shank
OVER BODY: White Antron yarn
Attach Antron to back half of shank and extending to the rear of hook. Note: Antron pieces need to be long enough to go over rear back body and then up as post.
REAR BODY: Black super fine dubbing and black permanent marking pen.
Dub a bulbous rear body up to mid shank, no further. Pull Antron snuggly over rear body and tie down. And attach Antron to top of shank with touching wraps forming a narrow mid body, about 1/4 of shank. Note: if tying a size 12 hook, additional touching thread wraps back to rear body then forward again.
POST: Continuation of white Antron
Hold Antron upright. Make 4 to 5 thread wraps upward around Antron. Then make 4 to 5 wraps down to base.Make a couple of wraps in front of post to hold upright.
HACKLE: grizzly barbs equal to 1 1/2 to 2 times hook gap
Prepare hackle by cutting off fuzzy end then cutting 4 to 5 barbs short at base of stem (crew cut).
Identify shiny dark side of hackle. Position on your side of hook, shiny side facing you, tip to rear, and crew cut at base of post. Tie in place in front and behind post.
FORWARD BODY: Black super find dubbing. And some ants have a red forward body, so thread can be changed to red and red superfine dubbing used for this section.
Wrap a small bulbous forward body from eye back to midsection.
HACKLE: same feather from above
Wrap thread behind post, then forward, then in front of post, then allow to hang on your side. Using hackle pliers, wrap hackle around base of post about four times , then allow to hang on your side. Bring thread up in front of hanging hackle till parallel to table. Wrap around post and under parachuted hackle about three times. Several half hitches behind hook eye. Cut thread. Cut excess hackle. Cut Antron so that it equals hook shank length. Push up on heckle from beneath hook to be sure it is parallel to table. Trim any barbs that hang below.
Posted on March 30th, 2022
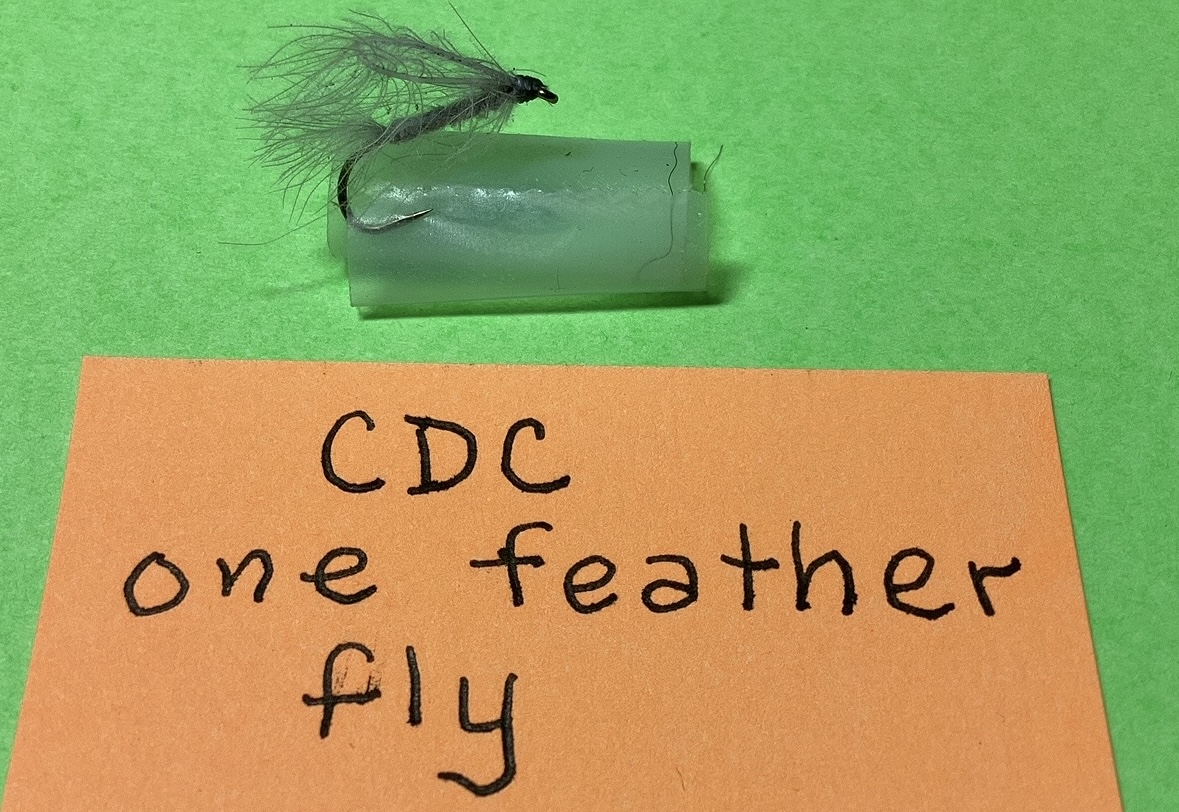
CDC stands for cul-de-canard which is the butt feather of a duck. It has some interesting properties that will help the fly float without gel floatant. In fact gel floatant actually mashes down the barbs making the fly not float. Instead dress with a dry powdered floatsnt like Frog Fanny. When it becomes waterlogged, squeeze dry on clothing or a chamois. Then brush more Frog Fanny into the fibers. Don’t be concerned with the white fluffy appearance for it doesn’t seem to deter the fish at all.
HOOK: TMC 200 size 24-20. crimp Barb. Note: length of CDC feather will determine size of hook. See shuck below.
THREAD: 8/0 Color to match CDC NOTE: mayflies come in many colors. Some of the more common are gray, olive, tan, brown and cream. Attach thread behind eye. Wrap to above hook point with touching wraps.
SHUCK; CDC feather. Measure length of feather along stem were barbs protrude. Select a feather that is at least as long as the following as in the following chart. Longer is even better.
One and 3/4” for 14 hooks.
One and 1/2” for 16 hooks
One and 1/4” for 18 hooks
One inch for 20 hooks.
Stroke barbs toward tip of feather. Tie in on top of shank, tips hook length beyond thread, with three wraps. Carefully pull feather forward until shuck equals shank length. Lift butt and, wrapped thread to eye.
BODY: continuing with the same feather as above. Spiral wrap feather forward covering shank. Tie off with 2 wraps between barbs.
WING: using same feather as above, hold stem upright, stroke barbs backward. Make a loop with stem that extends to shuck. Tie off securely add eye. Cut excess. NOTE; loop will probably lean. Wrap thread head. Whip finish, cut thread. Do not use head cement or any glue. Stroke barbs backward. Cut them short at end of shuck.
Posted on March 29th, 2022
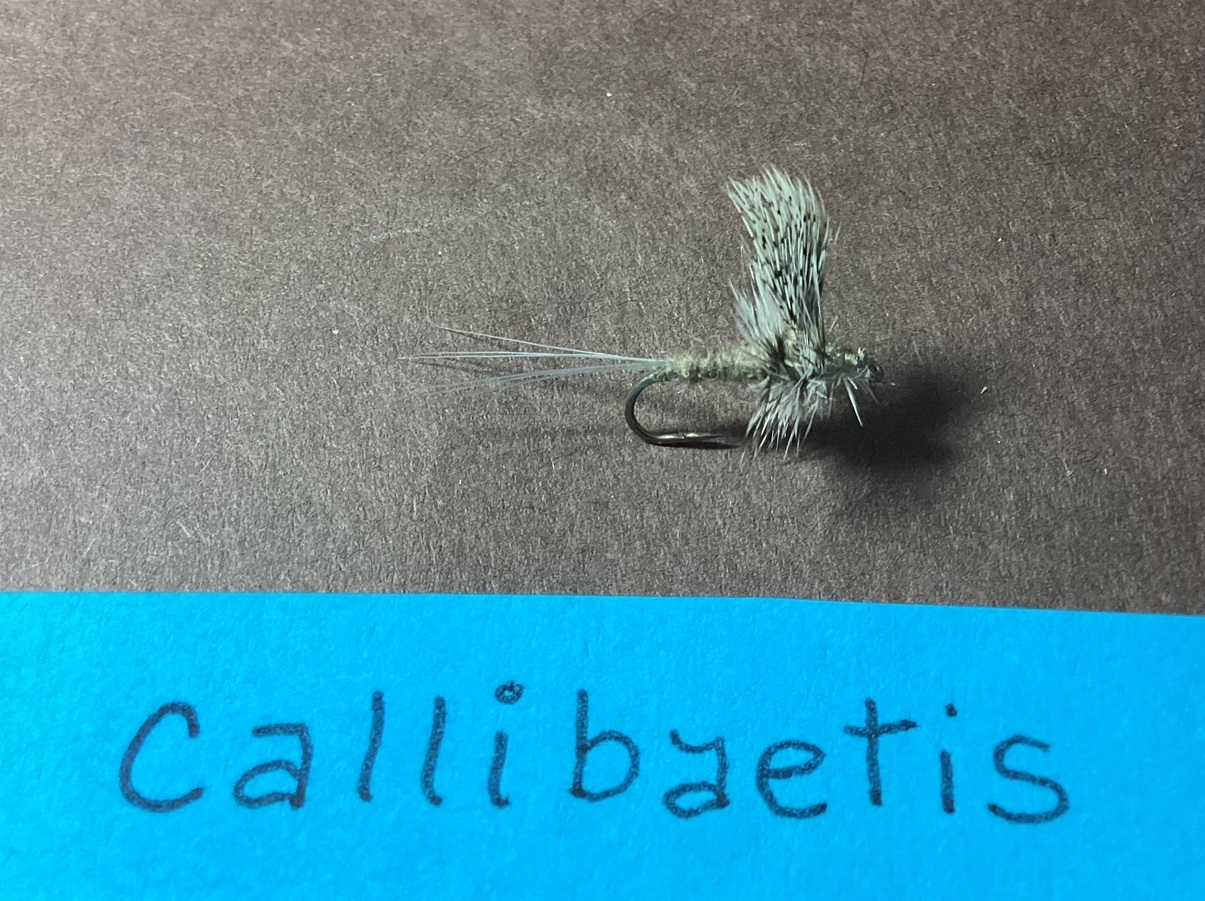
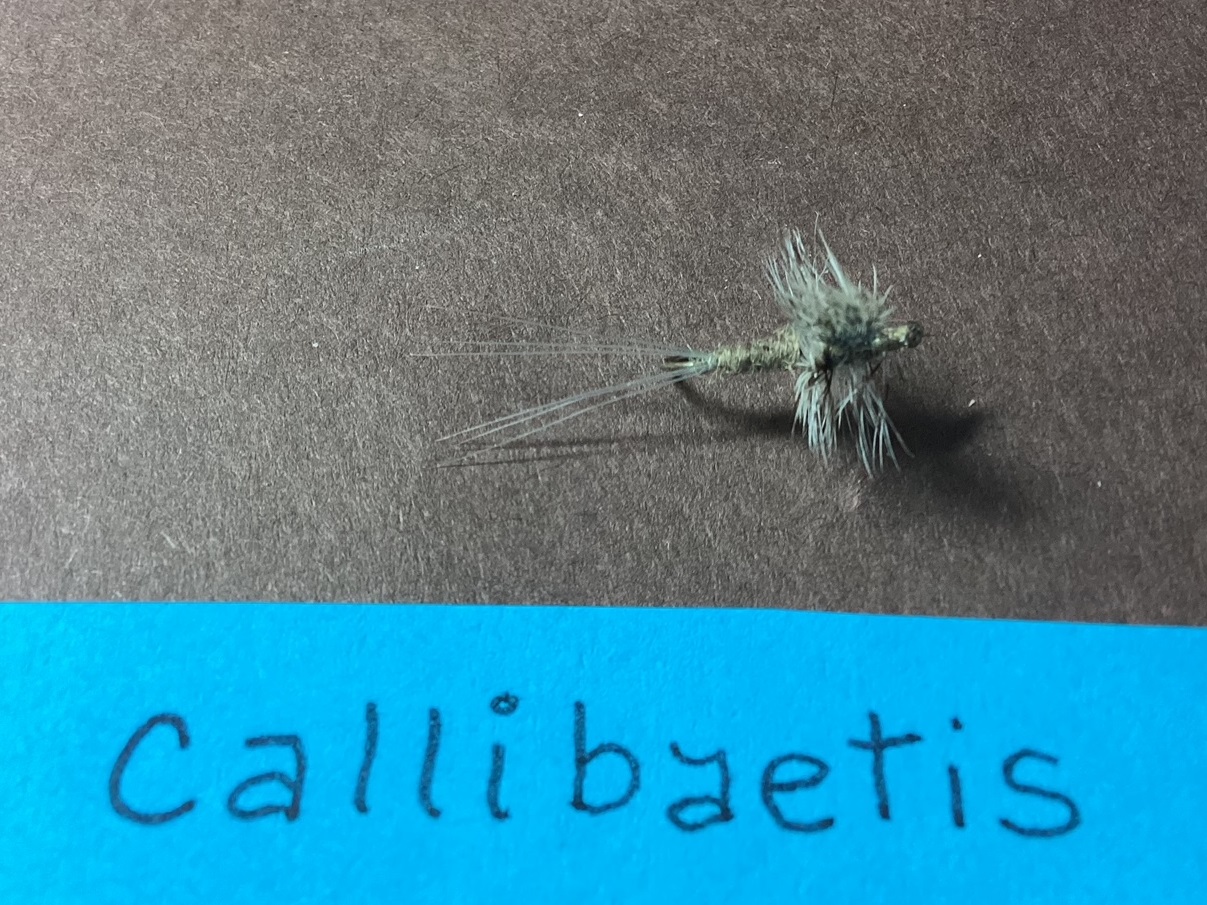
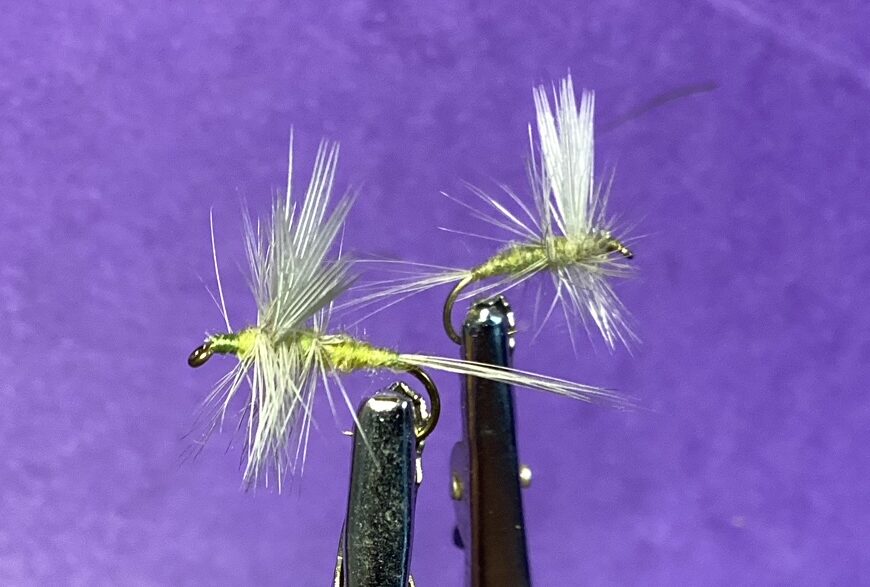
There are 15 species of callibaetis in the western United States in Canada. They emerge in spring, summer and fall, and are usually larger in the spring and smaller in the fall. Their distinguishing features are two tails, tan under body and modeled wings. They prefer still water but can be found in slow moving water as well. Use a floating line, apply floatant, leave still on water or dead drift.
HOOK: TMC 100. Sizes 12-16. Crimp Barb. Crimp Barb.
THREAD: Tan 8/0
Apply mid shank. Wrap forward to 1/3 back on shank. Cut thread tag.
WING: Hungarian Partridge
Using two feathers, pull barbs off base of feather until a narrow fan is formed. Length of fan should equal hook shank length. Attach feather to top of shank tips, forward and stems to rear , at junction of feather and stem. Pull feathers upright and make several wraps in front to hold in place. Tie down 1/8 inch of stems behind wing cut access. Make several thread wraps around base of wing to hold upright. Wrap thread to rear of shank.
TAIL: dun microfibetts
Make thread ball with 8 to 10 X thread wraps on top of one another. Wrap thread forward 1/3 of shank. Select 6-8 fibers(keep tips lined up). Lay on top of shank, tips extending well to rear. Tie to shank with four touching three thread wraps toward ball. Pull fibetts forward to make tail equal to shank length. Divide fibetts with bodkin. Pull the fibetts on far side away from shank and slightly upward, take one thread wrap toward ball. Grab remaining fibetts, pull them toward you and slightly downward. Take another wrap of thread toward ball. Repeat last two steps a couple more times. Ending at the ball. Cut access.
BODY: Tan super fine dubbing
Advance thread one wrap. Dub a narrow tapered body up to wing.
HACKLE: Grizzly, barbs equal to hook gap
Form a crew cut at butt end of feather by cutting 5 to 6 barbs short on each side of stem. Tie crew cut in at base of wing with dark side of feather toward you and tip to rear.
THORAX: Tan super find dubbing
Dub around base of wing. Taper dubbing forward to one hook eye length behind eye. Spiral hackle forward, two wraps behind wing, to in front of wing. Tie off cut access. Tie thread head. Whip finish, cut thread.
Posted on March 25th, 2022

The Quigley represents an merging mayfly that is stressed in an unusual manner to make the rear of the fly hang down in the water and the thorax and wing out of the water. Apply saliva to the body tail, then floatant to the wing and hackle. During a hatch fish tend to be more eager to take an emerger than a dun because they are not ready to fly off.
HOOK: TMC 100, sizes 14 16 18.
THREAD: Gray 8/0 or 12/0(preferred).
TAIL and BODY: Gray marabou (fluffy)
THORAX: Dark Olive Debbie.
WING: Deer hair with narrow fibers
HACKLE: Grizzly
Posted on March 25th, 2022

Midges, also known as chironomids, are available to trout year-round. Not only in their larval stage but hatches occur as well. In nature they vary a lot in size and color. For the club fishout at Pyramid Lake tie larger flies. I prefer size 8 hooks. For Crowley lake use smaller hooks. The best way to fish a midge is to suspend it under an indicator so it rides a little above the bottom.
HOOK: TMC 2457 or TMC 2487 sizes 6-16
Note: 2457 is a heavier hook and is typically the hook of choice for a bigger fish like it Pyramid Lake.
Crimp Barb.
BEAD: Silver, size to match hook.
Note, for a size 10 Hook use a size 5/32 inch.
Slip small opening on to hook first, and position behind hook eye.
THREAD: Red, 3/0 or 6/0 depending on hook size
Test thread with glue to be sure it doesn’t turn black when applied.
Thinner thread with larger hooks will require more thread wraps.
Attached behind the bed.
RIB: Larva Lace Other brands also available. This is a vinyl strand with elasticity. Diameter is usually round, sometimes D shaped.
Micro midge for size 16 hooks, midge for 12 and 14, small for eight and 10, medium for size 6. Lay on top of shank with and slightly behind bead. Touching thread wraps halfway back on shank. Then pull on rib material to make thinner and continue with thread wraps halfway around rear bend of hook. Note spin thread counter clockwise to keep flat and avoid twisting.
BODY: Red thread.
Wrap forward with touching thread wraps to cover rib well up to bed. Spin thread as above. Use more touching thread wraps backward and forward to form a slender tapered body if necessary. Finish with thread behind bead. Make one half hitch.. Snugly spiral rib forward in opposite direction of thread wraps, 6 wraps to reach bead, each a little further apart. Secure in place with 5 to 6 snug thread wraps. Cut excess rib. Tie off thread, cut. Applied glue to entire body. Allow to dry.
COLLAR: Peacock hurl and black 8/0 thread.
Attach thread behind bead. Select one hurl from stem of feather with medium to long barbules. Break off fragile tip. Tie tip in behind bead. Make dubbing loop. Hold hurl down side of loop, insert dubbing tool, and twist to make chenille. Make several chenille wraps behind bead, tie off, cut excess. Apply glue to about 1/2 inch of thread near bead, whip finish behind bead, cut thread.
Posted on February 14th, 2022
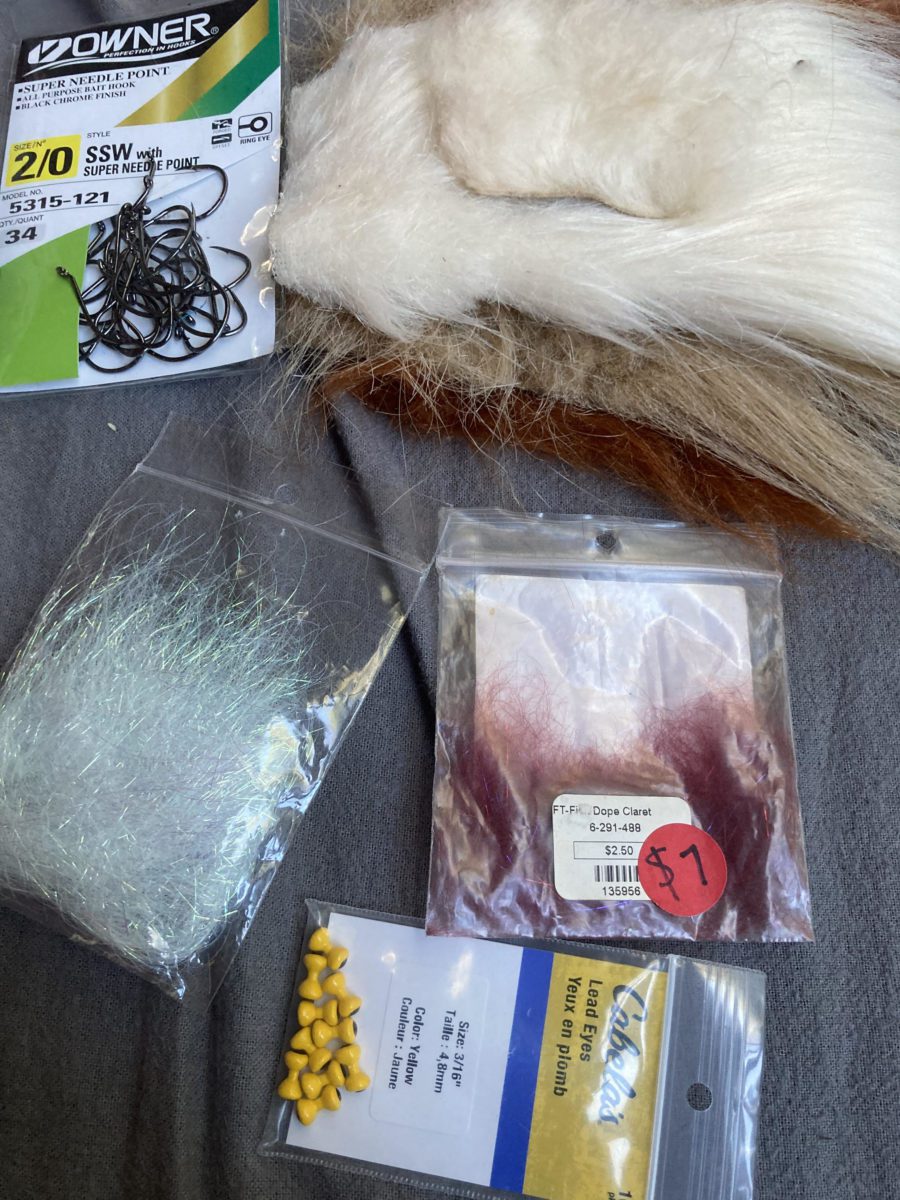
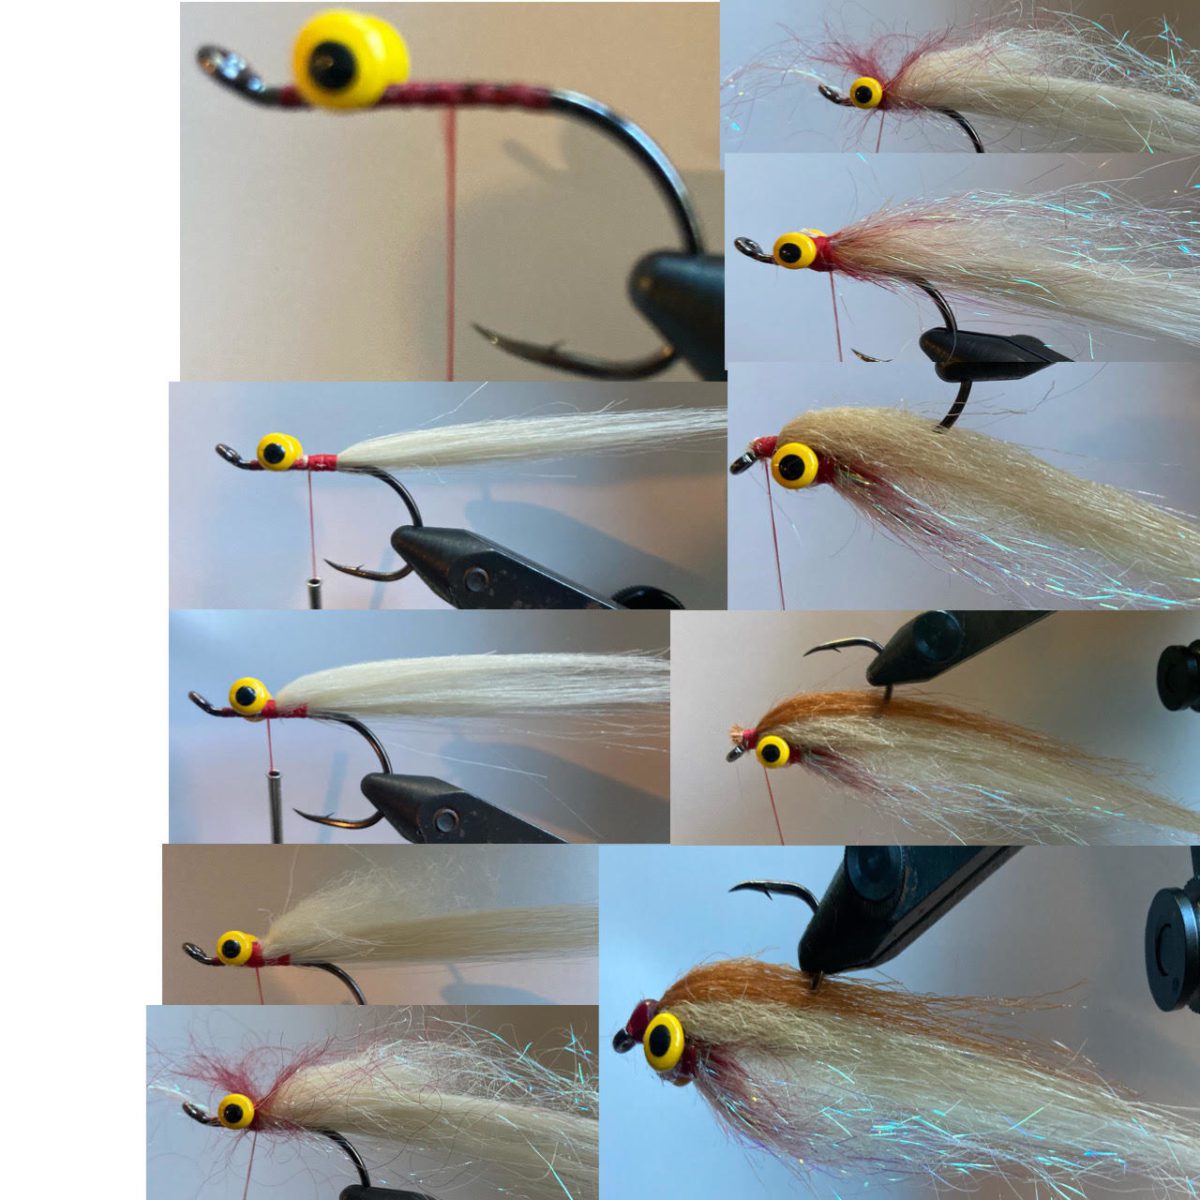
Having recently joined the Santa Cruz Fly Fishing club, Joshua Wilkens was first introduced to the Lee Haskin’s San Luis Smelt by Jeff Slaboden last year. “I was kind of neurotically tying these last year so if anybody just wants a few I have probably enough for the short group that potentially wants to go.” said Josh who hosting the Del Valle fishout in March.
Material: I usually tie on shorter shank so less craft foul, typically octopus or drop shot hooks, 3/16 yellow eyes for my 8wt and a size or two smaller and slimmer body for 6wt. The fish dope was from last day sale at California fly shop, and the belly fat is my cats toy which I’m not sure on what pelt that is but it’s very knotted and curly like roughed up by my kitty. I think it’s like streamer hair not craft fur and it’s the parts I didn’t use at base years ago when I must of used it no clue. Then creame/tan/rootbeer craft fur (I’m subbing rootbeer for what’s usually dark brown artic fox because my cat ran off with it I can’t find it) and some pearl lengthy dubbing. I use Danville’s 210 cause it’s cheap thread.
I put two little chunks of creame up the shank towards eyes leaving room for belly. Add belly chunk behind eyes, add pearl on body tie ahead of eyes, add red stuff, fold pearl back over eyes and red stuff, flip over tie thick chunk tan, tie medium chunk rootbeer/dark brown I think. I was trying to imitate smelt last year with material I had, then I went fishing with Jeff whose friends with the smelt creator and he said something like the ginger dye he started with they stopped dying that color.
Posted on January 25th, 2022
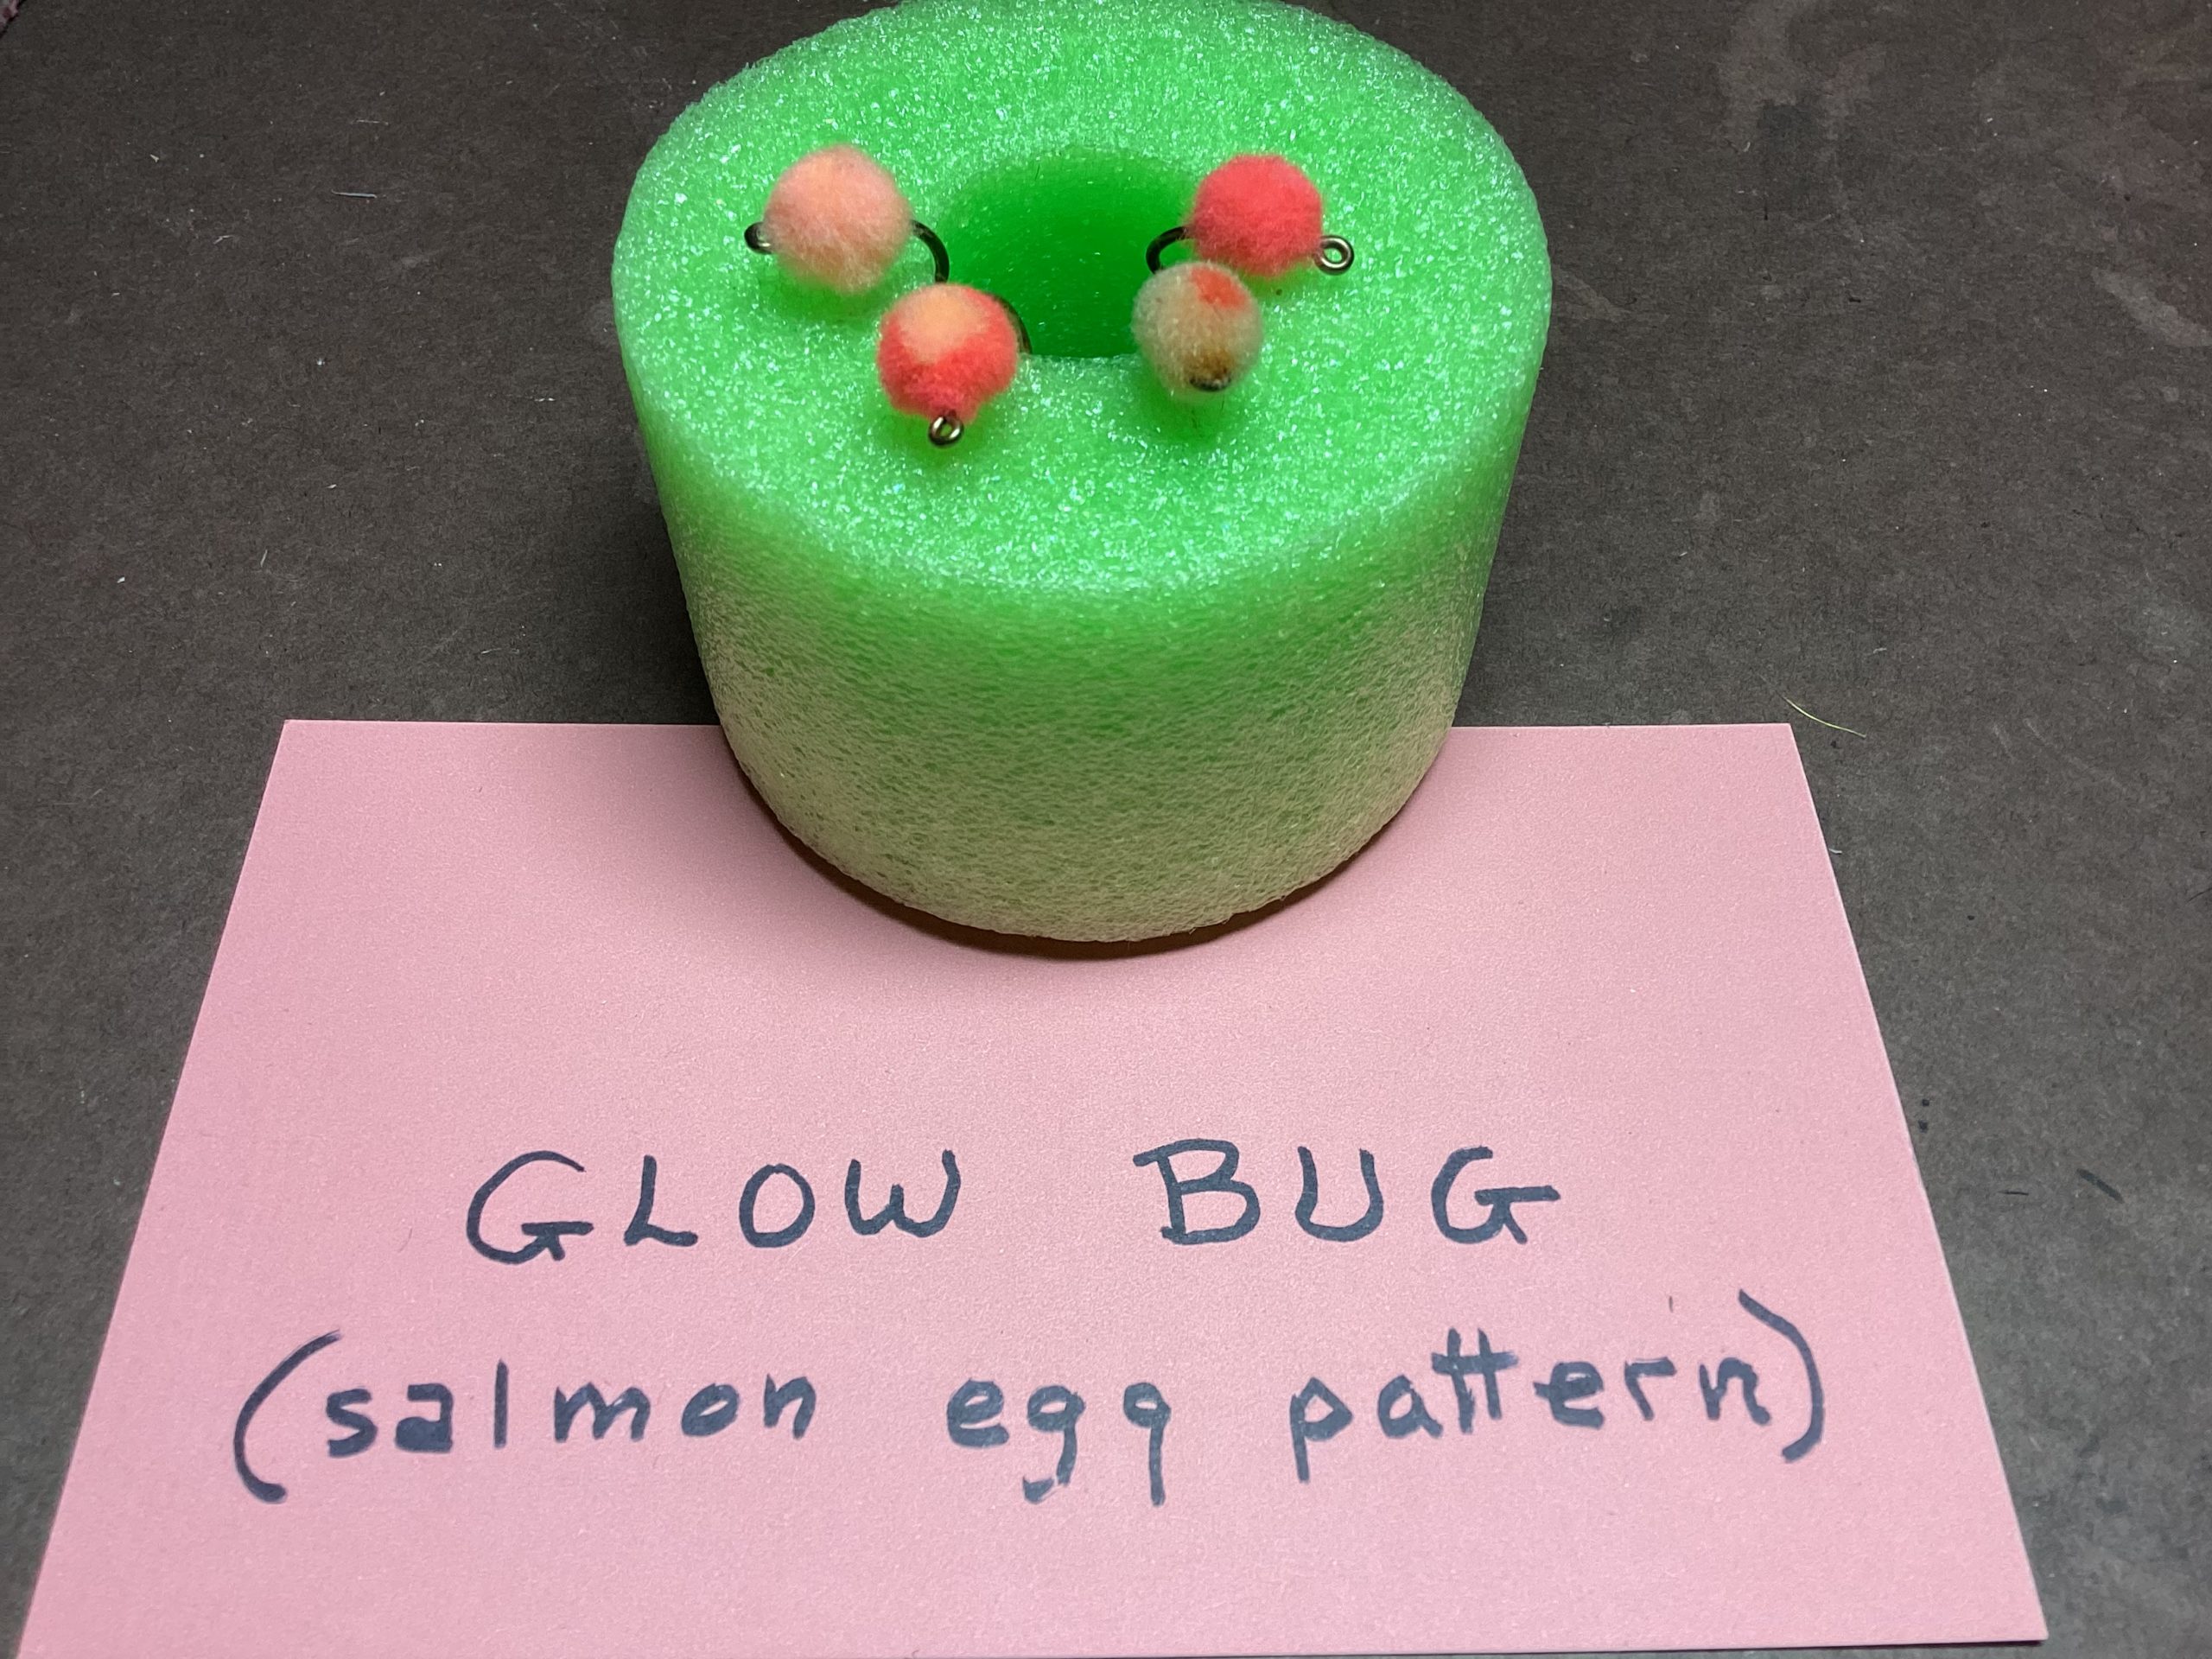
Steelhead and trout follow salmon as they spawn and readily eat their eggs. This pattern simulates them. The fly doesn’t sink well so use a sinking line, put weight on your leader, or trail the fly behind a fly that sinks well, or add a gold bead to the hook before tying on the yarn.
HOOK: Mustad 9174 or TMC 105 or Targus 105. Size 6 or 8
THREAD: STRONG: white, peach, salmon or other light color. Such As: flat waxed nylon, Danville 2/0, monochord, Gudbrod Gx2 or Ultra 149 denier.
EGG: Glow Bug Yarn: comes in both thick and thin strands. bright salmon, pale salmon, orange, peach, pale yellow, and pink
1. Crimp Barb. NOTE: a hook with upturned eye also works, but material is harder to trim.
2. Attach thread 1/3 back on shank. Cover center 1/3 of shake with touching wraps. Leave thread mid shank.
3. THICK YARN:
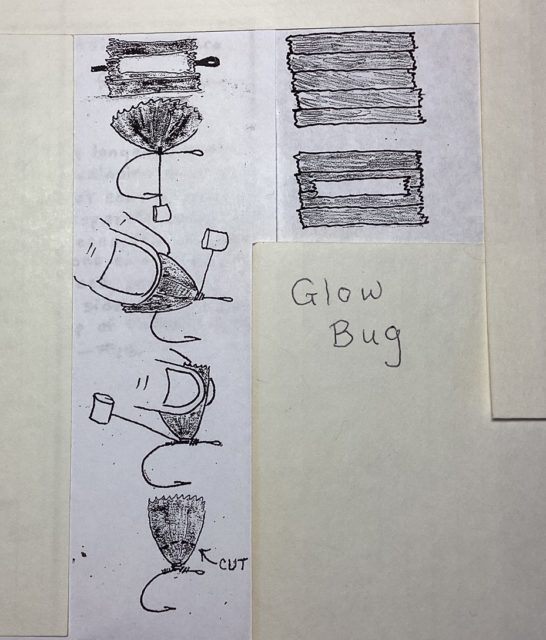
THIN YARN:
–
–
Posted on January 13th, 2022
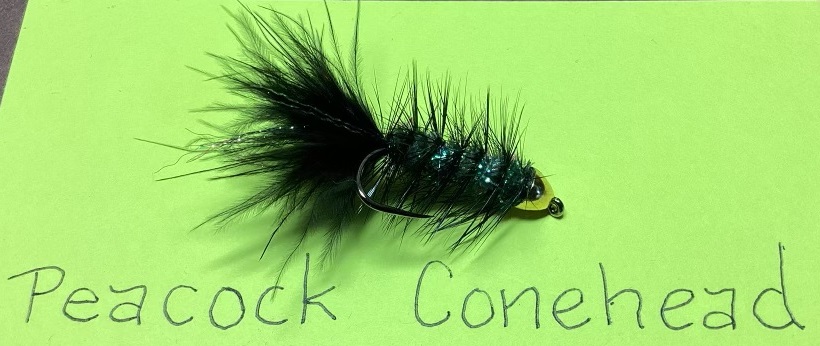
Both the Fly of the Month and Fly Tying Class this month will feature bass flies the Dan Eaton highly recommends for his upcoming Fishouts in the spring.
HOOK: Saber 7246. Or. TMC 5262
BEAD: brass conehead Size 1/4 “ (large) fits size 2-4 hooks
THREAD: black 6/0
TAIL: black marabou with long barbs and Black Krystal Flash
HACKLE: black saddle hackle, barbs equal to about hook gap
BODY: small peacock crystal chenille and small grey or silver chenille
Posted on December 27th, 2021
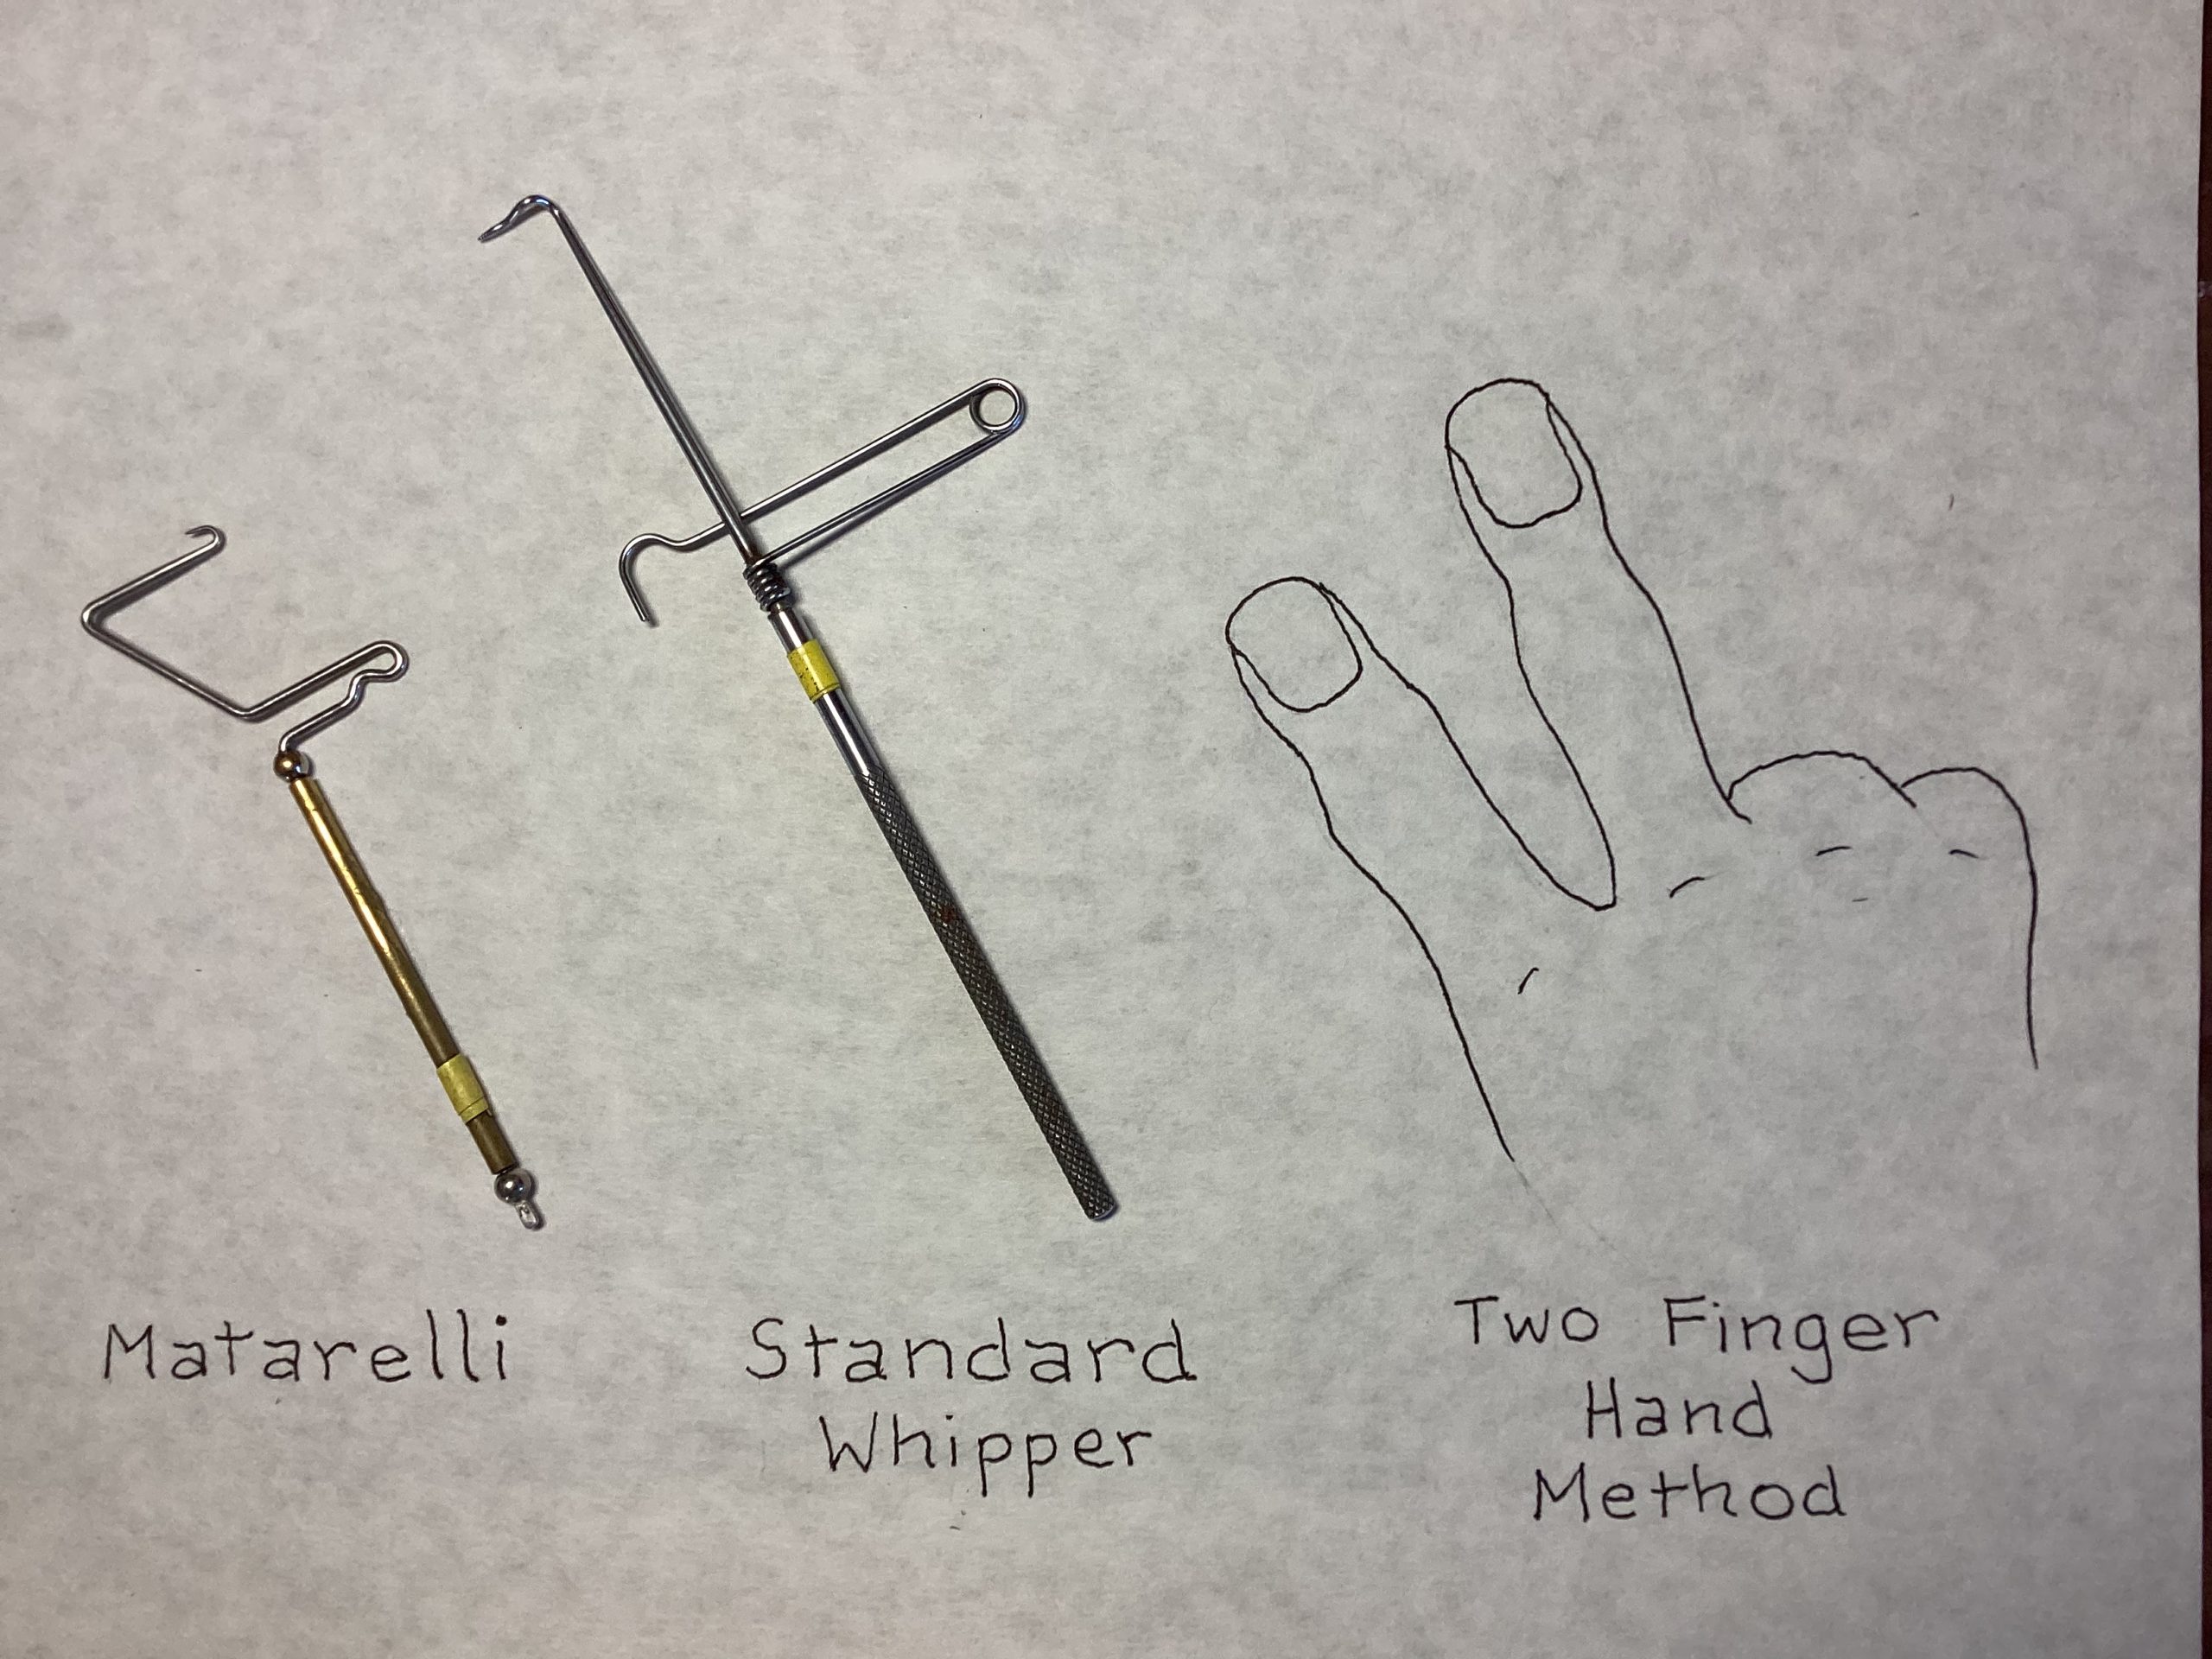
Instead of featuring a specific fly this month, using the “whip finish” method to tie your favorite fly will be discussed. Having the skill of tying the knot to complete your fly using a “whip finish” is very important for certain flies. Some folks use the method more often, for they just find it easier when they get the hang of it. There are 3 methods to accomplish this:
Specific flies that require this method are any that must be tied off behind the material on the hook, ie: beaded flies, poppers. You can use this method on the fly being tied at the fly tying class this month but won’t be required. This is a great time to learn how, refresh your skill, or learn a new technique. There are numerous demonstrations on YouTube for all 3 methods. Just ask for “whip finish demonstration for tying flies”.
I found the one done by Copper Landing Fly Fishing was well done for a Matarelli. Check them out and do some practicing on a bare hook.
Posted on November 17th, 2021
If you desire or must have a steelhead fly for the San Lorenzo, here’s one that comes highly recommended. Of course it will probably work for the mighty fish elsewhere. This is a variation of Cliff Watt’s Kilowatt Fly. The color combinations are limitless but the 2 that seem to work best are: maroon marabou and hackle OR maroon marabou tail with both both blue and black hackles.
Material:
Instructions:
This is not an early season fly. It can be swung on a Skaget line in the estuary when big fish are in, or dead drifted on a tight line through a riffle or under a bobber. It also can be jigged like a spoon through a pool or frog water. You may have noticed that there isn’t a lot of room for a back cast on the upper reaches of the San Lorenzo. That’s why most seasoned Steelheaders fish exclusively with mono line much like euronymphers. Strip casting is the common method of presenting a fly on the S.L. It is a similar technique to flipping for bass and allows the angler to pitch a fly into tight pockets in very tight quarters. Not to say that you can’t use a traditional fly line but many times anglers spook fish with a role cast over a run or pool, especially in low clear water.
Posted on October 18th, 2021
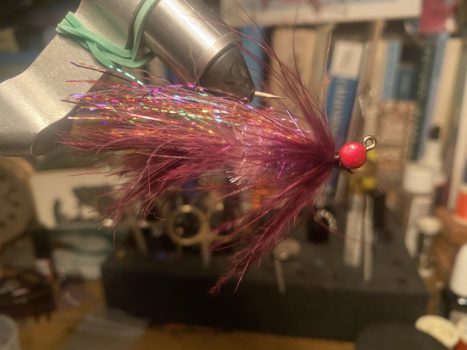
Instead of a specific fly to tie this month I’m sharing some tips that ought to help you tie more flies in the future.
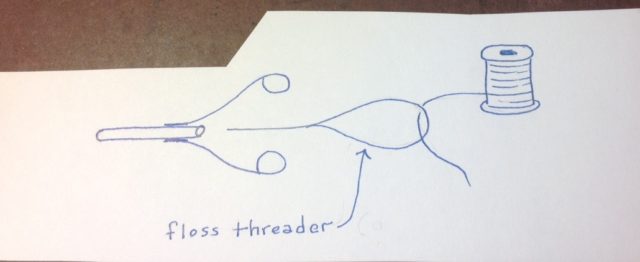 1. There are various methods to thread a bodkin. My favorite is using a ” floss threaded” which is a dental item that is sold in most pharmacies. I advise never using the wire tool that is designed for that purpose. It will score the inside and in turn cause thread to fray and break.
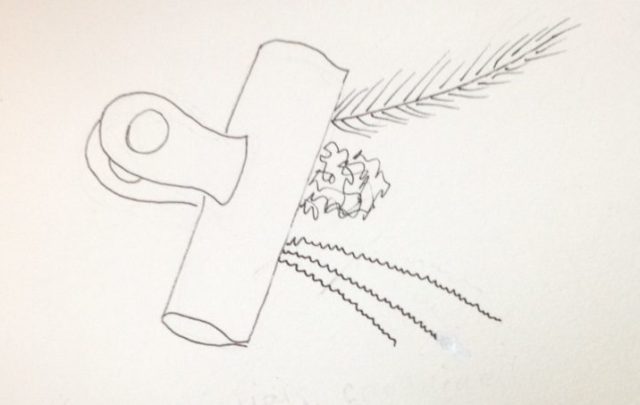 2. While trying to tie a particular fly, it helps to prevent materials from being lost in the clutter or blow away in the wind you using a clip or cloths pin. For your hooks, glue a magnet to the base of your vise.
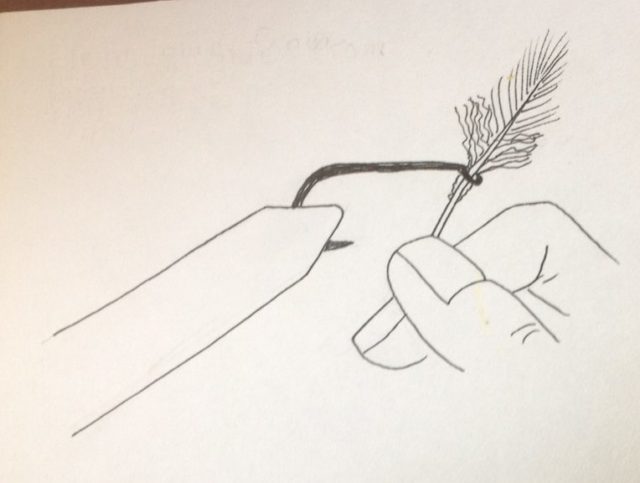 3. Bodkins usually get freshly applied glue out of the hook eye but a feather is really effective.
 4. Frustrated with the hole in your glue bottle being glued shut? Try this, after each use quickly wipe with a cloth, re-establish hole with a safety pin or bodkin, then cap right away. If that doesn’t work try a flame heated pin. Also cutting off the tip will often get below the hardened glue.
 5. Hardened glue on bodkin or safety pin can easily be scraped off with a razor blade.
Posted on September 21st, 2021

This pattern can be used for stripers, pike, salmon, steelhead or ocean fish depending on size. These directions are approite for stripers. Use a fast sinking line and rapid long strips. The overall length of this fly should be about 3 1/2 “. This fly will turn upside down when fished.
Hook: Mustad 34007 size 1 1.Crimp Barb.
Thread: White very strong, ie: flat waxed nylon or monocord 1.Attach behind eye. 2.Touching wraps to mid shank then forward to one and half eye lengths behind eye.
Eyes: Lg. bead chain, cut in sets of 2 1.Attach to top of shank with many figure eight and circular wraps. 2.Apply Zap-A-Gap or similar glue. 3.Thread wraps to mid shank.
Upper Body: Red Bucktail 1.Cut clump from hide about size of wooden matchstick. 2.Pull out long fibers from tips and line up with others. 3. Cut butt ends at an angle 3 1/8 ” from tips. 4.Attach to top of shank behind barbells wrapping back to mid shank. 5.Repeat with a second clump. 6.Apply glue.
Mid Body: Mega Baitfish Emulator-pearl 1.Cut about 1/8″ of binding. 2.Attach strands behind barbells to top of shank tips at rear of fly.
Lateral Line: Neck grizzly hackle 1.Select 2 feathers, barbs equal to hook gap. 2.Cut stem 3″ from tip. 3.Cut about 10 barbs short on each side of butt end of stem forming a “crew cut”. Tie one “crew cut” in on each side of shank behind barbells.
Lower Body: white Bucktail 1.Repeat like upper body but only use 1 clump.
Thorax: red chenille-lg. 1.Strip fuzz off exposing threads. 2.Tie in threads. 3.Advance thread to barbells. 4.Wrap chenille forward. 5.Tie off, cut excess.
Hackle: Very webby Grizzly hackle with very playable barbs. 1.Select feather, barbs equal to 1 1/2 hook gap. 2.Cut off fuzzy end and prepare “crew cut”. 3.With dark side up, tip to rear, tie in “crew cut between barbells on top of chenille. 4.Stroke barbs to rear while wrapping hackle 3 times behind barbells. 5.Tie off, cut excess. 6.Moisten fingers, hold barbs back, make a couple thread wraps to hold them toward rear.
Head: Tying Thread 1.Make a number figure 8 wraps around barbells. 2. Form a small tapered nose infront of eyes. 3. Whip finish, cut thread. 4.Apply glue to nose and thread between barbells.
Posted on April 22nd, 2021
Understanding how to fish this fly is important. The rear end of the fly needs to hang down in the water and the thorax and wing out of the water. Accomplish this by applying saliva to the body and tail, then floatent to wing and hackle. During a hatch fish tend to be more eager to take an emerger than a dun because they are not ready to fly off.
Hook: TMC 100, size 16-18
Thread: yellow 8/0 but 12/0 or 14/0 are preferred (Note: Rather than purchasing multiple colors of very fine thread, get one spool of white and use a Sharpie pens to make various colors.)
Tail and Body: Brown marabou (fluffy)
Thorax: Pale yellow dubbing
Wing: Deer hair with light color and narrow fibers
Hackle: Ginger neck or saddle
1. Crimp Barb.
2. Attach thread one eye length behind eye. Touching wraps to rear of shank.
3. Cut 3-5 marabou barbs from stem. With tips extending hook length length to rear, make 2 thread wraps forward, then fold marabou backward and make 2 thread wraps backward.
4. Make thread loop. Hold loop and stem end of marabou together, and wrap thread 2/3 forward on shank.
5. Twist loop and marabou into rope, then wrap up to hanging thread with touching wraps. Tie off,cut excess.
6. Dub a round thorax that covers shank from 1/4 to 1/2 back from eye.
7. Cut a small bundal of deer hair from close to hide. Clean out under fur. Stack tips. Lay on top of shank, tips out over eye so that they measure a shank length from thorax. Tie in place by making first wrap around only hair fibers then second wrap around both fibers and hook shank. Make several snug wraps on top of one another. Then one around base of wing to bundal it, then one more around shank. Cut butt ends so they just cover thorax. Apply very sm. amount glue to thread wraps.
8. Select hackle, barbs 1 1/2 hook gap. Cut off fuzzy end. Cut 5-6 barbs short on each side of the base of stem forming a “crew cut”. With feather tip to rear and dark side facing you, tie in crew cut between wing and cut deer hair butts. Make 3-5 hackle wraps around shank. Tie off cut excess.
9. Tie off with half hitches behind eye. Cut thread, apply small amount glue to half hitches.
Posted on April 9th, 2021